
Penny Countertop
Updated October 30, 2023
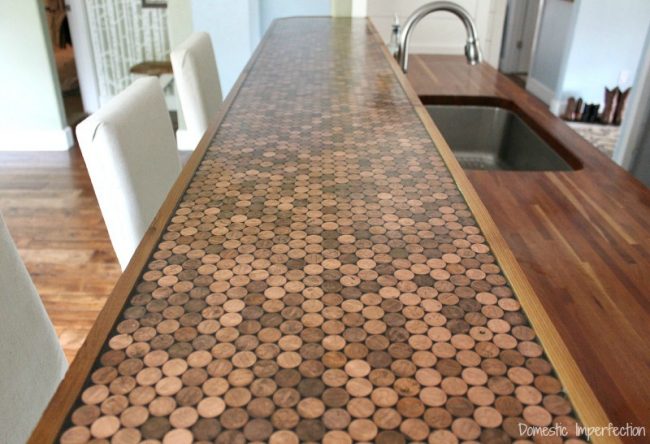
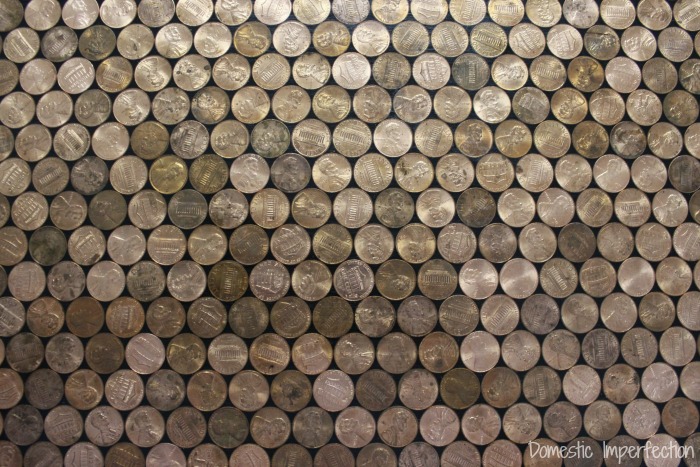
This epoxy and penny countertop is without a doubt my favorite project EVER. Not actually doing it (because that part was rough), but the end result. Just look how cool…
This is one of those projects that if I was to do it again it would be super easy. I now know exactly what NOT to do, which means I’ll fly through all the other penny countertops I have planned. Oh wait…no, this was the only one. *Sigh*
However, if any of y’all want to make a penny countertop, then you are going to LOVE me for saving you a headache. LOVE ME. So here we go…
How To Make An Epoxy Penny Countertop (but mostly what not to do)
Step One – Gather your supplies
Here is what we used for this project –
- Black Paint
- Paint brush
- Pennies. You will need roughly 260 pennies per square foot you plan to cover.
- Epoxy resin
- Blow dryer
- Toothpicks
- Roll of painters plastic
- Tape
- Gorilla glue
- End snips (for cutting pennies)
- Putty knife
We also used cedar 1x’s for the edging (you may not need edging) and polycrylic for the satin finish.
Step Two – Prep your surface
For this project, our surface was the laminate countertop on the right of the photo. You can do this on anything though…a table top, dresser, bar top, serving tray, etc. It’s all pretty much the same process.
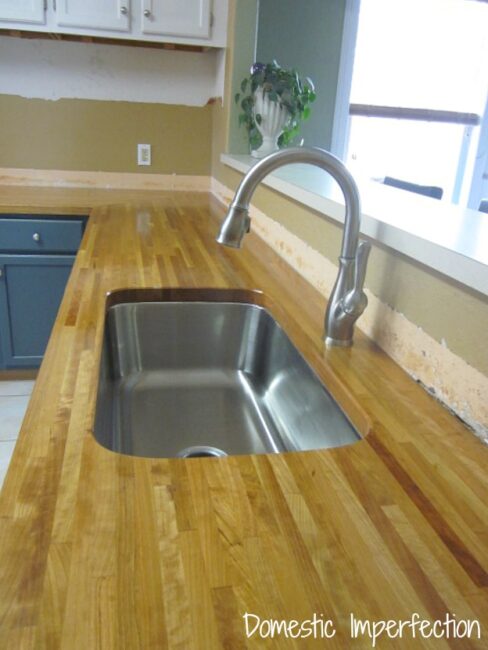
Our original plan was to remove the countertop, take it out to the garage, cover it in pennies and epoxy, and then reinstall it. This project has the potential to get very messy and smelly, and we wanted to avoid all of that in the kitchen. Plus we have toddlers running around, and if you have ever owned, borrowed, or spent any time with toddlers, you know it’s best not to combine them with hundreds of tiny copper choking hazards and pools of sticky clear goo.
However, removing the countertop was a fail. We de-laminated it to make it easy to get to the nails to remove it… except that there was NO WAY that sucker was coming off.

Change of plans #1 – Make the penny countertop in place.
Next we painted the countertop black, since you will be able to see bits of it between the pennies.

Painting a laminate countertop? I have a tutorial for that – HOW TO PAINT A LAMINATE COUNTERTOP
Step three – Prep your pennies
You are going to need more pennies than are rolling around in your center console, so head to your bank and ask for them in rolls. You will need roughly 260 pennies per square foot that you want to cover.
I got what I thought would be more than enough pennies, but what I didn’t think about is that half the pennies would be gross looking and not really usable. I liked the idea of some color variation in the countertop, but I also wanted all of the pennies to be at least semi-shiny. I figured there must be some way to easily shine the gross ones, so I did some research online and saw that people recommended Tarn-X for easy penny shining.
Anyway, Tarn-X didn’t work, it just turned my pennies and dull pinkish color….

So I made it my life mission to figure out the bet way to shine a penny….

So what’s the best way to shine a penny? Soak it in vinegar and salt (just a few good shakes of salt, not a ton), let sit for about a minute, then shine with a baking soda/water paste.

Then I set out to shine all my piles of pennies one by one.
Haha, just kidding. There was no way was I going to shine pennies one by one. What I actually did was go withdraw $50 worth of pennies from my bank (they come in HEAVY $25 boxes) and pick out the clean(ish) ones, and deposit the dirty ones back into the account. Way easier. I’m sure I’ll use all that penny shining knowledge at another time.
Lesson learned – Go to the bank, get 3-4X the amount of pennies you will need for your project, pick out the ones you want to use, and return the others to the bank.
Step four – arrange your pennies on you surface
Now that we had all the pennies ready to go, it was time to glue them to the countertop. We did so much gluing. It was tedious.

As a special treat, here I am and I’m NOT in my painting clothes….a real rarity around here. Also, I know there is a bottle of wood glue next to me, but don’t be fooled, it doesn’t work. We used Gorilla Glue.
Here is where this project took a frustrating turn. That’s right, the previous stuff was nothing compared to this.
I wanted the pennies to wrap around the countertop edge and look all modern and awesome. The plan was to let the epoxy run off the edges and coat the sides, dripping onto the plastic. This is why taking out the countertop and doing this project in the garage seemed like the best idea.
Anyway, to make the pennies wrap around the countertop we had to cut A LOT of pennies. It’s not easy to cut pennies. We used end snips to do this, you can see them sitting next to the bowl in the picture below. The whole process left me with sore hands, but the countertop was looking super cool and I was really excited.

For whatever reason, the pennies kept not lining up. (Not because we started in random places like the picture above makes it seem..that was taken after I started taking pennies off). We did the entire side, then we started on the top and some of the pennies wouldn’t fit. You can’t try and force them either, because the pressure would just cause pennies elsewhere on the countertop to pop off like popcorn. Super annoying.

We came to the conclusion that we couldn’t have the pennies wrap around the edge. It was a very sad moment. Not quite as sad, though, as the moment I realized that I had to pry all my carefully glued pennies off one by one.
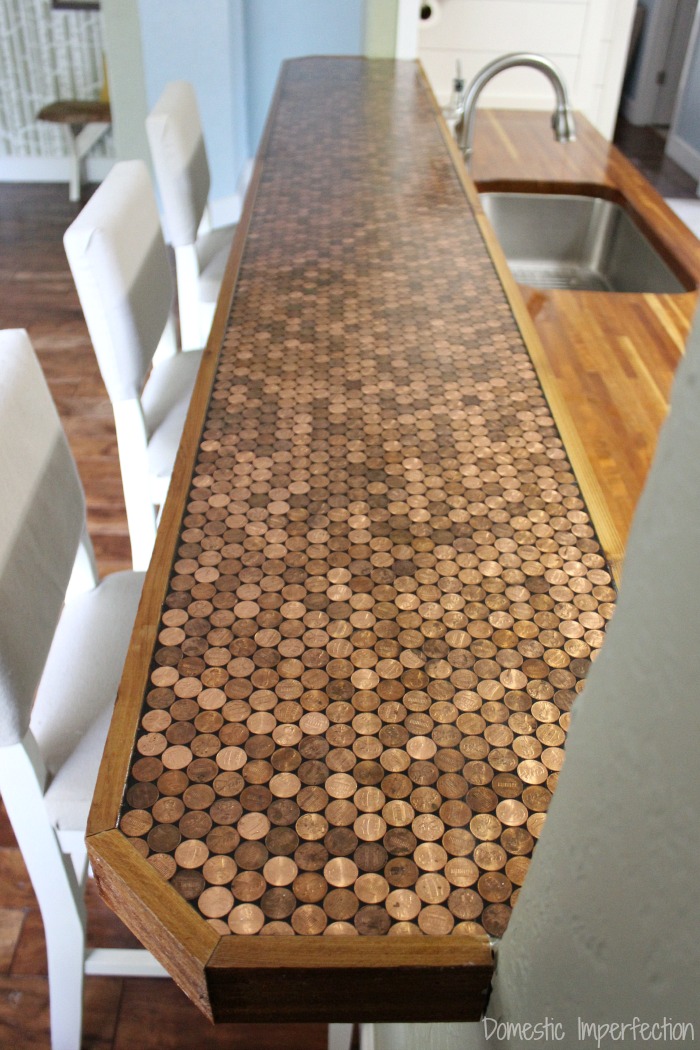
Change of plans #2 – put an edge on the countertop instead of having it be wrapped in pennies.
So after about a week of working on it, we were back to an empty black countertop.
My husband and I brainstormed about what kind of edge to use and decided on copper flashing (to keep it copper/modern on the sides.) Then I went online to buy some and saw that is costs about $1,000 a foot. Okay, so it’s not quite that much, but you get the gist…it was too rich for our blood. So we fell back on ‘ol reliable….cheap rustic cedar.

After adding the edge (with about a 1/8 inch lip) we filled it with pennies. We didn’t use glue or anything, it was super easy. WHY OH WHY did we not just do this in the beginning?

Step Five – Epoxy
After all the pennies were laid out, it was time to cover them in epoxy. I only have pictures of the prep work because the rest of it was really time sensitive and messy. Make sure you use plastic to cover the area in case it drips.

The epoxy (I used and recommend this one) was actually fairly easy. We just mixed according to instructions, poured, and spread with a putty knife. The epoxy was self leveling, so we didn’t have to be too exact. We did get a ton of bubbles, so we went over it with the blow dryer to bring them to the surface. Whichever ones we didn’t get with the blow dryer I popped with a toothpick. We let it sit overnight and in the morning it looked glossy and perfect!

The end, right?
Not quite. We noticed that the epoxy wasn’t quite deep enough and some of the pennies were still exposed a bit. That’s no bueno.
Since the epoxy was so easy to do, we decided it was worth another coat. Baaaaaad idea, the second coat was a disaster. It didn’t self level, so it was super wavy and looked terrible.
Lesson learned…when doing epoxy, make sure you do a THICK coat – thin ones don’t turn out well.
The box said you could get a satin finish by sanding and waxing so we decided to go for that and see if we could even things up. Here it is sanded, you can see where it was still uneven after sanding.

Waxing didn’t help, you could still see shiny parts and dull parts. At this point I was completely over working on this damn countertop, so I decided to just give it a coat of polycrylic and call it a day (month). It worked perfectly… well, perfectly enough for me!
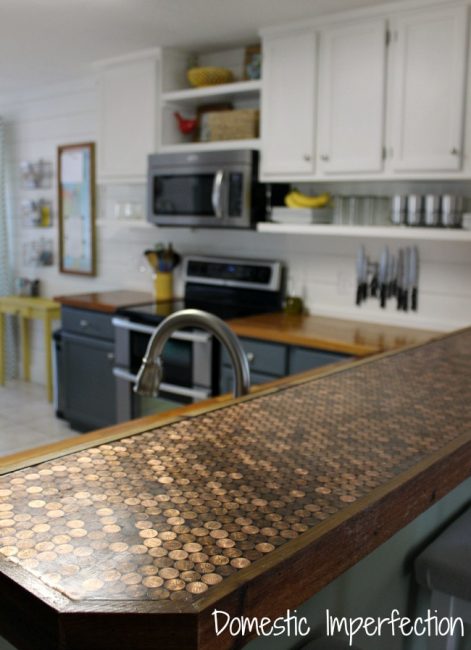

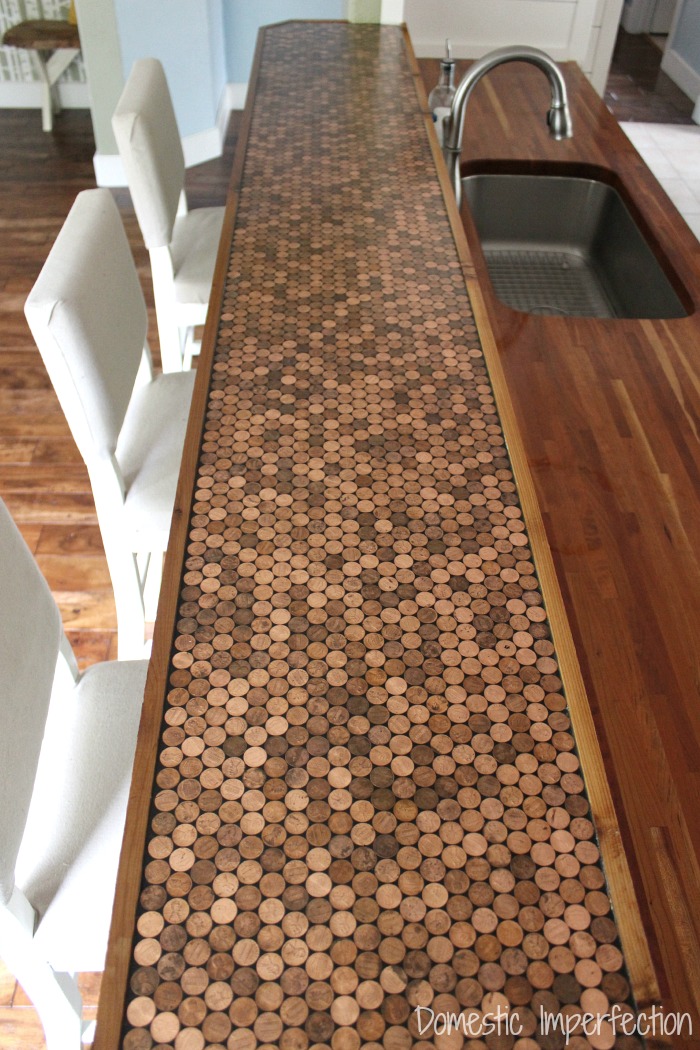
Whew, I’m glad this post is written and I can stop thinking about it. I do love the countertop though, it’s one of a kind. I like that the color is similar to our counters in a totally not similar sort of way. Also, it’s indestructible. Really, it can take a beating… you can leave water on it (it’s where my dishes dry) AND it’s easy to clean. Perfect.
I know that was a bit of a rough tutorial, and if you have any questions, please leave them in the comments below!
Kitchen Remodel Links
Shop the Look


That turned out great! It was a very informative post. I have seen a few penny projects and this was a great space for it. Very unique and a wonderful accent. Enjoy!!
WOW! I love it!!! Great job!
That is gorgeous!! And I LOVE the butcher block counter as well!
looks great!
Wow! This is AWESOME!!! I pretty sure I need a penny countertop. Thanks so much for sharing! :)
The penny counter top is great. How do you figure out how much epoxy to purchase to coat the entire counter?
wow…it looks incredible. what drama with that epoxy, huh?
incredible story to boot!
i’ll be featuring you this monday, and of course, sharing at pinterest. :)
thanks for posting this to creative juice. this is one to remember for the next house. i’m sure the hubby would love that idea for his future bar in the man cave.
I’ve seen stuff like this all over pinterest, but it’s good to know what kind of work actually goes into it! I love how it turned out, though!!!
I love it! It turned out amazing!!
We’re getting ready to redo our kitchen and have been talking about this idea for our island.
Now I want it even more!!
Oh this truly looks GREAT. What a lot of work, but the results will be enjoyed for years and it’s certain to be a conversation piece.
I wish my husband would be open to something so unusual. Maybe I’ll start off by doing the top of a side table that I recently dragged home. Thanks for providing so much information about your experience with the epoxy.
GREAT WAY TO FEEL RICH!! That is so lovely! Come link it up at our party http://www.finecraftguild.com/party/ It’s worth sharing it with others!
Excellent story — love that you included the trial and error bits — very helpful to the rest of us who may think you didn’t TRY something else that would work more easily.
Very cool & you had lots of help! That’s always great. (1st time here)
It looks great! Too bad it was such a headache, but you really do make it easy to replicate!
So cool! I love how it turned out! I am stopping by from the catch a glimpse link party and I am a new follower! I blog over at http://www.garagesalesrus.blogspot.com/ check us out when you get a chance!
Wow, that turned out amazing! You had a few disappointments along the way, but the end result is just gorgeous. And if you still want copper flashing down the road and it’s more affordable , or maybe you find some for a deal, it looks like that part of it might be possible to change out. (That would be stunning!)
I didn’t realize pennies could look so glamourous!
WOW! What an awesome project. It’s great to hear about all the real grunt work that goes into something like this. Thanks for sharing!
This project turned out just beautiful! Thanks for sharing all the steps. It really is helpful and fun to read. Megan
i hate it
I can only guess that you are so negative because it is nearly midnight on New Years Eve and you are surfing the web alone…for this I am sorry, even more so for the idea that bringing someone else down could make you feel better.
Wow!! fantastic. This looks amazing. I am visiting you via the party at Somewhat Simple. I look forward to seeing you at My Dream Canvas.
Very creative. Love this! Thanks for linking up!
Danielle @Blissful and Domestic
http://www.blissfulanddomestic.com
That looks amazing!!! Great job!! Thanks so much for sharing this with us at Thursday’s Temptation.
Jill
Wow, I’ve seen a floor like that. It looks great!
I am amazed and wowed by this spectacular project.. Pinned and shared it on my facebook page.. Thanks for linking up at friday fun party :)
WOW, that looks awesome! I would love for you to share this (and any other house projects) at my “May House Par-tay” at http://www.cheapcraftymama.com!
Wow that looks very cool!
This looks so gorgeous! Found you via The Grant Life link party :)
-Bonnie @ Revolutionaries
http://www.revolutionariesblog.com
Wow, reading this made me frustrated for you! It turned out really cool, though.
This is awesome!! I’ve never seen a penny countertop before- it looks so good!!
This is really amazing!
There is a link party going on in my blog today. I would LOVE for you to share this :)
http://myricandreasen.blogspot.com/2012/05/link-party-and-give-away.html
xoxo
Myric
This is soo cool. I hope my hubby likes it, because I think I’d love to try something like this. Lol, I love the indestructible part.:)
Wow! That’s a lot of work, but in the end it turned out great! I love it!
Looks great! Well done :)
Greetings from Australia
~Pernilla
I love this! I’m considering covering my painted counters with epoxy– what brand did you use, and where did you purchase it??
We used THIS epoxy and we bought it at Home Depot (though it’s slightly cheaper and tax free on Amazon). It works really well and is fairly easy, as long as you do thick enough coats.
Ashley, not sure if you’ve heard — we Texans are going to have to start paying sales tax on Amazon in, I think, July. (Boo.)
Whaaa? Please say it isn’t so! I buy pretty much everything off of Amazon…it’s so convenient and almost always the cheapesst, not including no taxes and free shipping. CURSES!
Don’t shoot the messenger: http://www.statesman.com/news/texas/amazon-texas-reach-deal-to-settle-sales-tax-2328279.html?cxtype=rss_ece_frontpage.
I knew the law states that if you have a brick and mortar store in Texas that residents must pay sales tax when buying online…Amazon does, but it’s not like you can go there and shop. They should settle and half tax or something. Anyway, thanks for letting me know…I guess I should buy all the stuff thats been sitting in my cart before July 1st. It’s too bad I can’t get credit for my purchases throgh my own Amazon affiliate links!
Ashley, Do you have to remove the old countertop in order to make the epoxy stick? Just wondering.
No, you don’t (at least I don’t think so). We took the laminate off ours because we were trying to get to the nails in order to remove the whole countertop and do the project outside. The countertop ended up not wanting to come off, and if had known if wouldn’t I would have just painted the laminate black and gone from there.
Love it! Need to find something I can cover with pennies…
WOW!! How awesome is that!!! Love it!
Don’t know if it would work in my kitchen, but I know I could do this somewhere..
Great job!
Stopping by via Addicts Anonymous.
Holy Abraham Lincoln! That was a lot of work. It looks great, and it must be fun to have a one-of-a-king counter.
(I came over from Serenity Now. Thanks for posting the link!)
LOL, holy Abraham Lincoln…
Love this! I think it came out great!
Looks great!! One of the best I’ve ever seen. Thanks for sharing :)
So awesome. Just wondering, though — what was the epoxy plan if you had been able to get the pennies to work on the sides? Seems like gravity wouldn’t have been your friend….
Well, in my head we were going guide the epoxy over the edges with the putty knife and let it cover the sides, letting it drip onto a plastic sheet and then cleaning up the bottom drips. It’s pretty thick stuff, so I wasn’t worried about it running off the top. I figured the edges wouldn’t be smooth (kinda ripply), but I was okay with it…mostly cause it’s was the best plan I could come up with.
FYI you can use a paint brush to do the sides and yes the apoxy will drip off but you can brush on multiple coats. I have apoxy on my countertops however mine do not seem to be indestructible, maybe I need to put come polycrylic over it??
This is an incredible project and an even more incredible tutorial. You are going to save people countless hours of aggravation, me being one of them. I’m not ambitious enough to cover a counter with pennies, but I love how this looks. I’m going to try my hand at a penny tray. I just must have something of my own that looks this cool. Thanks for sharing. Your counter is inspiring and beautiful.
Glad to help! A penny tray is a great idea…it will be beautiful and should be pretty easy.
I. LOVE. IT!!! Looks really great and I appreciate your tips on what NOT to do. LOL I’m jealous of the awesome job you did.
This too cool! Sorry you had such a hard time with it, but I hope it was worth it in the end. Now following though Facebook!
Your counter top looks amazing!
I saw this idea on pinterest for flooring, but thought that would be ridiculous… I wanted to do it on a coffee table or something. But this is a really cool idea ! I think it’d be neat in the bathroom on the vanity. Anyway, thanks for sharing this ! It turned out beautifully !!! I’m anxious to do my own penny project now :)
Wow! This looks great! What a cool idea!
Pennies from heaven!! This is heavenly! Of course, free food would have enticed me to help you sort thru all those pennies too. Looks amazing.
Kelly
You beat me to the punch…I was about to come over here and ask you to link this awesome post up to my party and it looks like you just did!! What a fabulous project!! I’m sad that you had to pull so many up and start over, but it was worth it. Looks gorgeous!! Thanks so much for stopping by!
{HUGS},
kristi
Wow, what a show stopper! I was cruising through the Saturday Nite Special pics at Funky Junk and your counter grabbed my attention. It’s is so cool. What a fun project.
That is so cool!! I just love seeing unique projects like this and it turned out just so fabulous. :-) Thanks so much for sharing it with us at Inspiration Friday!
Vanessa
Oh! That’s a nice idea as a unique table style and at the same time it can be a family bonding when doing or creating this penny countertop.
Oh…my….GOODNESS! I am so ‘borrowing’ this idea for a project! LOVE LOVE LOVE LOVE!
Wow, even if this project was so much trouble it still turned out great! I’ve been thinking about doing something similar (with bottle caps) for my husband so I’m really glad I saw this. Hopefully if I’m ever brave enough to attempt it I’ll know what to do.
What a cool project this was, I really like how it turned out. Stopping by from the Feature Friday Link Party at Blissful and Domestic.
I love how this turned out! I saw this once on HGTV but they used beer bottle caps {the husband was a collector} on their bartop! It looks great!
WOW, WOW, WOW!! Never seen anything as amazing as this! What an incredible job you did and it looks awesome. Have a great week.
FABBY
Oh, I can feel your pain! This was alot of work but the end result is really cool and unique. Thanks for sharing the experience and I don’t think I will be doing this any time in the near future even though it came out great! I’m way too lazy!
Robin
Robin Flies South
Absolutely LOVE it! Thanks for the “don’t do” tips!!
Yes, a lot of work, but wow what a great project. So love it, absolutely beautiful. Simply cool. And they a penny doesn’t go very far anymore. This sure proves that wrong! Totally cool! Thanks for sharing your creative inspiration at Sunday’s Best.
I really, really love it! Sounds like a lot of work though, and thanks for all the tips. I think I might try this on a tray. Thanks for linking up!
Holy cow, this is AMAZING!!! What a fun idea and I love how you made them heads and tails
This is the neatest countertop!! Totally love it! We hope to see you back next week to our “Strut Your Stuff Saturday.” Thanks for coming!! -The Sisters
Oh my gosh! That is wonderful. Unique. Thank you for sharing all the info on how you did it and what you learned.
I’m here from Cowgirl Up!
Maybe a nickel backsplash! Wonderful job.
Hi there! I just wanted to let you know I featured you today over at Blissful and Domestic. Stop by and grab a button:>
Danielle @ Blissful and Domestic
http://www.blissfulanddomestic.com
Awesome! I’ve seen a floor done with all the pennies heads up and in the same direction…..your counter is really unique, love it!
Brilliant post! Wonderful blog! I just found you via Pinterest. Having just remodeled our cottage I don’t have anywhere to add a penny countertop at the moment but I’m thinking it would be great on an outside patio table or a built in bar b’ qeue too. Thanks for the tutorial and I signed myself up to follow your blog and your Pineterest. Failte
Love this idea, so cool! Good thing you had lots of help. Thank you for linkin up.
OX
Kristin
Nice work. I did a bar counter top for a client a few years ago. He was well traveled…and especially loved Ireland. As an Irishman myself now living in Chicago, I was able to get my hands on a bunch of older and newer Irish coins…..and did his bar top with them plus a two part bar epoxy. Worked out well. Again……nice work.!
It turned out beautifully! What a labor of love, though. I give you so much credit for not just giving up. :)
Stopping by from Time-Out Tuesday. :)
What an interesting idea, it looks like it came out great!
Looks great! Might be something I would consider for my kitchen counter-tops. How well does it do with accidental knife marks? I’d hate to put in all that work only to have my sons carve the epoxy up every time they make a sandwich. LOL!
I think all of your hard work really paid off, it looks amazing!!! I felt for you as I read the post, I’m glad that it all worked out in the end. :)
Wow. What a unique countertop!! I love it. Thanks for sharing at oopsey daisy!
Wow! I’ve seen this on Pinterest, but you were brave enough to attempt it! Turned out awesome! I’d love for you to add it on my link party at: http://printabelle.com/?p=3188 Thanks!
I’m very impressed. It looks great and I bet it’s quite a conversation piece. Thanks for sharing at DIYbyDesign’s Swing into Spring party.
Thanks for linking to TAke-A-Look Tuesday – you were featured today!!
–Mandy, http://www.SugarBeeCrafts.com
This is incredible, I love it! Great job! And even if it took forever, it was worth it, because it looks great!
This is so great!! I love how unique it looks and I really appreciate you showing all the steps you tried!
Love this project!! And so worth all that work! Found you at a linky party, and on Hometalk…. AND we are neighbors! I’m in Boerne!!
Oh WOW! That looks BEAUTIFUL! You’re home is also very very beautiful!
this is AMAZING! I would love for you to share at on my link party!
http://www.thesasselife.com/2012/05/crafty-sasse-wednesday-link-party-36.html
Hope to see you there :)
That was a lot of work…but it is so worth it.Just gorgeous and so unique!
Very original and clever. Great job and it is a really cool and unique countertop. Thanks for sharing at Cowgirl Up and I hope you come back next week.
This is the coolest countertop ever! Very creative!
I found you at the Link Party over at Thrifty Decor Chick. Thanks for sharing!
Ashley! It’s gorgeous! WOW! I love it! I’m going to share a link back in this week’s highlights. :) Thanks so much for sharing your hard work, tips and creativity!
Your countertop is amazing! I am so saving this idea because we are in the planning stages of a remodel. Thank you!
I love this project so much I decided to try it myself! I don’t have a bar, but I do have a wooden serving tray that I have been wanting to modify. I decided to “age” some penny’s with tuquoise paint (to add an accent color) and a sponge and intersperse them with the other penny and I think it looks great! Thank you for the inspiration!!
That sounds awesome! I would have never thought of aging them…you should post a picture on my facebook page so everyone can see!
Wow, I had to scroll for days to finally submit my comment. :D So you just knew I had to feature you on this week’s Motivated Monday at BeColorful. Thanks so much for sharing.
pam
This is late for your project, but if you want a shiny copper edge, you might try gluing copper flashing or foil on the wooden edging you installed. They are both affordable and easy to glue. Foil is more likely to wrinkle or get deformed. Flashing takes a little more work to bend and shape. But either would be affordable. A rubber mallet would help shape the flashing. The foil is more like using kitchen foil.
http://www.enasco.com/product/0401500%28A%29
http://www.lowes.com/pd_59448-205-850678_0__?productId=1093759
Ashley,
was the one epoxy kit enough for the whole length of the counter top or did you have to buy more than one kit?
We used a kit and a half.
I was wondering how you figured out how much in pennies you needed and would it be safe to do this on a kitchen counter top that you prepare food on?
One penny is one inch, so it takes 144 pennies to do one square foot…and I have no idea about food safeness, sorry!
That is FANTASTIC! I love your idea… Ketchup cleans pennies and copper just like new!
Have a fun week,
Donna
Very cool! My husband hoards pennies. He would lose it if he came home to all his pennies epoxied into a counter or something. LOL Seriously, great job!
Thanks a lot…..now where can I put a penny counter in my house?
Love this! So unique! Question for you…my friend is wanting to do a penny backsplash and would like to seal it. I know you didn’t end up doing edges, but if you had…were you planning on sealing them and how would you have done it?
I was just planning on letting the epoxy run over the edges and then smoothing it all out. I have no idea how you would seal it an a totally vertical surface. Maybe cut out some thin plywood in the exact shape of the backsplash, cover with pennies and epoxy, and then install with some liquid nails? that’s the best I’ve got.
Hey Ashley,
I’ve never responded to these kinds of blog posts before but I would like to just take a second and say thank you very much! My wife and I were looking at doing the pennytop idea in my parents house and this gives us so many new ideas (and saves us from the headache you went through!).
Thanks again!
-Christopher
Thanks for taking the time to comment! I read a lot of blogs but rarely comment as well…I’m more of the silent blog stalker kind, lol. I love that your parents are cool enough to let y’all do a penny countertop in their house. Good luck and have fun! If you want to send me pics of the final product I would love to feature it on my facebook page!
LOVE the penny idea! It turned out good. Am enjoying looking at all your projects. Must say I was inspired by your {Awesome} Paisley Stenciled Table that I saw on Pinterest.com. I used your idea to make an Awesome Stenciled desk of my own. Love to see creative things……keep it up :)
I’ve read a couple of your DIY projects/learning experiences. It’s really nice to hear that I’m not the only one who runs into problems that require creative (and durable) solutions. I love the idea of the epoxy countertop. I’ve always wanted to do this. On those rare occations when I stop by Joe’s Crabshack, it always reminds me how much I want to still do that kind of project. I’m wondering if using 100% epoxy would be better or 100% poly…? I would definitely get extra epoxy if I was worried about running out. Thank you for putting up your experiences (good and bad).
Do you mean 100% poly as in polyurethane? Would your just pour it over your pennies like we did epoxy? I’m not asking because I have an answer, it just never crossed my mind to use poly. It just might work, though I’m not sure it would make for a better finish than the epoxy…it would be cheaper though.
Well, we used polyurethane for a DIY resurfacing job on old laminate countertop. We didn’t need for it to be that deep, but I’m wondering if it would have turned out better if we did lay it on really thick. The polyurethane would probably take longer to set because it’s so much thinner. I probably put on 1/16″ of it over the laminate and that was from 4-6 coats. It took two weeks to cure too… It’s really clear though. In hindsight, maybe the epoxy would have been better. Again, thank you for the details and information. It’s helpful to know of other options for custom countertops.
Have you calculated how much this costs per sq ft? Other projects like this mention $7.50/sq ft. but just the pennies are about $1.25, the rest would be the epoxy. I am planning a counter top and you tutorial is perfect. Thanks for sharing.
I think $7.50 a square foot sounds really high. I never calculated the cost per sq ft for ours though. Let’s see, it’s about 12 sq ft, we used about $40 worth of epoxy and wood, so that’s a little over $3.30 a foot, plus $1.25 for pennies is about $4.50 a square foot. Whew, math at midnight…not my strong point :)
Wow, its a good think you had some cheap labor for shining all those pennies! :) looks great!
Thanks so much for linking up. Make sure to grab a button or link back! Good luck and feel free to follow us on facebook for all the contest updates!
You have such great ideas!! You have inspired me to do my own hardwood floors and my own version of a penny counter. Thanks for all you post!! :)
I saw what you did there. You got lazy! you needed to start it all at once but you started the top then the side then started on another part. When you lay down tile you get the same problems. I also know why you got lazy and didn’t fix it. Resin is self leveling and you would have had to pour the side in a mold which isn’t possible with what you were doing. Don’t go blaming this on “oh my it just wouldn’t line up if we pushed it, it buckled. bullshit you didn’t think this thru and what you did took no expertise or skill. To have done this properly you would have had to take the counter off apply the pennies and flip the counter upside down. once upside down it would have to be suspended above a mold and the resin poured in just like making a fiberglass part. The mold would have had to been covered in a releasing agent for the resin to turn out both smooth and clear. You are a lazy piece of shit and your project is bullshit as well. This has no place being documented! You are self indulgent pigs that are the bane of society.
Obviously we didn’t do this project as professionally as you would have. I see why you think we got lazy as well, the photo with the pennies on the side and that gap in the middle makes it look like we just started gluing pennies on in random places. What actually happened was that I started popping the pennies off after completing the side, then realized that I forgot to take a picture. Perhaps I should have clarified. Calling me “the bane of society” is obviously pretty extreme for a silly penny countertop project though, so that can’t be the root of your anger and I don’t take it personally.
Honestly! What kind of a commenter are you? A rude one, that’s for sure! I can’t believe some people – to go on someone’s personal, well-respected blog and be insulting and call names like that.
Ashley, I’m glad you have thick skin because this person is WAAAAY out of line! I am just outraged. Grrr!
Oh, please don’t pay attention to that rude commenter! I think your project turned out wonderfully and I appreciate your honesty with the hang-ups that you had! You are just showing all of your readers to not be intimidated by projects like this! Mr. Rude doesn’t have to live in your house or use your countertop so just ignore him! :) You are awesome! Please keep doing what you do!
You are so classy and composed in your response to that bottom feeder! I love your penny project and also check several times a week to see your new posts! Keep up the awesome work!!
what a jerk I loved it ….don’t like it don’t go on any blogs …stop being a jerk…Ashley i love your blog and check it 2 or 3 times a week to see what you have done ..Keep up the good work….
OMG! You know I have seen several things on your site that have inspired me. There are also several that I looked at and could appreciate but didn’t really mean all that much to me and couldn’t use. I can’t imagine when you put yourself out there for us to enjoy your projects and share a lil bit of yourself with us to receive comments like the one listed above. I’m really sorry. Please don’t let him bother you that much and keep up the good work and to the guy who wrote the comment , shame on you, you obviously need a time out so go stand in a corner.
Lol! You tell’em, Kat.
Lol, thanks for the support Kat!
lol i see what YOU are doing here, Tim, trying to troll to get some fantastic bully reputation. You should troll somewhere else, where your overblown anger would make more sense, like a political or religious blog. Your comment just makes you look like an idiot, getting all out of sorts over a craft project. lol. I mean, no offense, Ashley, but your project isn’t exactly making any huge mark on society. It’s simply a fun project, which I think took some creativity and I can see that many people took inspiration from it as well! Good job! Tim, if you have any other interests, or passions, that have any relevance to your quality of life, try trolling over to that blog. Good luck.
Tim,
Here’s an idea: if you don’t like a project or a blog, then feel free to stop reading it with one simple click of the mouse. Maybe you would further benefit by spending time on researching the meaning of the phrase, “pick your battles,” at which point you might figure out that you need professional help with that little anger issue ya got goin on there, Pal.
thanks for documenting your cool project. I presume your pennies are copper like ours used to be, i which case, I reccomend lemon juice for shining. its awesome.
http://www.epbot.com/2010/09/money-money-money.html
It looks awesome but the issues you encountered are all offered options at Epbot. They did a rounded edge table and it’s amazing
I saw and loved their rounded edge table, its the look I was trying to get with mine. Square edges kills it though, lol.
It came out wonderfully!
Hi we did an epoxy counter in our wetbar in the basement. We put hockey cards (hopefully not valuable ones …LOL) on the counter and covered with epoxy. We had a problem as well with the epoxy in that it is opaque in some areas but I just think it looks like hockey rink ice. If I do anything again with the epoxy, the blowdryer idea is useful.
Susan
Home DIY always fascinates me, lovely!
This looks awesome! I will definitely be trying this with a counter top in the future. For now, it wouldn’t go with the kitchen decor, but I like the idea that someone posted about just painting and then covering with epoxy. When you painted yours black for the first layer, did you sand the laminate or prime it? I was wondering how it held up when it dried.
We ripped the laminate off entirely and painted the wood/mdf stuff that is underneath it.
Your counter looks great – I liked your tutorial too, looks like you all had fun! I’ve got this linked to my pennies post as well today, nice job!
The bank can order you all new pennies so no polishing needed. And they will be dated with the year your countertop was made : ) As for the sides, perfaps routing out the cedar, doing mini penny counters inside, then mounting to the countertop? Thoughts for future “penny counters” : )
im thinking of doing that on a desktop thanks for the posting and tips on how to do it awesome job
Tomato juice works great for removing tarnish from pennies…
The man’s intelligence really shows through with the language he used! I am at a loss for words…guess maybe because I don’t use the type of words he uses! Jeepers!
I LOVE this countertop and you have inspired me to NOT give up on this desk that I have been working on forever! I thought the top was just heavily varnished and was going to sand down to bare wood so I could stain a nice dark stain…………..well what ever finish was on there would not come off with sanding or with stain/paint stripper so that idea bit the dust. Next idea was to paint it however since using the stain/paint stripper on it previously it was causing the paint to look funky and uneven toned. Soooo third try a charm right? WRONG! I then tried to decoupage fabric on the top, however, the mod podge for so reason was adhering funky and was causing the appearance of dark stains and streaks on portions. So it is currently sitting in my garage until I am not frustrated with it again to try something else (planning on decoupaging scrapbook paper to it) crossing my fingers!! So thank you again for showing that persistance does pay off and that my desk will turn out great (eventually).
Oh my gosh, that desk sounds like a pain in the neck! I hate when something you think is going to be fun and easy turns into a nightmare project. It feels extra good when you finish them though :)
Isn’t it lovely that there are so many kind, wonderful people in the world, and comparatively few nasty, rude, plain ole mean-spirited human beings? I guess all one can do is forgive the nastiness, and assume he just is a miserable person who has absolutely no class, no respect for himself or anyone else. Sad, really. I feel sorry for him. Even more sorry for anyone who is so unfortunate to have to live with him.
AND, I love your project!! I would attempt it myself, but I gotta tell you, that was a lot of work, and I am tooo lazy, lol.
I Love your countertop and I think it came out beautifully! As for “Tim”…well, I believe the lazy banes of society are the people who don’t even attempt DIY on their homes and leave them looking like crap inside and out and the ones that don’t follow…”If you have nothing nice to say then don’t say nothing at all” are truly a horrible bane on society…Keep on keeping on girl…We love your posts :) Also, my husband and I DIY all our projects because that is what we can afford…perfect? No…Better? Yes MUCH!
I LOVE this! we are planning on making a coffee table for our living room using this! Thank you for all the great advice. It looks great!!
I just did my living room hallway. It was a lot easier because of you steps showing accomplishments and failures. You are the Bomb (dot) com! Thanks
I *love* this countertop, and LOVE that you posted it including your errors. I want to pennify something in my house and think a countertop or bar is fantastic.
Has your epoxy top held up well to scrapes/scratches?
It looks gorgeous, though it would be frustrating to have so many versions of the plan fall through/mess-up. thanks for doing it, though, because learning from your mistakes = only making some (creative, new!) mistakes when I try it myself :P
Now I now why the banks say there is a shortage of pennies! Good job…. I work with epoxy on concrete so I can relate to some of the problems you had. You saved it though! I’m working on a painted table with an epoxy and urethane coating. Here is a good article on the differences in epoxy coatings that might help other people.
Love it!
Persistence is key! Thanks for doing all the grunt work for the rest of us. It turned out really cool.
I never respond to blogs…but I can’t pass this one up. What a wonderful creative project – and thank you so much for taking the time to explain it all step by step. Gives me hope for doing something creative with my dining table. I love it!!!
Thanks for taking the time to leave a comment Sandy! I’m a blogger and hardly ever comment when I read blogs as well…that’s like being a waitress and still being a bad tipper. Eek! I’m glad you liked my project and it would look great on a table. You could put anything under the epoxy as well, you don’t have to do pennies..I am partial to the pennies though :)
Comment about the Gorilla Glue that you used… I have been using your post as a step-by-step guide to a penny project that I am doing in my own home, and suggest *not* using Gorilla glue. Though it’s great for many things, bear in mind that it expands/ poofs up as it dries; That may explain why your pennies weren’t lining up when you laid them down… they shifted as the glue dried. Just a thought.
Btw, people have said great things about this glue for penny projects: http://www.rockler.com/product.cfm?page=1418
I actually didn’t use the poofy gorilla glue… though not because I have any foresight and thought about that little problem. We used a gorilla glue “super glue”, it comes in a tiny little bottle and costs twice as much, lol. We tried the regular poofy stuff (you can see it in a pic I believe), but it didn’t stick immediately and the super glue did, so that’s what we went with. Thank for taking the time to send that tip though, I’ll update the post as not to lead anyone astray. What kind of penny project are you doing in your house?
A penny mural! It is of stalks of wheat…let’s see how it turns out! :)
Holy cow that sounds amazing! So are you using the different colors of pennies to make the shapes? And when you say mural…how big is it? You HAVE to send me a picture when you are finished. Seriously.
I love these! I am going to post a link on facebook! Its a have to share!
Toilet bowl cleaner super cleans and shines coins all in one easy step. No brushing with soda paste, then buffing.
sick as hell
Just wondering, if the wrapped pennies had worked how would you have epoxyed the sides of the counter without gravity making it drip off?
Sorry for the late response, I’m am just now seeing your comment. I had planned on just letting the epoxy drip off and use a squeegee to direct it (and put plenty of plastic on the floor). They did that in this blog post – http://www.epbot.com/2010/09/money-money-money.html – and it seemed to work alright.
Hi Ashley,
I just did a painted penny tile back splash in our kitchen and after seeing your countertop I’m wondering if I could have glued and painted pennies instead. It looks very cool, and I love the kitchen as well. :) (www.makingitworthy.com)
I love your blog, I am planning on covering my Kitchen floor in pennies with alot of help from my son. I hope the epoxy works, I can’t find any other product that would give the thickness I need to cover the pennies. I love your bar
Wow! Love it! We have a ton and I mean ton of 1940’s steel pennies and late 1800’s indian head pennies. I think we will make a couple accent tables now that I see your project. The indian heads are only worth up to a dollar each and the steel pennies arent worth more than a few cents. Unless a person finds a 1943 copper penny, then don’t waste time taking it to your local coin dealer! Rare and worth alot!
Love it, what a job! I had to laugh when you said you poured it and left it overnight to set up. In my house the next morning it would surely have added cat prints in the surface!
Wonderful ideas, my wife and I live in an old farm house over 100 years old that we r trying to fix up as cheaply as possibly considering I am unable to find work where we live. so anything like this I cherish, please feel free to contact anytime you like always lookin to share new ideas. I am an artist I love to reuse things like this as well, check out my art and tell me what you think.
Kristufek, an environmental artist.
Girl this is the coolest project ever! I luv your blog, its so unique and creative… keep it up I am inspired!
QUESTION: Delightful post, beautiful floor. I also love your paper bag floor! I wonder about the quantity of epoxy. Your first was too shallow – about how much did you use? I am trying to figure out the quantity of epoxy I will need for my project – two areas, each about 4×4 feet. My surface will be different (just bare wood, I think) but I want the durability you produced. One will be a dog grooming areas for my wife’s pups, and the other an outside rain-exposed tabletop. How many square feet at what thickness do you estimate you get per quart or gallon? Thanks in advance for your help.
I’m not really a math girl, so I’ll just give you what I know and you can go from there. The epoxy we used (http://www.amazon.com/gp/product/B007177NZU/ref=as_li_qf_sp_asin_il_tl?ie=UTF8&camp=1789&creative=9325&creativeASIN=B007177NZU&linkCode=as2&tag=domestiimperf-20) is one quart and the box says it will cover 6.4 square feet of surface. Our countertop is 8.5 square, we used about 3/4 of the container, and the total depth is about 1/8 an inch. Hope that helps!
Thanks for responding to my inquiry. I enjoy your site.
Brilliant! I should do something like this now that the Canadian penny has been discontinued. Can’t wait to see what else you come up with.
Besos, Sarah
Blogger at Journeys of The Zoo
Finding Humour in Everyday Life
I love how it looks. :) The project was not only great because of the outcome, but how the siblings worked together to help you make it happen. :)
I was wondering what type of epoxy you used. I have done a tabletop for a boat with pictures of visitors embedded in epoxy–like you said, blew out the bubbles with a hair dryer, and it worked great. I was able to set hot items on the table, direct from the oven. Can you do that with this? Do you think it’s practical to use all over the kitchen, or only where it’s more decorative than functional?
We used this epoxy… http://www.amazon.com/gp/product/B007177NZU/ref=as_li_qf_sp_asin_il_tl?ie=UTF8&camp=1789&creative=9325&creativeASIN=B007177NZU&linkCode=as2&tag=domestiimperf-20
I’ve never set hot items on it so I can’t really answer that. I’m not sure about the whole kitchen thing either, Adam says it’s what they use in bars and restaurants and it should be fine. I’d tend to agree, though I would still use hot pads and cutting boards for sure.
Not to be a dick, but i’m pretty sure cutting pennies is not just difficult but illegal. I think that falls into the whole “defacing federal currency” thing.
You’re not being a dick, and you’re certainly not the first person to ask me this. Here is a snippet from the social security website (http://www.secretservice.gov/money_law.shtml)
“Anyone who manufactures a counterfeit U.S. coin in any denomination above five cents is subject to the same penalties as all other counterfeiters. Anyone who alters a genuine coin to increase its numismatic value is in violation of Title 18, Section 331 of the United States Code, which is punishable by a fine or imprisonment for up to five years, or both.”
From what I can tell, it’s not illegal to alter a coin if you are not trying to pass it off as being worth more than it is. It also specifies that the coin needs to be above five cents in value to be subject to penalties even if I was trying to pass pennies off as more then they are worth. So, as far as I can tell, using pennies for decor projects is perfectly acceptable. Perhaps not smiled upon, but not illegal.
Ashley…you are truly an inspiration! You and TDC blogs have given me the confidence to try my hand at repurposing furniture, DIY, upcycle…etc…however, I do not have a supportive hubby. He thinks its all crap and doesn’t want it in his house. How do I try to convince him that this is cheap, fun and crafty??
Oh no, an unsupportive husband is really a DIY buzz kill! If I was in your position this is what I would do…find 5, 10, 15 (however many he’s up for) DIY projects that you would be interested in doing and go through them with him. Ask what he likes and doesn’t like about each one. Then pick something to do that is EXACTLY what he said he likes (even if you hate it) and create it (furniture is probably safe). Make sure not complain about it at all, even if it is a huge disaster. Hopefully he won’t hate it and will appreciate the money you saved. Then go from there, creating things that suit his taste until he decides DIY isn’t so bad. Then go hog wild :)
Where do you live, Ashley? Would love to be your neighbor – you are my kinda gal! lol.
Im in Texas!
The greatest idea I could help you with ( your job is amazing)
that pennies come clean and shiny with SWISH toilet bowl
cleaner. The product is safe for your hands believe it or not!
Great job in the kitchen!
I’ve been dreaming of doing this to a room since I was twelve. But I am going to do it to the floor. I am now 26. Some day.
Ben
I love it, and want to do this with an old L-shaped desk that I have. I would leave the top as it. Think it is clever and looks wonderful.
Not sure if this question was already asked, there were SOOOOOO many comments…lol My question is: When you poured the thick epoxy on the pennies, did any of them try to move? Or are they heavy enough that they stay still while you’re pouring and spreading it out? Thanks very much & I love how it turned out! :o)
Nope, I don’t think this has been asked before! The pennies didn’t move and we didn’t glue them down (not after the initial glue fiasco at least). We did have the lip on the edge holding them all in and they were packed in there pretty tightly though.
WOW! This is awesome!! I realize y’all ran into a few snags along the way but, y’all really did a great job!! My husband & I are in the middle of remodeling our house (first time home owners & DIY’ers). Although he has the ability & the tools, it’s still such a learning process all together and can be super frustrating! Again, y’all did such a great job!! I found your blog through IHeart Organizing! So glad, new follower!
Gorgeous! Love this look, I’d really like to do something like this somewhere… someday! Thanks for all the tips!
wow… each penny worths a lot..
thanks for this great idea..
*GASP*
Why oh why didn’t I find this post before Canada eliminated pennies??? This would be PERFECT for my bathroom countertop. I want raised glass sinks, & this would look stunning beneath them!
Perhaps I could do the same with some pretty river pebbles, but it won’t have the sheen & spark of the copper.
Beautiful.
This would be beautiful on a bathroom counter! It is indestructible too, I haven’t had a single issue with mine. Could you get your hands on some (okay, a lot) of american pennies? You could put ANYTHING under the epoxy though and it would work!
I’m sure many people have a ton of pennies left over. If you advertised on Craigslist or Kijiji, you could probably find people who would love to get them off their hands.
The best method I’ve found for cleaning anything copper, including pennies, is to cover with plain old tomato ketchup and let set for anywhere from 10 minutes to 1 hour, depending on how shiny and clean you want them. Lay them on the palm of your hand and gently scrub with a Scotch Brite scrubby, toss into a stainer or colander, rinse and buff dry with a clean cloth…..depending on the copper content of the penny (newer ones are more alloy than copper), they can come out of the bath looking almost new!
There’s a similar tutorial on the epobot blog (the same woman that does Cakewrecks) that I think is a little more detailed. Might give answers to a lot of some of the people asking.
This is awesome, I’ve seen penny toilet seat covers but never a penny breakfast bar. Now you’re giving me lots of ideas and I want to now go home, rip out my countertops and line them with fancy colorful post cards and epoxy.
Wow, what a great job you did! I’ve always wanted to make something with pennies and this is just beautiful. I’ve posted about this & like the idea of making a penny wall for a small nook. I’d use a piece of plywood and put the pennies on while it’s on a table. After it’s all done I could set it up as a back wall for the nook. I’m thinking it would be great for a bar area. Or even make a smaller square covered with pennies for wall art. I could see 2 or 3 of these really sparking up a wall. And I can work on small projects! I’ve seen old bowling balls covered in pennies too. Lots of fun!
If you don’t mind, I’d like to link back to this on my blog. Your tips are great!
Wow. The first time I see such a unique DIY. It required a lot of work. But the effect is great
I may begin similar, maybe end table top, with stamps. Just copy,paste, print from illustrations of net. Could follow themes like ships, trains, nature. I want tp begin a George Washington stamp one.
Hi, LOVE this project! I have a question…if you HAD gotten the pennies to line up, what was the plan for containing the epoxy? I notice you used the edge of the counter to contain it here…but if the pennies ran over the edge, would the epoxy have worked out?
For anyone else dong this and seeking to overcome the alignment issue – perhaps the alignment problem was similar to what would happen when installing glass mosaic tile… the wall and counter aren’t perfectly square; therefore, if you start at an edge, you will have issues with alignment once you get 5 feet away from where you started. Perhaps starting at the center and using a straightedge for lining up that first row, then snipping the pennies at the wall would be the way to go?
Also, I highly recommend Nexabond. Water free CA (super) glue. PERFECT GLUE! Expensive, but dang near perfection and lasts forever (thanks to the water free business). You will use it for wood glue (which is what it was designed for), fabric glue, gluing together plastic toys…amazing.
Excited to hear about the epoxy plan, I freaking LOVE your design and MUST do this on our bar counter!
I honestly didn’t have an exact plan, I was just planning on letting the epoxy run over the edges and cover the pennies, with a little manipulation from me. The epoxy is really thick so I think it would have worked…though the edges, unlike the top, wouldn’t be perfectly smooth. That is also why we were trying to remove the countertop before starting the project, letting the epoxy run over the edges would have been messy and I didn’t want to do it inside my house. It all worked out in the end though, even though nothing really worked out!
AMAZING! Such an original idea, it looks really really nice!
Thank you, I have just been searching for info approximately this subject for ages and yours is the best I have discovered till now.
But, what concerning the bottom line? Are you certain about the source?
Hi there! I could have sworn I’ve visited this web site before but after looking at a few of the posts I
realized it’s new to me. Anyhow, I’m certainly happy I discovered it and
I’ll be book-marking it and checking back often!
USAgain – a head within the cloth recycling sector after 1999, USAgain works as a for-profit agency who
recycles and reuses clothing, shoes along with textiles.
Their target is to try to present clients with a convenient as well as environmental solution to be able to rid them of needless textiles, and that is diverted from dumps.
USAgain maintains more than 14,000 clothes collection bins located in 19 states of the
union.
Greater than 54 million pounds of clothing have been generated within USAgain reusing bins throughout the country in 2014.
The country’s textile reuser offers a release to deliver
additional clothes an additional life via a web of
thousands of recycling bins located nationwide.
By way of directing 54 ,000,000 lbs of cloth, USAgain and the clients kept 378 ,000,000 lbs of co2 away from entering
atmosphere, rescued at least 75.6 billion gallons of
water, as well as 308,571 cubic metres for land fill space.
USAgain reusing systems are organized combined with cities,
local firms, occasion established community drives and
also fundraising to schools and also non-profits.
Above 12,500 clothes collection containers within 19 provinces supply occupants
with a beneficial strategy with removing their own extra outfits
or shoes with a green responsible approach.
“We all hope to lower the destructive consequences from items on the natural environment by increasing their recycling and reuse.
Its key element is that ensure clothing reusing an easy section of life,” stated Mattias Wallander, Boss from USAgain. “Cloth recycle programs will get attention with organizations having a
goal to raise their generally waste disruption ranks and also we’re doing work hard to aid with their purpose”.
Whew….so tiring to read all these link party comments to try to find the answer to one simple question: How much epoxy? that stuff is not cheap and I’d rather not mix too much.
Every counter will be different so I can’t tell you exactly how much you will need, but I can give you the stats on our counter. One box of “Super Glaze” is one quart and the box says it will cover 6.4 square feet of surface. Our countertop is 8.5 square feet, and we used a box and a half, and the total depth is about 1/8 an inch.
“DOG Bless You” for your Persistence & Diligence with your “Pennies Against You” Battle until you WON! I have a collection of coins and bills from around the world [Started in the 60’s!] and have always “Dreamed Of” creating something like this with them. Now; I can; and with the full benefits of your “Trial & Errors” that I am sure will save me much time & frustrations. But I’m sure I’ll create some Frustrations on my own; as I have NO Building of ANYTHING Experience; not even Legos! klee
Thank you for taking the time to detail your project.
This website SUCKS. Cant even read the articles without it jumping down to end of page
I’ve never had that problem or complaint before, but I will look into it. Thank you for your feedback.
The first thing I must have you understand is that when you go into business, YOU are the
determining factor for success. Many online magazines for the fairer sex and tech blogs pay regular Joes and Janes
to fill up their Websites with articles. These include catalog sites, as
well as other marketing sites.
I wonder how much, in pennies, that you ended up using on the table?
I really hope this page is still checked from time to time. If not;….well……I’ll just be glad to share my admiration for this project into the cold, vast emptiness of the Internet.
That penny counter is amazing, and I’m so glad you shared some of the pitfalls so that, should I try a similar project, I could avoid them and create some of my own. Two tings, though. First, in Canada, we no longer have pennies. Unless you can find a hoarder, there is no way to get any. I’m guessing I’d end up using vase gems or similar.
Second, and far more important, how much of that epoxy did you use for that counter, and what were its dimensions, please? I guess I can do my own volume calculations, but it would help to have at least a rough estimate as a jumping-off point. Now……off to explore this site. THANKS!
Jim
PS…I’ve seen those paper bag floors mentioned in the comment above mine, and they’re fantastic1
You can get pennies on eBay. :)
Excellent post. I was checking continuously this
blog and I’m inspired! Very helpful info
specially the final section :) I care for such information much.
I used to be seeking this certain info for a very lengthy time.
Thank you and good luck.
Just a thought – if u were really set on a copper trim rather than a wooden one, u could use copper-leaf & size to attach it to the wooden frame, then u could seal the copper-leaf under some clear epoxy, like when u finish off decoupaged items.
I found this post through Google…I just wanted to ask how, after a few years of living with it, has your penny countertop held up? Thanks!
Out of all the projects we’ve done over the years, this one is probably the one that’s holding up the best. It looks as good as the day we finished it.
What a shame…it would look 100x better with pennies flipped on sides:(
What a shame…it would look 100x better with pennies flipped over the sides
Your idea is really creative. I love it. I’ll collect penny to do it. Thanks for sharing!
Awesome work done with the pennies on the table. And you are right about the problems as i know you can have issues with epoxy as we do have the same from time to time.also as we work in the same industry.
Just found your penny post. We once paved the entry way of our dorm room in pennies with poster putty, then had to pry them up, so we decided never to do that again. It turned into a penny covered coffee table, which I still have and don’t know what to do with! It looks great, but doesn’t match the decor of many people. Ah well. A fun project nonetheless. Thanks for sharing! I love a good DIY.
I love how this turned out…..what a great idea. I covered over my kitchen countertop with faux paint to make it look like granite and then poured enviro-tex…..it’s such a magical product although a little intimidating to use. I’m wondering what I can use the penny’s on in my home now because I love that look….maybe a sidetable! Thanks for the inspiration.
I love it, and want to do this with an old L-shaped desk that I have. I would leave the top as it. Think it is clever and looks wonderful. thancks for sharing.
This is so great.. I love it! and I really appreciate you showing all the steps you tried!
I have to say I love your DIY blog :D Specifically this post where you cover the bar with pennies :) I have seen other people do it on FB where they actually cover the floor with pennies. It just look so stylish. It has its own charm. I love when the style and design in every home is a bit different.
Love the satin finish. How has the polycrylic held up over the years? Curious how it withstood the abuse over the years and if it stayed adhered to the epoxy. Great project and writeup!
It held up really REALLY well…I was actually quite surprised. We sold that house last year and the penny countertop looked as good as the day we did it.
Wow I am surprised as well! Thank you for the quick reply. Been wanting to do something with pennies and the satin finish really caught my eye in google images. I snooped around and your blog is great, keep up the awesome work. Cheers!
I like it very nice coins on decoration on pennies
nice
Hey, despite the headaches you did a fabulous job. I installed a penny floor inside my front and back doors. Now I’m thinking a breakfast bar Penny countertop would tie the rooms together nicely. I used polyurethane instead though because it’s waaaay more forgiving than epoxy (in case you ever do another). Thanks!
Excellent post in every way! Thanks for sharing your experience.
This is so great… I love your DIY blog :D