
Installing Our Highback Drainboard Sink
The first draft of this post was titled “Installing our Highback, Double Drainboard, Faux Vintage Kitchen Sink”, which is quite a big description for a simple sink. That title is like when they introduce Kahaleesi on Game of Thrones, and they’re all “Daenerys of the House Targaryen, The First of Her Name, The Unburnt…. eight more super long descriptive tiles…and Mother of Dragons.” It’s the longest title ever, and I’m over here rolling my eyes at the TV and thinking “just call her the queen and get on with it already!”
Anyway…. I’m not sure that comparing my kitchen sink to the “Breaker of Chains” was the least awkward way I could have started this post, but I’m just going to roll with it.
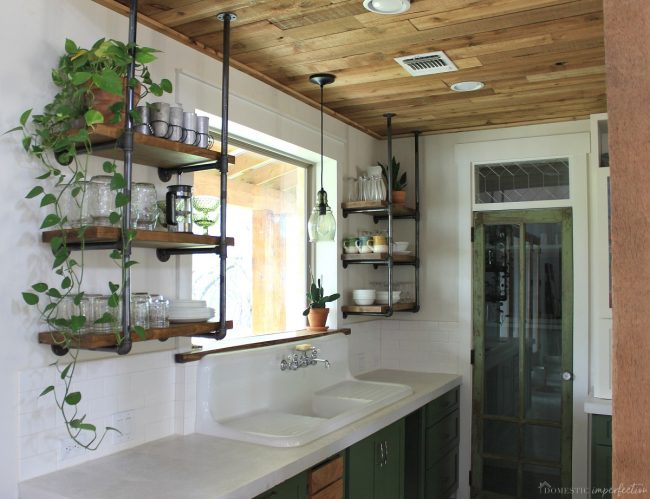
So recently Adam and I checked two big things off the kitchen to do list, and they made a huge difference. The first was the kitchen backsplash, and the second was finally building in our highback drainboard sink.
Before –
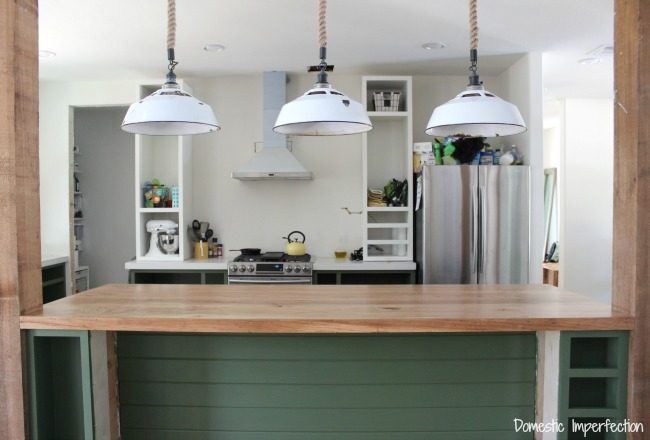
After –
Before –
After –
Obviously, there have been other things finished since those before pictures were taken (and we still have a ways to go), but that backsplash and installed sink were big leaps forward.
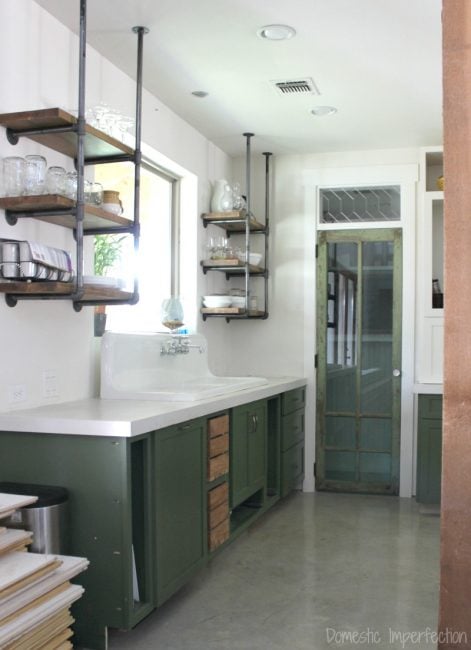
I love the way the sink turned out, but this was definitely not how the plan started. The original plan was to get a highback drainboard sink and built it into the cabinet, so that it was flush with the countertop (not sitting on top) like this….
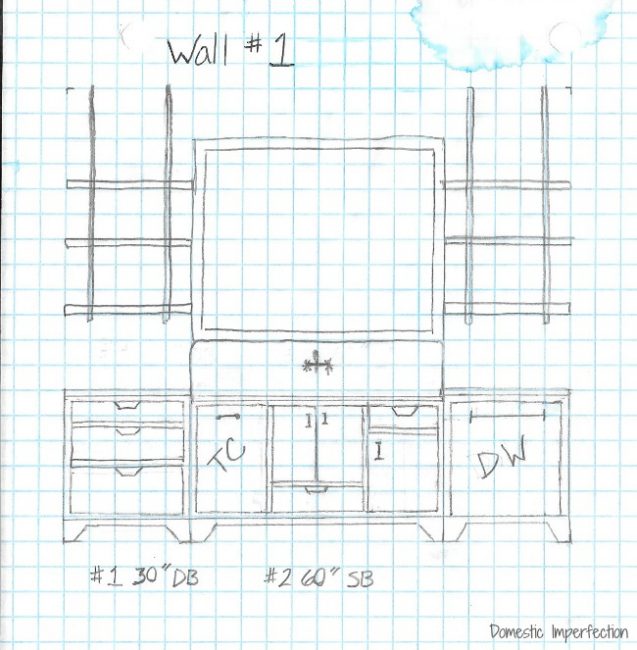
My husband built all the cabinets, and after we decided on what sink to get Adam built a very cool, furniture style sink base cabinet…weeks before the sink arrived (big mistake). I don’t have a picture of it, but here is the sketch.
Then the sink was delivered, and since it was a replica (hollow mold instead of real cast iron) it couldn’t be installed like originally planned. We were both bummed, and after debating all our options we decided that building a new, less cool sink base cabinet was the best route to take.
So between raising the height of the sink a few inches and the concrete countertop being thicker than we thought, we ended up with a sink that was about 1.5 inches taller than the window.
Isn’t building a house fun?!
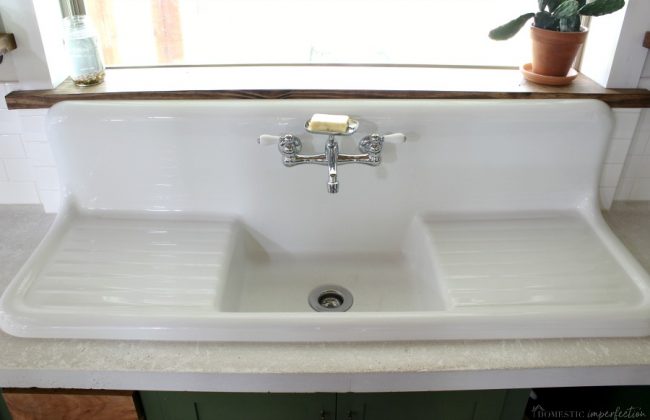
Another challenge with the vintage drainboards sinks is that they aren’t as deep as a standard countertop. So your choices are that you can either pull the sink forward so that it’s at a comfortable distance from the front of the cabinets (leaving a huge gap between the wall and the back of the sink), or push it against the wall and have to lean way forward to reach the basin.

I’m short, so pulling it forward was the only real option. Therefore, for about two years the drainboard sink sat like this in our kitchen…
Completely functional, but certainly not living up to its potential in the visual department.
The kitchen backsplash installation was looming though, which means we had a deadline for figuring out how to build in the sink. Which was a great thing actually….sometimes a good deadline is just what you get to finally get it in gear.
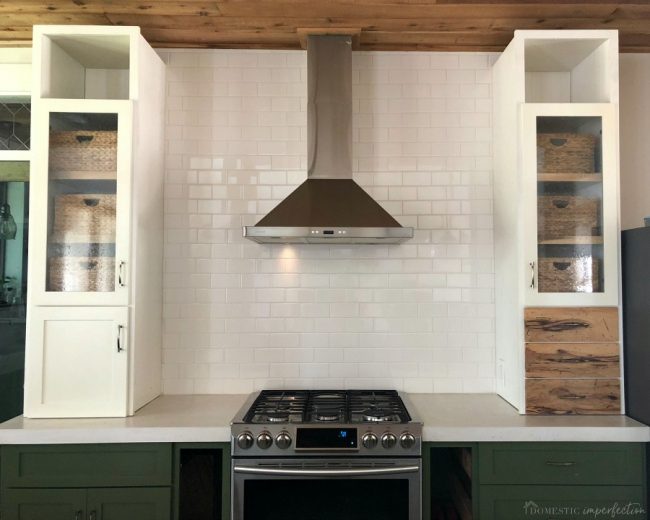
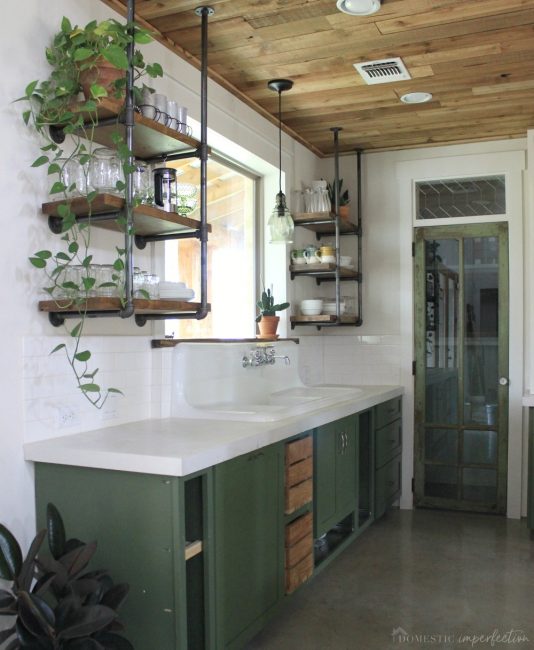
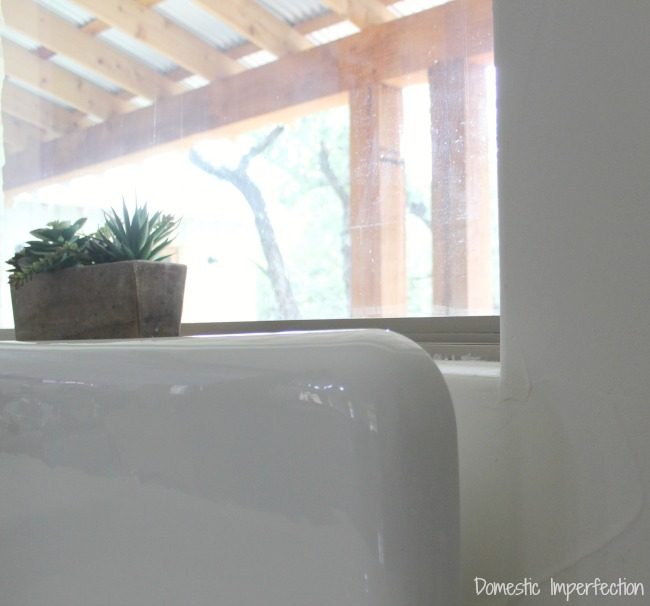
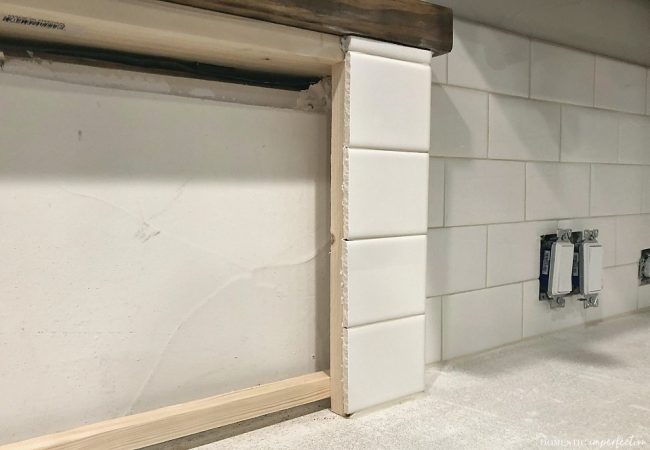
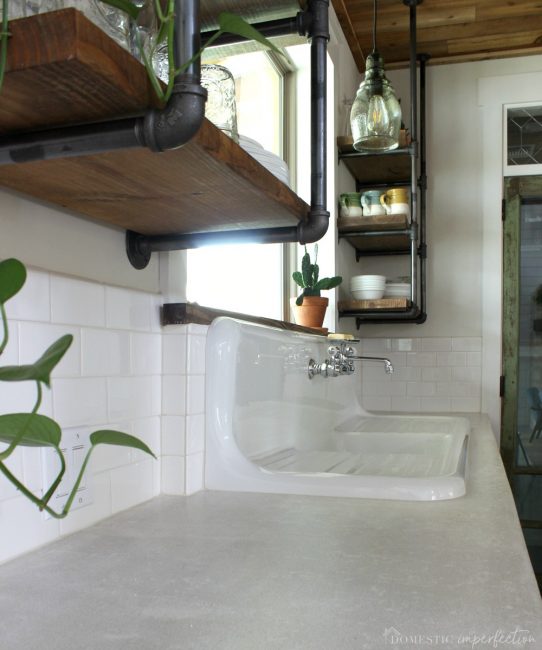
The first step was to frame out the area behind the sink, essentially bringing the wall forward.
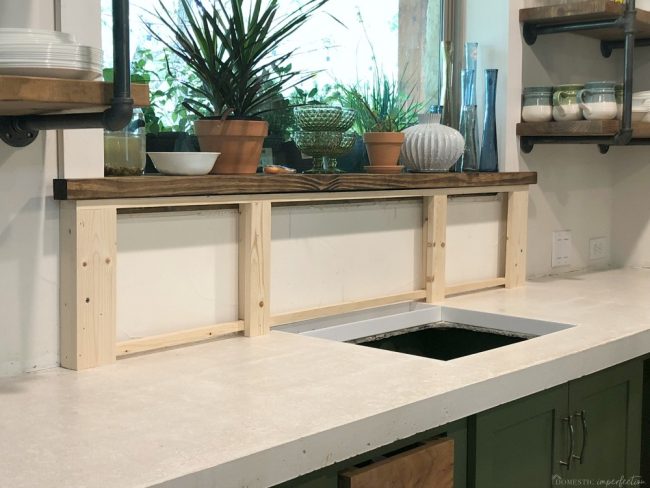
The frame is the width of the window (which is about eight inches wider than the sink) and blends right in with the new window trim. The wooden windowsill is just a pine 2×12, and it is “floating” above the actual windowsill on top of sturdy spacers. It covers the window frame and sits level with the bottom of the glass.
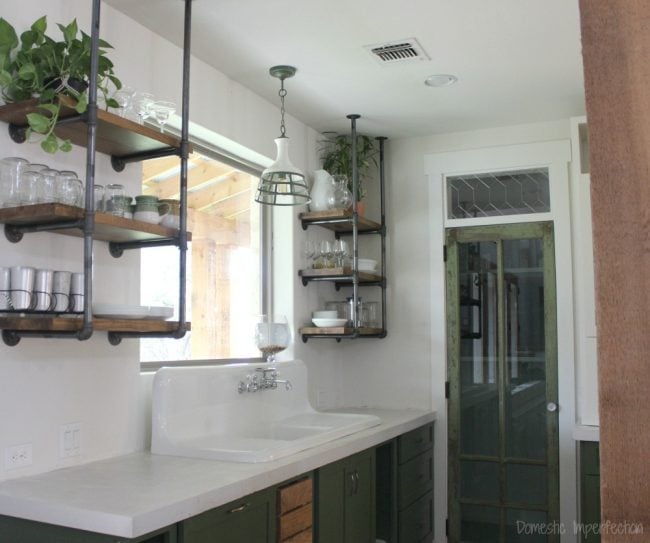
Next came the tile, which we did on the lower part if this wall and wrapped around the frame so it would disappear behind the sink.
Once all that was finished we put the sink back in place, and caulked it in with caulk that perfectly matched the grout (it even had a sandy texture and everything).
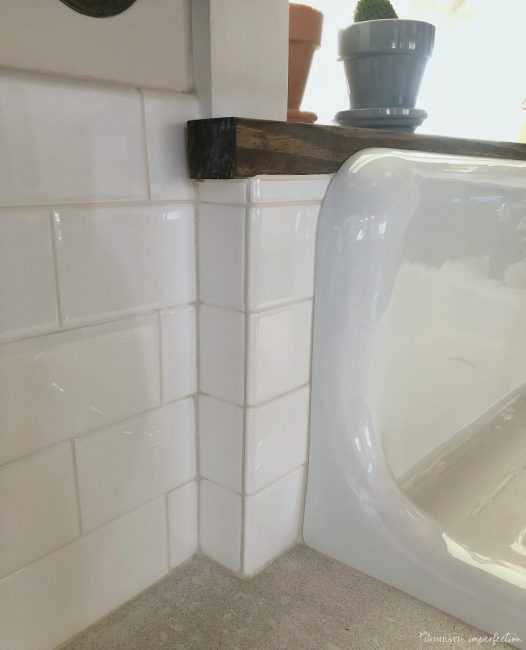
The result? A built-in highback sink that looks like it belongs.
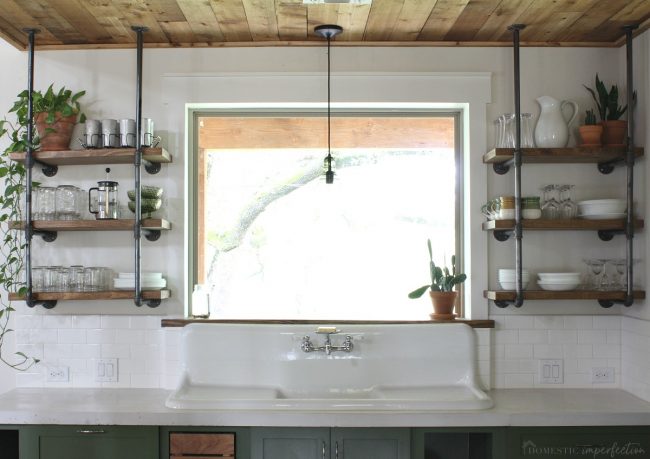
I LOVE the way this wall turned out, despite the fact that we had a few roadblocks along the way. Do I think the original plan would have looked even better? Well, yeah. But nothing is perfect, and that is okay…this is a pretty darn close second.
Anyway, that is where we are with the kitchen! Also, if you are looking for a review of the sink and how it is holding up after two years, stay tuned…that will be my next post.
Kitchen sources + tutorials
- Drainboard sink – NBI Drainboard Sinks
- Faucet – Amazon
- Concrete countertops
- Pendant light – Pottery Barn
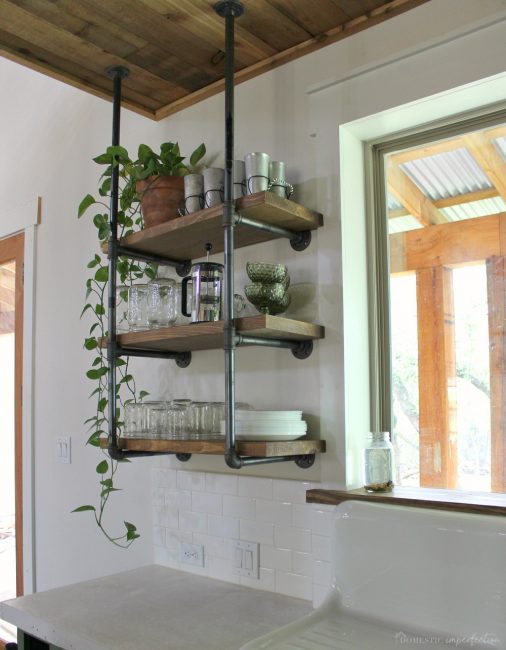
- Pipe shelves
- Reclaimed wood ceiling
- Pantry door and transom
- Window Trim
- Subway tile – Home Depot
- Cabinet Hardware – D. Lawless
- Cabinet color – SW Oakmoss
- Wall color – SW Shoji White
- Trim Color – SW Alabaster
- Seagrass baskets – Amazon
P.S. – Want to follow along with projects in between blog posts? Head on over and follow on Instagram, where I’ve started doing Instastories to keep you up to date!

This looks sooo great! And is the inspiration to us getting a similar (a bit smaller) sink for our bathroom! Did you attach the sink at all to the counter tops or below at all? Or just caulk it in place? Thanks for sharing!!
Jennblogshere.com
Thanks Jenn! The sink is only held in place by plumbing, caulk, and it’s own weight….there really isn’t a way to attach it better than that. It doesn’t budge though, so it’s fine!
Interesred in the sink review! We had an NBI drainboard sink installed in our new kitchen a few months ago… so far so good! Although I’m curious to hear others experiences and tips as the sink does have to be coddled a bit! We had similar issues with the back sitting flush… yours looks better :0) I’ll stay tuned!
So excited to see this! Although, really, I’m always excited for a new post. Your last post about the camper had me looking at getting one, to my husband’s delight, until we realized that we couldn’t park it at our house and would have to pay to park it somewhere else…yeah, no. He was all “What’s gotten into you? YOU want a camper? You hate to camp!” I told him it was a fabulous idea I got here and we could totally fix it up (despite having exactly zero DIY experience between us), and he is now totally on board with me reading this blog. :) I think I’ve even convinced him to paint our kitchen cabinets. We shall see…
Haha, I love it when husbands are on board! Not being able to park the camper at your house is a bummer though. Not only is it an extra expense, but one of our main reason for getting it was that it could be a guest house. We have overnight guests fairly often and no real guest room, and so far (even in its current state) it has been working great for that. You should rent one for a few days and see how you like it! I have a feeling you will :)
I know this post is about the sink and backsplash, but the wood ceilings! They make such a difference in the before & afters.
On a side note, how do you deal with the slow pace of finishing stuff around the house? Maybe you’re just not as easily frustrated as I am! We moved into a fixer about 6 months ago, were able to do some significant renovations before moving in but not enough time/money for everything, and now some weeks it’s so hard to see all the things that need our attention when we often don’t have the energy to tackle house projects after work & kids. Even low cost stuff like baseboards, installing more shelves in the pantry, hanging curtains, removing bathroom wallpaper… sometimes it gets hard to enjoy what IS beautiful about the house!
Girl, YES. I feel you. It can be over so overwhelming and frustrating when you already have a full plate and look around your house and see nothing but a to-do list. You just have to concentrate on the positives though, here are mine –
1. There is always something to look forward to. Day after day, year after year, there is always dreaming and planning to go on, followed by beautiful finished spaces. You would never get that in a new house, and that would be boring.
2. We are paying cash for finishing this house, and also have a plan to pay off the mortgage in five years. That means when the house is finished (hopefully in five years?) we will own it completely. For me, that is worth the slow pace.
3. My boys are learning valuable skills. Not only about how to do projects and use tools, but about patience, hard work, goal setting, budgeting, and working together.
It’s not easy, but try and concentrate on your positives and enjoy the journey. The journey is just as important as the destination.
Thanks so much for the truly helpful encouragement <3
When I grew up, drainboard sinks were common in most of the places I lived, and the drainboard sink was mounted to the wall without cabinets. Over time, because of the weight of a sink and daily use, the sink started to lean forward and became a bunny ski sink. The drainboard sink looks great in your new home, but I would never dream of using another sink of this type because it is typically shallow and needs constant mopping to keep it free of water and water stains. I love your home and your blog.
Thank you Judy! When this sink first arrived I almost sent it back because of how shallow the basin was. I had a very deep sink in the last house and I loved it, it could hide all the dirty dishes and contain all the water. This one took certainly took some getting used to, but the drainboards and backsplash contain the water and the shallow sink means I can’t let dishes pile up (and trust me, I try, haha). I’m not sure which sink was more functional, but both have worked for us.
Absolutely wonderful … as is everything in your beautiful home! I always feel a sense of peace when I visit Domestic Imperfection (mostly because I love your choice of the word “imperfection,” which counts me in!). Thank you for sharing
I love that, thank you.
Love how the updates look! So good!
Wait….you don’t have a dishwasher??
No, Adam says we didn’t need to spend money on a dishwasher when he married one.
Kidding! The dishwasher is a panel front (so it looks like a cabinet), it is located to the left of the built-in wooden crates.
HAHAH!
Thank goodness! Your kitchen is so beautiful. Every bit of it!
I like how you solved the problem with the sink. It now looks original to the house and is gorgeous! Thanks for sharing at #HomeMattersParty
After seeing getting this newsletter all I think about is your beautiful Kitchen
https://www.houzz.com/magazine/new-this-week-4-refreshing-kitchens-with-green-cabinets-stsetivw-vs~119537957?utm_source=Houzz&utm_campaign=u10248&utm_medium=email&utm_content=gallery0_0&newsletterId=10248
Looks Great , thanks for sharing!
That was a creative way to work around the problem! As always, I’m impressed by your ideas and your skills. The backsplash also looks nice. It’s so good to have things like that finished out.
I am so glad to have found your blog and how you managed around your double drainboard shallowbasined highbacked sink. I got a vintage one for $13 thru an auction our town had when they were cleaning out their old boro hall (nobody much knew about the auction and the bidding started at $10). The second floor of the hall had been rented out for a while in the 30’s-40’s and had a kitchen with this great sink, metal cabinets, the works. Brought it to our farmhouse and we are waiting for the right time (read: enough money) to convert two kitchens in this 1892 duplex into one 20×28 kitchen with the sink as the focal point. Love your idea to build out the wall behind. I wont have a window to work with so maybe that gives me the option for some shallow shelves all the way up behind it for trays and such. Again, thanks for your blog post! What a great help it will be!!
Hi! I love your sink and how you adapted around the quirky issues.
We will be building a new home and I want one of these sinks. Trying to decide if I should find a cast iron – old one or go with the new ones like you have.
Question on your statement, “since it was a replica (hollow mold instead of real cast iron) it couldn’t be installed like originally planned.” what do you mean by this? Can you still build a separate cabinet for the sink? I am not sure I understand, but your response will hopefully keep me from making any mistakes. :)
Love your sink – I have one without drain board I want to install but our pipes don’t come through the wall they come up from below / so the faucet doesn’t want to stay tight against the sink like it would if it’s screwed into a wall pipe – trying to figure out a solution
Do you use any clips to fasten the sink to the counter or is it just siliconed
Love your sink! That’s a beautiful retrofit you did there. I bought a drainboard sink and the manufacturer’s installation instructions are to cut the entire countertop the width of the sink, including drainboard. I dont think that has to be done. What is your advice? Thanks!