
Carving Pumpkins with a Drill
I haven’t carved pumpkins in a really long time. Why? Well, because this is how pumpkin carving seems to go…
First you cut open the pumpkin and clean out all the guts. Lets face it…no one really likes this task. It’s kinda nasty. Then you carve it up, put it out on your front porch, throw a candle in, and enjoy knowing it’s out there for a few nights. Halloween passes and since the pumpkin has been sitting on your porch for a while you don’t really notice it anymore. Thanksgiving comes and goes and you pull out the Christmas decorations. As you’re stringing lights on your house the breeze blows and you catch a whiff of that collapsed pile of pumpkin you forgot about long ago. At that point you pretty much have to scoop it off your porch with a shovel, all the time wondering what the neighbors and UPS man think of you and your giant liquefied squash.
Nonetheless, I figured my kids would get a kick out of carving pumpkins. So here they are, my two excited helpers.
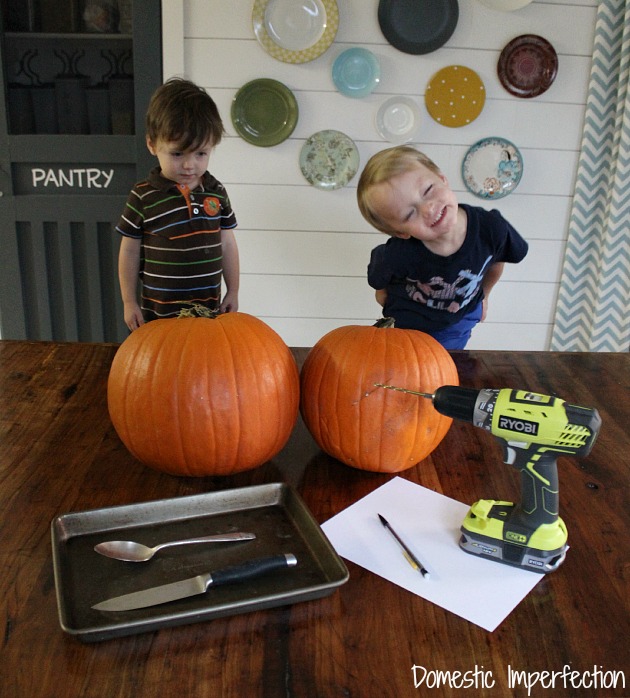
Or rather, one REALLY excited helper and one that is only there because I told him I would give him a marshmallow to stand behind a pumpkin.
Heres what you’ll need…
- Pumpkin
- Drill and drill bits
- Knife and pumpkin gut scooping supplies
- Pencil and paper (optional)
- Tiny human helpers (also optional, but recommended)
First, cut out your pumpkin lid and scoop out the guts. Standard pumpkin procedure.
Basically the whole point of us doing pumpkins this year was to watch (and photograph) my kids faces as they reached in a scooped out pumpkin guts. Much to my surprise and disappointment they refused…flat out refused. Not even marshmallow bribery worked, which is new to me. Such party poopers. So instead of showing y’all an adorable picture of my kids looking disgusted, here is one of me and my brother circa 1996.
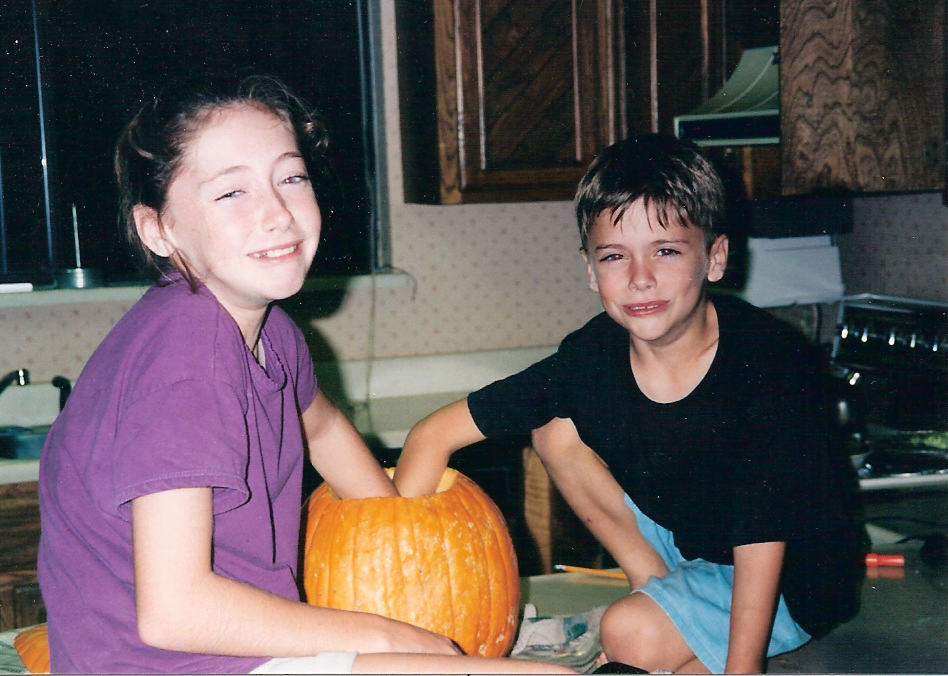
My opinion on pumpkin guts is long-standing.
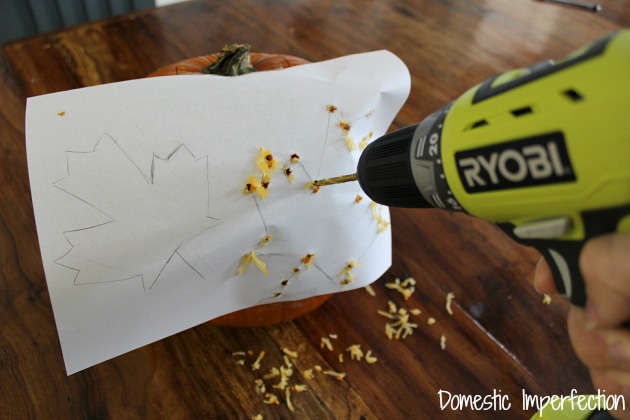
So, first real step…choose a design. I choose maple leaves and drew them out on a piece of paper. Then I taped it to the pumpkin to use as a template. You could draw directly on the pumpkin too, or just free hand (free drill) it.
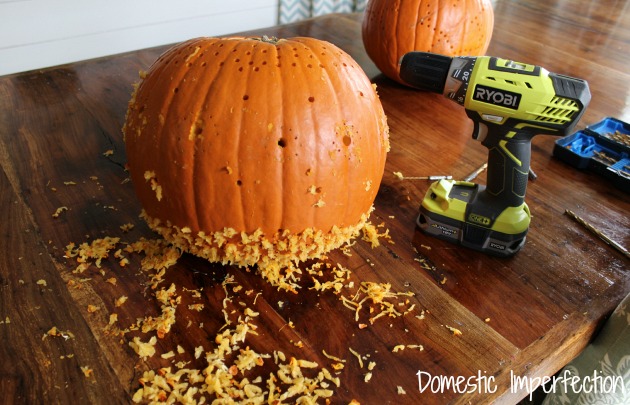
For the second pumpkin, I decided to forgo a plan and just go at it (the kids had lost interest at this point).
Then I cleaned up my sizable pumpkin mess and threw in a candle. However, the candle wasn’t staying lit in my pumpkin (not enough holes for oxygen I guess) so I used the top of a solar light instead.
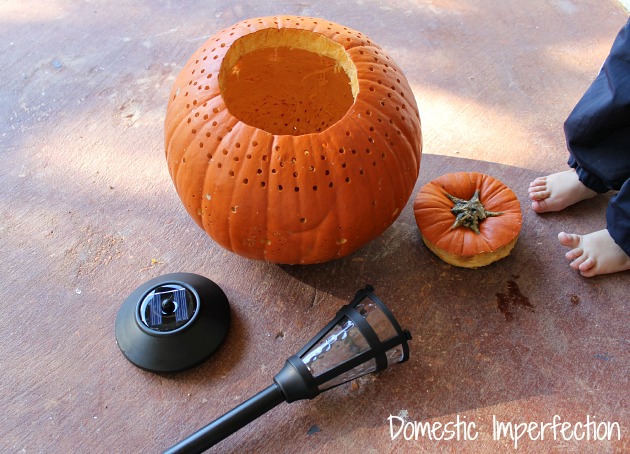
The solar light works great, and I much prefer it over the candle, honestly. You just have to remember to take it out every now and then to let it charge.
Now comes the part where I have to admit something to you. Here it goes….I have no earthly idea how to take pictures of a pumpkin at night. None whatsoever. I don’t even own a tripod, so pictures without great lighting don’t stand a chance around here. Keeping that in mind, here is the final product.
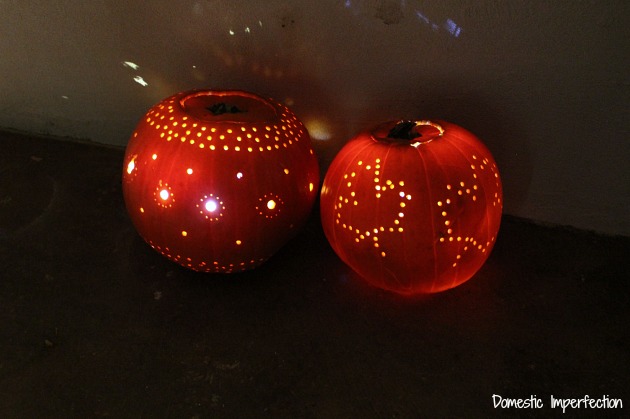
That leaf pumpkin somehow ended up looking like a giant ball of glowing pumpkin mold in all my pictures. I swear it’s a fresh pumpkin. Anyway, there you have it…pumpkins with a drill. The good news is that my kids think they’re pretty much the best thing ever, and my porch feels festive for the first time in many years.


When I was a kid we used to pretend we were mad scientists and the goop in the pumpkin was brains. Made it a bit more fun to scoop it out :)
Haha, too funny. I’m sure as a kid I told myself “it’s not like it’s brains, it’s just the inside of a pumpkin”.
I thoroughly enjoyed your commentary in this post :).
The not-maple-leaf one looks like an awesome pumpkin disco ball.
Now there’s a great Halloween party idea!
Are you nuts?! Pumpking guts are a sensory novelty and a messy messy treat! Plus you can bake the seeds and eat delicious. That’s my opinion and I’m sticking to it! PS I like your tinpunch-esque pumpkins.
I thought my kids would think the same thing as you since they love anything messy, but they didn’t. Maybe it’s because pumpkin guts are gross ;) My family loves the seeds though and makes them every year.
I hate pumpkin guts, but somehow, I’m always the one stuck doing the scooping! And of course, every year I end up with a lovely allergic rash from fingertips to elbows, because some component of pumpkin guts is related to latex. And I’m highly allergic to latex. As in, don’t let me walk by the open doors of the latex-riddled Halloween Super Store unless you’ve got the paramedics on speed dial.
They have yet to mention pumpkins this year. Maybe I’ll skate by without!
Oh my gosh, that’s terrible! Hopefully your kids will miss the pumpkin memo this year, and if not I say it’s dads job!
Pumpkin guts rule! We got our pumpkin at a very expensive patch this year, so we (to stop the hubby’s griping) roasted the seeds, made a zillion of pumpkin muffins and froze the leftover mush. But I am going back to the patch tomorrow… cause me want a new pumpkin to drill :)))
You’re so much better and pumpkin carving than I am! I had planned to save the seeds for my parents…but then all the mush and the seeds ended up in one big squishy pile and I tossed the whole thing. Sorry mom!
I did wonder about my seeds:) No worries love.
The drilled pumpkins look great. And that photo is hilarious! Pumpkin guts…it seems to be a mama’s job…
Oh my, we must have grown up in the same neighborhood, because my Pumpkin memories are eerily similar to yours! I hope your beautiful drilled pumpkins manage to get removed before the liquified state occurs. :-). Oh and by the way, I usually think the pictures you post of your two adorable boys can’t be beat in the cuteness category – however the one with you and your brother took my heart this time!
Happy Pumpkin season,
Maureen
I love how your pumpkins came out! I am not good with traditional pumpkin carving, but I do have a drill! so maybe I will try using a drill on our pumpkins this year! Thanks for the tip.I’ve been working on adding Halloween decor to my home, so I can’t wait to get started on some pumpkins!
Hi Ashley! I have read about using a drill to ‘carve’ pumpkins and really like the final products! (yours included!) I don’t own a drill (yet!) and want to borrow a neighbor’s for this task. Did your drill bits clean up okay?? I want to be able to report truthfully that I won’t ruin his bits :):
I remember wiping them with a baby wipe before putting them away and I think they cleaned up fine. I really didn’t pay that close of attention, but I’d say you’re okay to borrow it :)
Your story is too funny!! Love your blog..Just found you!
Your pumpkins look amazing and I’ve been wanting to do something similar to this for years..Thanks for the laughs and inspiration today!!
Joey
OH I have also seen people put clear/white christmas strand lights inside them! Another tip I know..well, 2 of them ha…You can rub vaseline on all of the cut areas and it’ll make your pumpkin last longer and not liquefy haha
Also, I always used to cut my hole in the BOTTOM of the pumpkin if I used a candle(cut a smoke hole at the top though-small) and then you lift off the pumpkin to light it more easily!! I also wondered how you got your light to stay? did it just seat down in there well b/c of the size? thanks!
All of those are great tips, I love the idea of cutting a hole in the bottom. Anything that keeps me from reaching into the pumpkin is a good thing! For my solar lights I just took off the very top part (the part that looks like a disc) and threw it in there.
thanks and ohhhh, haha! ok, works for me!
I LOVE this and am doing it this afternoon with my two boys! Thank you for the inspiration. :)
Ashley!! That’s so smart!! Brilliant, girl!
Love this idea! The first time my son (now 5) had to pull out pumpkin guts (I think he was 2ish) he gagged! It was quite hilarious! Needless to say, grandma had to help de-gut his pumpking because he couldn’t do it. And I don’t think he’s done it since then!
What a fun article! The pictures are great, your kids adorable, and you have a wonderful sense of humor. ( Good job on the pumpkins as well! )