
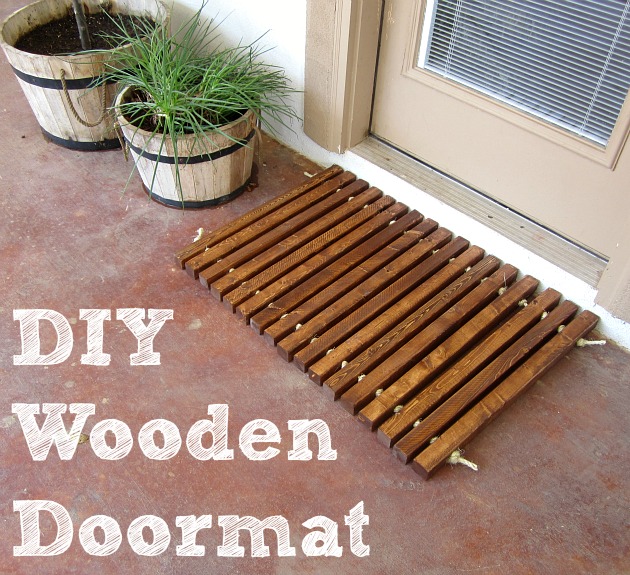
Wooden Welcome Mat
A better title for this post would be “Pinterest Challenge: Part II”, since Pinterest Challenge Part I was a big ‘ol flop. To jog your memory, here is the rubber mat I painted and ended up hating…

and here is the mat (from marthastewart.com) that I should have made…

Now if there is one thing I am good at, it’s perseverance. I keep at my projects until they look the way I want them to (like my white bed, hexagon table and penny countertop…though I did give up on my slipcovers…). Anyway, the day after I posted my ombre mat I was already buying supplies to replace it. Perseverance is a blessing and a curse, lol.
Martha’s website recommends using cedar or mahogany 2 X 2’s. At Lowes the cedar ones were $2.75 for four feet (two planks) and some quick math showed that it was going to cost more than I wanted to spend. Then I spotted some pine ones that were less than $1.50 for eight feet (four planks). Much better. My husband warned me that pine would warp and wasn’t the best choice for outdoor projects…but for half price I decided to throw caution to the wind and try anyway.
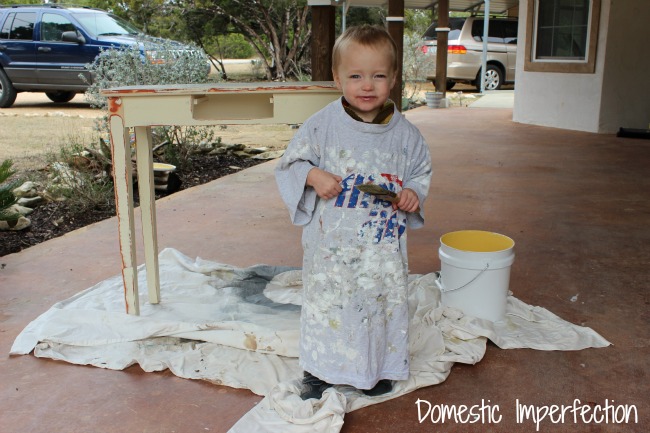
This project was really easy and my boys were all over it. Here they are trying to decide if I had bought the right amount of wood (I hadn’t).

I didn’t start the project for a few days after Adam cut everything down, but that doesn’t mean Elijah forgot about it…

And when I finally got around to working on it Elijah was right there with me. I drilled holes in all the planks and he diligently measured my feet.

I can’t believe I just posted a picture of my foot on the internet…they are my least favorite feature. Somehow I was blessed with super flat “flipper-esque” size tens to go with my 5’3″ body. My old nail polish doesn’t help things either, but it is what it is.
Moving on.
FYI for all you wooden mat makers…your holes may not be even. I measured and marked all mine at three inches in….the drill went in where it was supposed to, but where it came out on the other end was a surprise every time. Whatever, it’s fine…rope is flexible!

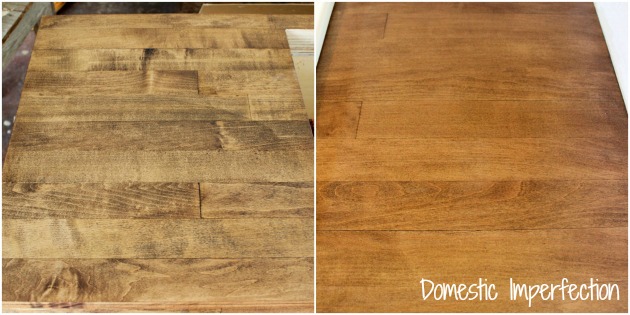
I gave them a coat of stain (English Chestnut by Minwax) and polyurethane. I polyed them pretty heavily in hopes that it would help them not to warp. I have no idea if the two are related, but I figured it couldn’t hurt.

Then I just laced them together with the rope, tying a knot between each plank. And yes, your fingers will hurt when you are done.

I kept knotting away, and the longer mat become the more I couldn’t get Dances With Wolves out of my head. “Good trade” …I think I feel a movie night coming on.

And here is my wooden welcome mat (aka giant indian chestpiece). It fit’s in sooo much better than the blue ombre one.

But wait, there’s more…I made two! When you have two front doors hanging out awkwardly on your porch you have to make two mats. Also, when you are scooping things out of the way for pictures, its good to remember that the glass on your front doors will give you away, haha.

The second one is smaller than the first, we want to make sure the real front door gets all the glory. (If you’re wondering where the heck this mysterious second door leads, it goes into our laundry room.)


And there you have it! I love them and will not be making a third mat :) If they start to warp I’ll update the post so that future tutorial followers will know not to use pine. (UPDATE 7/2013 – they are holding up perfectly!)


these are great, i do still love the ombre mat though. where did you end up putting that one?!
also, what kind of rope did you use?
M~
The ombre mat is now classin up the new garage. And I’m not sure what kind of rope I used…it was cheap and scratchy though.
I love these! Nicely done. Pine may not be the best option but it looks like they in a covered area so that will probably help keep them looking better longer. Great job.
Those are really nice! You did an awesome job, ably assisted by the world’s busiest little helper. Omg, he’s so cute! :) I like these better than the ombre mat as well. They are very striking and have that natural vibe that looks so good with the plants and colours.
I am trying to figure out how to show you photos of the stenciled dresser and I’ll let you know once I figure that out.
Cheers!
Those are awesome! I love using power tools so I might just have to try this. Thanks for the inspiration!
Cedar is another wood that is not expensive and will take the weather. I have seen one of these made for a bath mat. It was used in an old bathroom that had some uneven ugly floors. It turned out super cute.
Yours looks great. One idea too, if you want that 2nd door to ‘go away’ and blend into the wall. Paint it like the rest of the house. The windows. Not the front door. Then remove the mat. Put a plant in front of the door and it will come to look like a window. (I have one of those 2nd doors on my front porch too) Now no one will confuse what door to use.
Those are the best mats I’ve seen yet! Isn’t Pinterest addicting! Looks even better than Martha’s! I need your motivation to start a project that involves some type of wood! I hate to sand wood, it’s like fingernails on chalkboard to me! Hopefully I can talk my husband into starting my end tables so that I can do some stenciling! Great work!!! Your boys are adorable!
Love ’em ! Great job !
I gotta say, I was a little skeptical based on the Martha picture, but yours turned out gorgeous! They look so great , I hope the pine holds up well, it would be a shame if they warped.
I definitely like this wooden mat a lot more than the other one. It would fit in so nicely with our own condo front door! I just need to get a drill…. Thanks for sharing!
I love them! I will definitely be making a couple for our house. And just to let you know, I have flat, size 10 feet also. ;) Lol
It is a great idea to make a wooden mat like this and very impressive. By the way I love seeing your kids helping you to make this wooden mat and they enjoyed a lot.
Hello there! I’m a new follower! Found you from Vanessa blog, Love Live DIY – love the post about how you paid off your home. Congrats! :) We just bought a home and I hope we can also knock our mortgage out sooner! OH – and I LOVE this mat. Adorable! If you want to make a third one, my new house will need one :) jk
Brie @ Breezy Pink Daisies
Argh! I meant Virginia not Vanessa! And her blog would be LiveLoveDIY. lol I hate it when I get things wrong and then randomly remember them in the shower…weird I know :)
Lol! I knew what you meant! I remember things while in the shower too…it’s the only time it’s quiet and I have time to think.
This post gave me a good yuck!! Love your sense of humor and the mats look great. Your little guys are adorable! Something about boys…they love to “help” with everything :)
It looks like the ombre mat was a faster project but your wooden mat has a much more sophisticated look. LOVE IT!
I think those are wonerful. I would love to make some for my entrance from the garage to the house. It might be a good idea in the shower area.
I might have to try this one!! we ave a covered porch…so maybe pine would do fine!
Oh, wow! What a great job you have done! And, the little men…how cute!! Thank you for sharing. Visiting from The Shabby Creek. Would love it if you would share this at my Make it Pretty Monday party at The Dedicated House. http://thededicatedhouse.blogspot.com/2012/07/make-it-pretty-monday-week-7.html Hope to see you at the bash. Wishing you a grand week. Toodles, Kathryn @TheDedicatedHouse
This wooden mat looks great, and we’d love to feature it on CraftFoxes.com as a how-to. Interested? Feel free to email me at [email protected].
I’d love to be featured…e-mailing you right now!
Love this!! New follower :) (Thank you BlogHer for leading me to you!!)
Love the second attempt mat. It seems like all of my DIY tries always end up in disaster the first time around. I love the wooden mat, though. I might have to try one for our back deck. Thanks for the inspiration!
Wow, those mats look AMAZING! I really wish we had a porch or outdoor area at all (we live in an apartment) cuz I would so be making one! I’ll have to pin it and wait until we move somewhere else :-) I’d be thrilled if you want to share this at my current link party: http://practicallyfunctional.net/2012/07/the-fun-in-functional-link-party-9/
The mat is awesome! More importantly! I’m 5′ 4″, and I wear a size 9!!! I feel your pain. I call them ski feet. What’s worse, when I find really cute shoes, inevitably when I get to them in my size, they are big, awkward, and ugly!
wow! That’s just great and I would love to have an update on how they’re doing!
PERFECT!!
I love it! I’ve been looking for a cool mat for the back entry, I am so stealing this idea.
This is amazing! You have such a knack for wooden projects. I would love for you to share it at Snips & Spice Sunday Slice.
Malory
http://snips-and-spice.blogspot.com/2012/07/sunday-slice-its-party-5.html
love this project! will be hitting lowes in the Am for supplies. Also love the feet I also sport lovely size 10 super flat paddles. Luckily I’m a statuesque 5’4″ so i can carry them off :)
Lol, that one inch makes all the difference!
I REALLY like this! You did a great job! I’m gonna do this and use the pine too! Thanks for sharing!
Your project feels perfect for summer! Give yourself a huge pat on the back. Well done!
Visiting from the link-up party at homework. Love these mats! And your little helper is adorable!
You did a great job. I love this mat! Thanks for sharing at DIYbyDesign.
I love the matts, I think they are both perfect & I’m for sure going to make one for my size 10 Clod Hoppers. Course hubby wont be happy since he don’t trust me with a drill he’ll be the one drilling. Thanks for the great idea!
Wow! This is a great project.. I think I have to copy it too! Let us know how the pine holds up! (BTW.. I found this post via Sugar Bee Crafts!) Thanks for sharing!
Wow. I’m speechless. Your wooden mats are gorgeous!! Very professional looking.
I have loved this cute wooden mat forever…now I have to get to it! It’s GORGEOUS!!! I’m featuring you tomorrow.
XO, Aimee
{giggle} Showing your feet means we know “you” did it! Beautiful job, Ashley! I love the color and you sure made it look easy! Love them!
A great looking project and some pretty good looking help to boot. :D Thanks for sharing this week.
p
Thanks so much for sharing with us at Someday Crafts! I am featuring your project tonight on the blog. Thanks for the inspiration!
Wow, this looks great! I’m glad that you mentioned that the holes you drilled came out all uneven. That was one of my first thoughts about **why I could never do this**. After seeing this, I might just give it a go!
This has been on my list for well over a year, and just re-entered because of your beautiful success!! I love them, and they look more durable than the mats we currently use. Plus my german shepherd’s hair won’t stick like glue…
You know, they are holding up beautifully even though I made them out of cheap pine. No regrets…go for it!
I love the door mats! Have you ever thought of putting some kind of clever sign over the laundry room door? Maybe a chalkboard sign hung by rope and you can make it say “Mud Room” on uninspired days, or put a quote on inspired days, or holiday greetings when appropriate?
Your perseverance was worthwhile! These are fabulous *gets in the car to DIY shop*
This is very interesting, I’m might make one for a gift for someone I know who’d love this.
Did you use anything for bottom nonslip pads.
I really love your 2×2 mats! They caught my eye in my Pinterest travels. We are in the middle of moving into a new-to-us (rental) home, and I’d really love to give these a go. We have 4 (not a typo!) exterior doors in one area, and I’m thinking this is the answer. Now, about tying all those knots! ;-) Thanks so much for sharing.
I love my mats and they have held up awesome! They only thing is that the rope has stretched and I need to redo it. I’m thinking that this time, instead if tying knots I’m going to put metal nuts between the slats. That way I can just tighten he ends when needed instead of redoing the whole thing. Plus I think it would look cool :)
OK…. that blue thing that ‘you should’ve made’…….. NO WAY!!!!!!
You did beyond waaaay better with the wood.
I just love them and now have a bug-up-lower-rump to do the same!!!!!
…..exactly as you did —- stain color and all!!!!!
Excellent outcome missy!!!!
Thanks for the fyi/instructional (found you via google images)
Can’t thank you enough….. and ps: wear that old polish proudly just like the rest of most of us ;)
That is amazing. I will work this weekend on that, just that I need to my entry door. Thank you for the tip.
Lovely idea! There is no end to what you can do with wood – That’s why I love it and always consider wood first when looking for material to fabricate something.
What a great wooden mat you have. I love your ideas and you have inspired me to create one for my laundry room :)
Did you use 1/2″ or 1/4″ Rope?
WOODEN WELCOME MAT, really an interesting idea. Loved it.
But don’t you think we would not be able to clean our shoes on that?
our these rugs are going to be beautiful in my house, thank you so much for these great tips. Really enjoyed !!
Hi! Lovely ideia! I’ll try in my house.
Fantastic work Ashley and those progress shots are beyond cute. Never done wooden doormats before but your beautiful result got me eager to try it myself!
Very good, to be part of an electrical engineering company, more specifically we are Eletricista em Osasco
I’m not really into woodworks and I only read your post for research purposes but I must say I love your sense of humor and writing style!
Great item, thank you!
Fantastic work Ashley. Your project feels perfect for summer and those progress shots are beyond cute. Never done wooden doormats before but your beautiful result got me eager to try it myself!
I really loved this post, right now im going to buy all the material to make one for me!! Hope this easy as it seem!
Well! What an article! Really love it!
Well! What an article! Really love the way you wrote!
This is a helpful post for making doormat. Thanks again for share an idea with us. I hope you will share with us a new concept for home.
I like your work and article you written was really awesome. I didn’t do any kind of work like you. But after reading your article now i would like do something like you. Thank You
wow! amazing! I found it super creative !! Surely I will.
The product where you have to buy because you can place it in front of your home where the dirt-there will be less dirt also it plays as doormat in the entrance of your door. The product is designed is made of wood where it has to make drill using the driller then joint those wooden bars in a vertical position then make all those things arranged. Quite an innovative product where you can place at the entrance of a your home looks quity catchy to the eyes.
maravilha gostei muito
vou compartilhar essa ideia
lindas fotos
que blog top adorei
I love this as I can even stain it to match the color of our door.
I like your wooden door mat! Does it roll up for easy storage if I were to use it when camping?
I really loved this post, right now im going to buy all the material to make one for me!! Hope this easy as it seem!
Those are really nice! You did an awesome job.
Hello ASHLEY!
Wonderful and I must say it was the creative design.
Can you please tell me what types of saws are used to make those wood in a good shape?
TIA
keep helping people
Regards
James V. Jordan
Wow! this turned out so nice. I love love it and I am going to make one. Thanks for sharing your creativity!
This looks really nice and easy to clean off! I’m imagining me trying to get my knots all snug and wondering if wooden beads in between the wood might work and be easier.. I’m going to see if it will! Love your door mat!!
I actually redid the mat a few years after this post because it was loose. Added silver nuts between the slats and just tied the knots on the end. Much better! Here is a post about the update – https://wildfireinteriors.com/entry-refresh-and-a-wooden-doormat-update/