
How to Paint a Rusty Metal Shed
When we bought our house it had zero storage. No garage, no basement, an attic that isn’t really usable, and no extra closets. We needed a place to store lawn equipment, paint, and general homeowner stuff, so Adam’s parents offered us an old metal shed that was on their property.
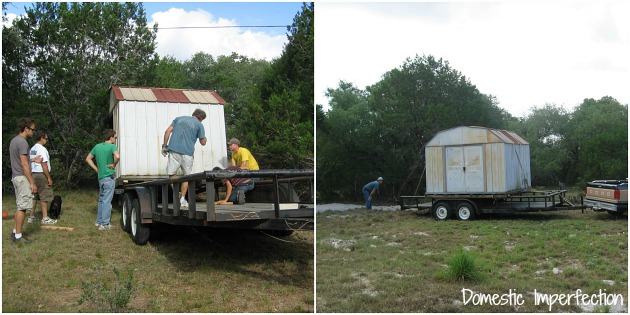
We put it on the back part of our lot, filled it with stuff, and promptly forgot about it.
Or at least I forgot about it. My husband on the other hand thought it needed some TLC. He would casually say things like “if you want you could paint that shed.” And I would nod my head and say things like “yeah, maybe” all the while thinking to myself that there was no way he was going to talk me into painting that rusty old thing. But he kept hinting – for years – that he wanted me to paint it, and I kept dodging his subtle pleas with mumbles and side-eyes. About a year ago he got he hint and stopped asking.
Then last month 3M contacted me for a campaign they’re doing about outdoor painting projects. 3M is a great company to work with, so I racked my brain trying to think of something. I wanted to do a project that actually needed doing, not something like painting a pot or outdoor rug that I have no current use for. Finally I gave up and asked Adam if he had any ideas. He thought about it for about half a second, turned to me with a subtle smirk on his face and said “you could paint the shed”.
Dang it….he had me, and he knew it. That bastard outsmarted me. So, without further ado….
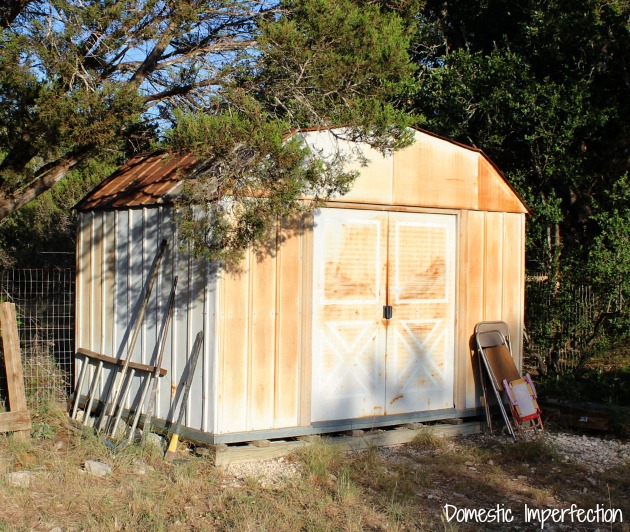
Now, the most important thing to remember when painting a rusty metal shed is NOT to do it in late July in South Texas. Just stay inside, enjoy your air conditioning, and wait till Fall.
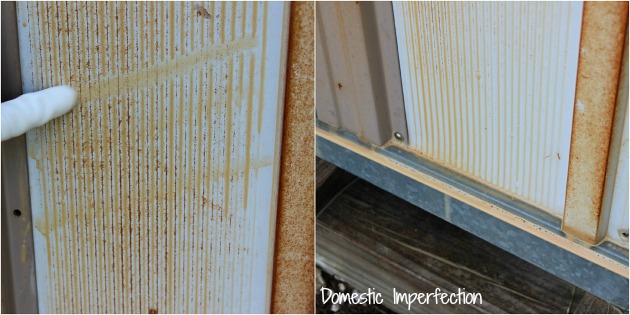
The second most important thing is prepping the surface correctly before painting. I’ve never painted rusty metal before and Google doesn’t give you a clear-cut way of prepping, but rather gives you about 47 ways you could do it and tells you not to mess up. Since my shed was only lightly rusted I decided sanding it wasn’t necessary and chose to wash it with TSP instead. I had never used it before but I’ve heard people sing its praises so I figured I’d give it a go.
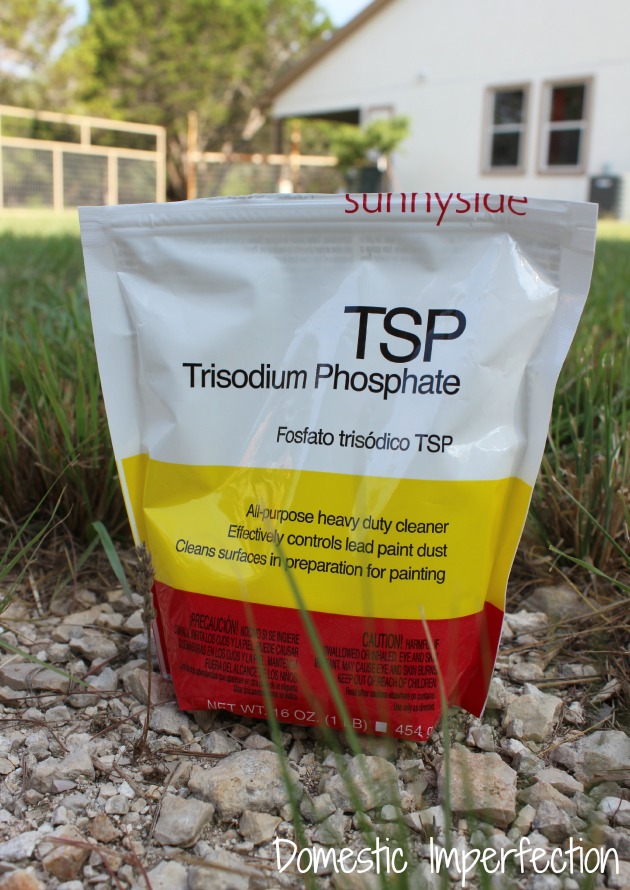
I’m now going to become one of those people that sings its praises, because the stuff is magic. MAGIC I tell you. It comes in powder form, you mix it with warm water, get to scrubbing, and the dirt and rust come pouring off. Literally.
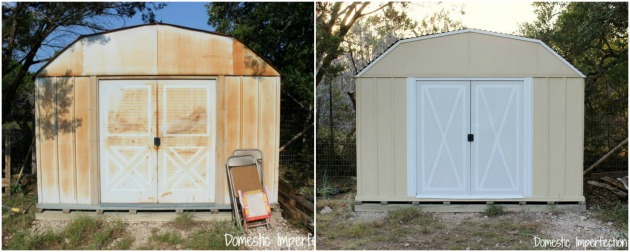
Here are some before and after pictures…
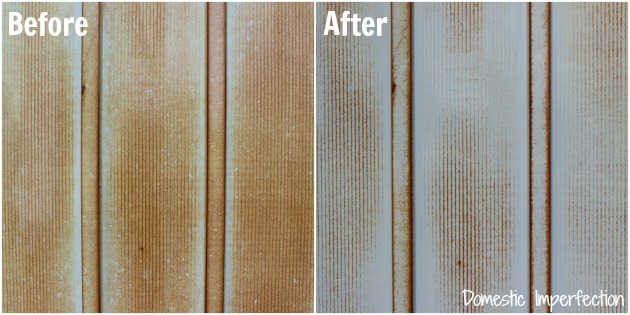
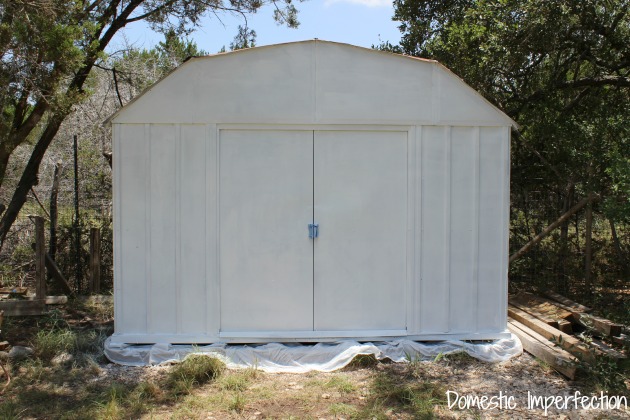
So much better already, right? I had other prep planned for the shed, but after cleaning it with TSP I decided that it was good to go.
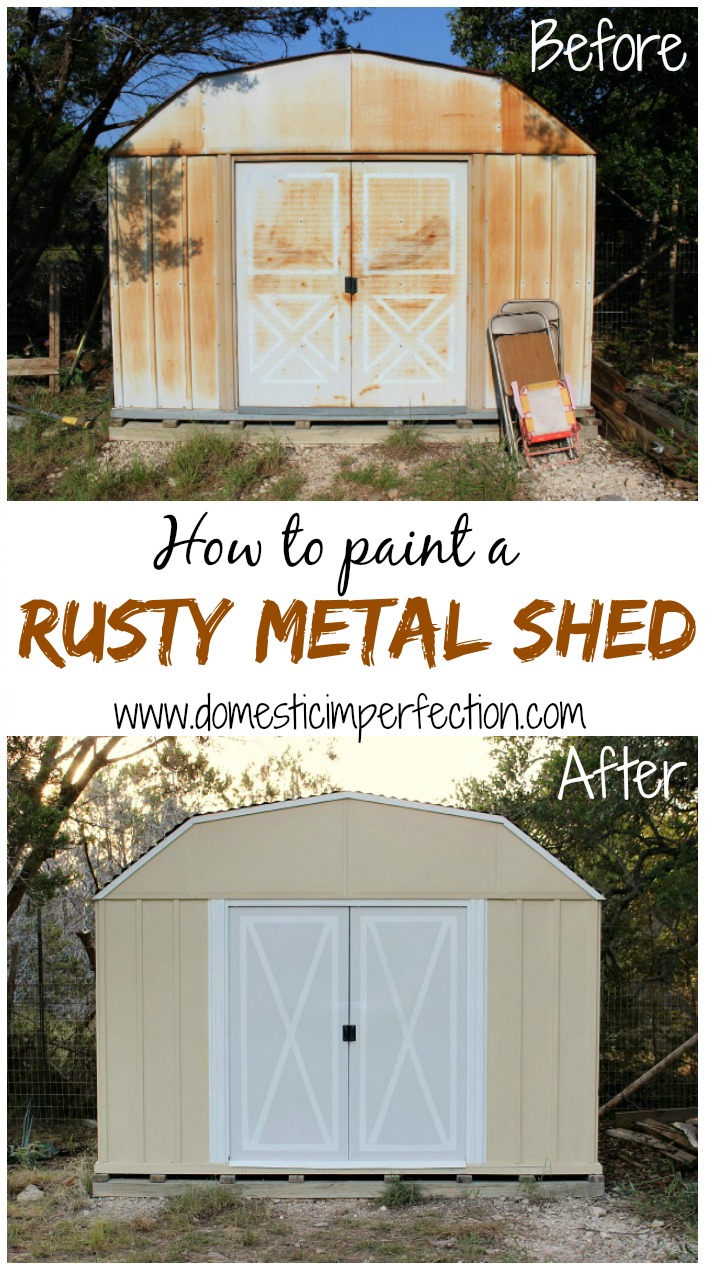
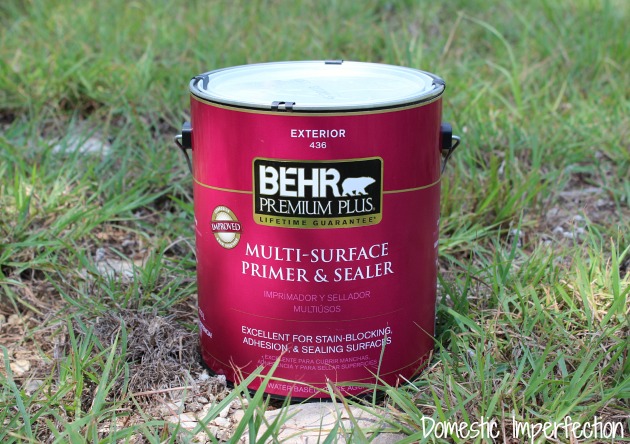
Next up was to prime the shed, I used Behr® Premium Plus® Exterior Multi-Surface Primer and Sealer.
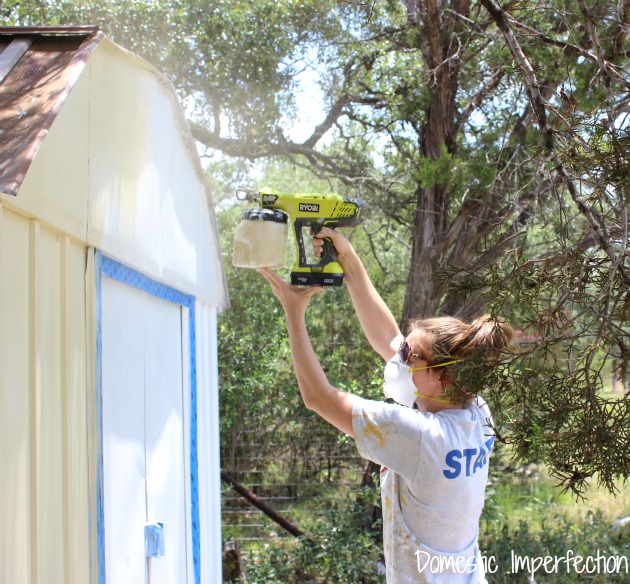
I also decided to bust out my paint sprayer. I had never used a paint sprayer before (so many firsts in this post!) and was hoping it would make painting the shed go really quickly. Also, my boys thought it was awesome. It looks like a gun and shoots paint…what’s not to like?
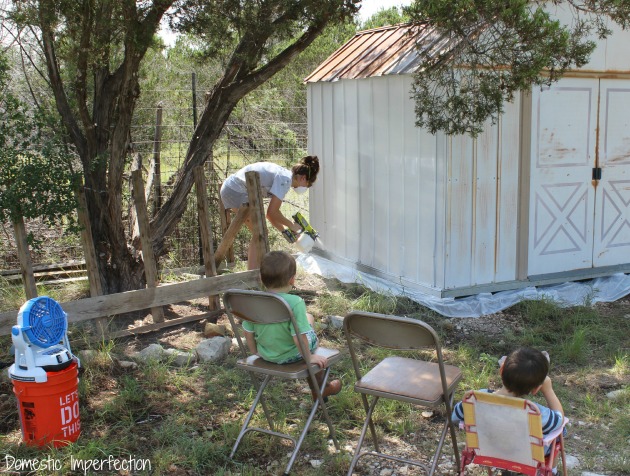
The paint sprayer was awesome. Seriously, it took me no time at all the paint the whole shed, and the finish was smooth and beautiful. That being said, there is a learning curve. I had no idea how much you needed to thin the paint (spoiler alert, it’s a lot), and I spent a lot of time cleaning and unclogging the sprayer.
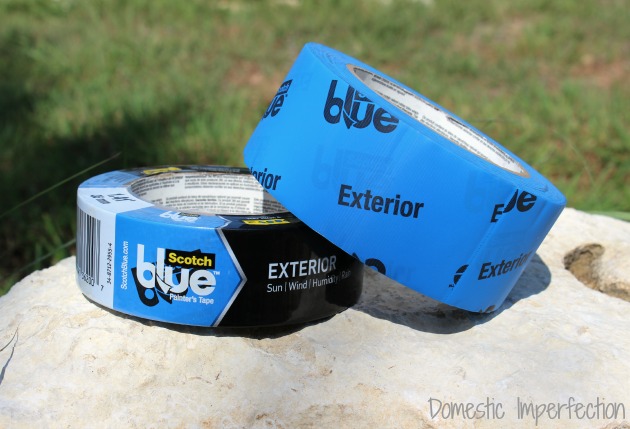
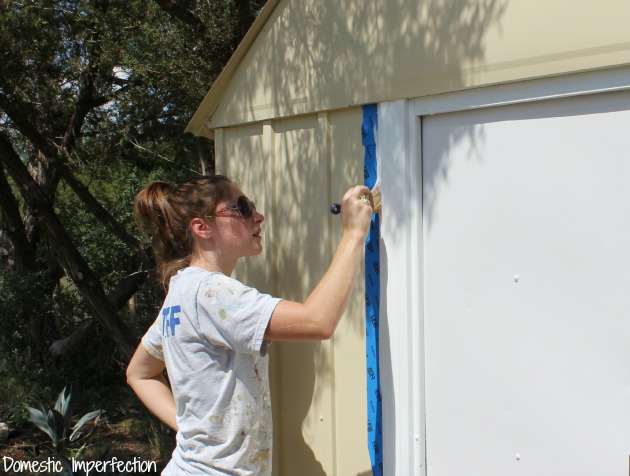
Next up was to prep the shed for paint. For this I used ScotchBlue™ Painter’s Tape for Exterior Surfaces and taped off the parts I wanted to keep white.
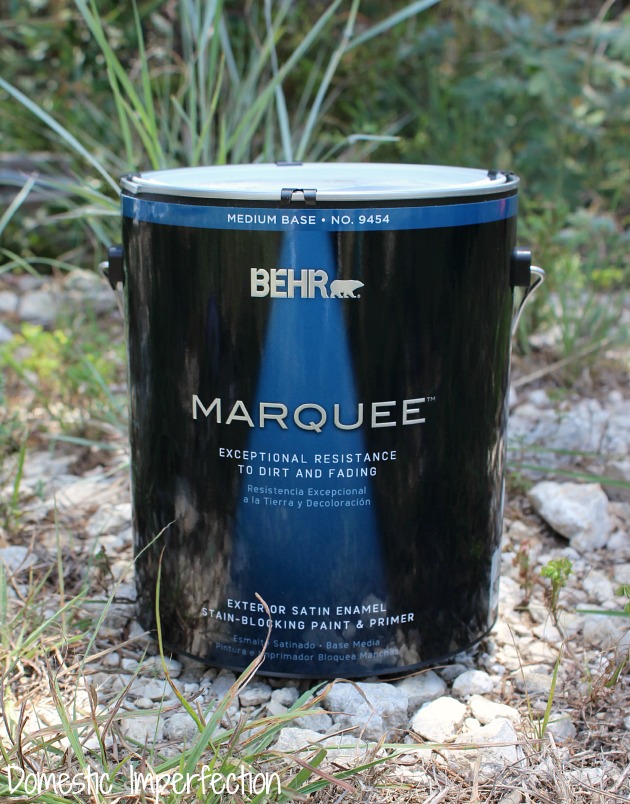
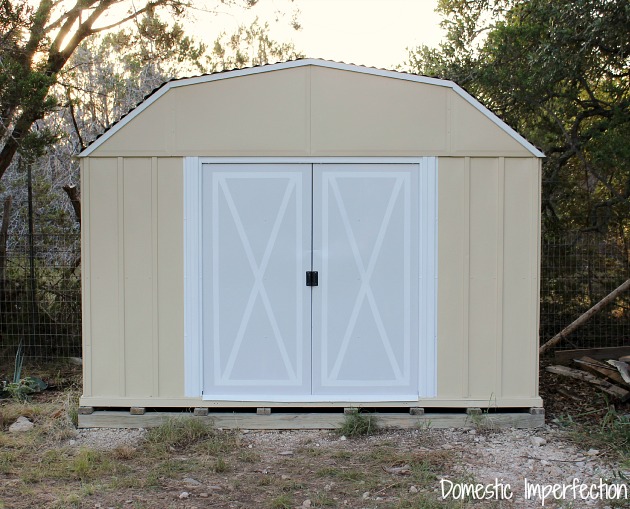
I used Behr® Marquee™ (in Oat Straw 740C-3) for painting the shed, which is meant for outdoor things that are going to get abused and ignored.
Then I got back to spraying.
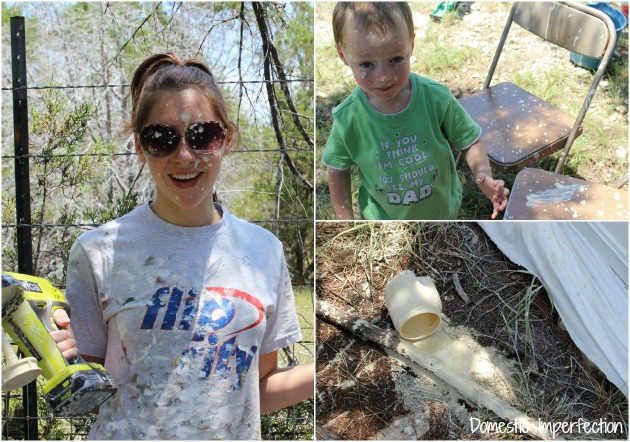
By this point it was mid-day and was getting really hot. The kinda hot where you wish you were naked… but also that you were wearing ALL THE CLOTHES so that the burning rays of sun never touch your delicate skin. My peanut gallery of preschoolers had abandoned me for dinosaur puzzles in the air conditioning. Smart boys. Not all that loyal, but smart nonetheless.
Oh, here’s another paint sprayer tip. Check to make sure that the paint container is locked on before you start spraying. Even if you think it’s good to go, double-check… you know, just in case.
After that I moved my tape, grabbed my favorite paintbrush, and painted the trim (Marquee™ Ultra Pure White 1850) and the doors (Marquee™ Subtle Touch 790E-1).
Then I called it a day, abandoned the outdoor inferno, and took my sweaty, paint-splattered self inside for a shower.
We weren’t finished yet though…oh no.
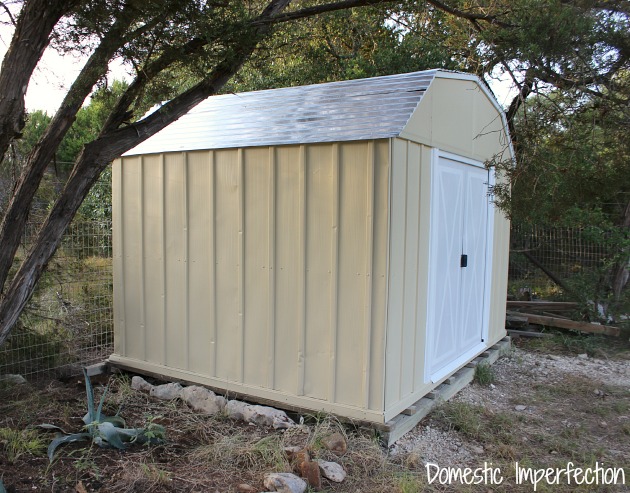
The next morning my husband got up before the sun to start working on the roof. The roof, you see, was really rusted…way more rusted than the rest of the shed. I had planned on just leaving it (or maybe painting it), but Adam decided it would be a good idea to replace it. “It will be easy” he said, “I’ll just buy some corrugated metal panels to replace it with.” Let’s just skip ahead to the part where I tell you this was NOT easy. As it turns out, roofs on metal sheds are quite structural. In other words, when you remove the roof the walls just kind of flop around and infuriate your husband.
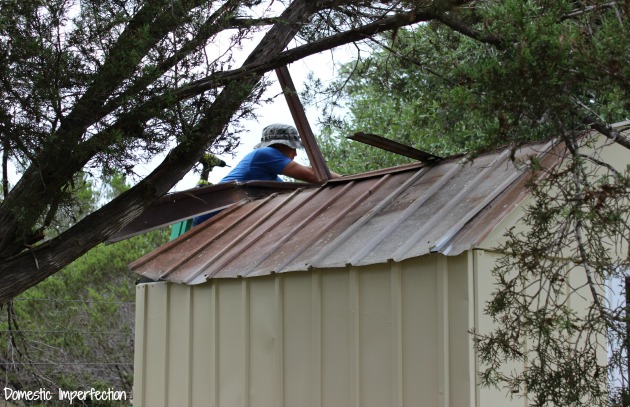
So yeah, the roof replacement turned my laid back husband into an angry cursing machine. And while I felt bad that it wasn’t going well, I was also thanking Jesus that replacing the roof was 100% his idea and not something I asked him to do.
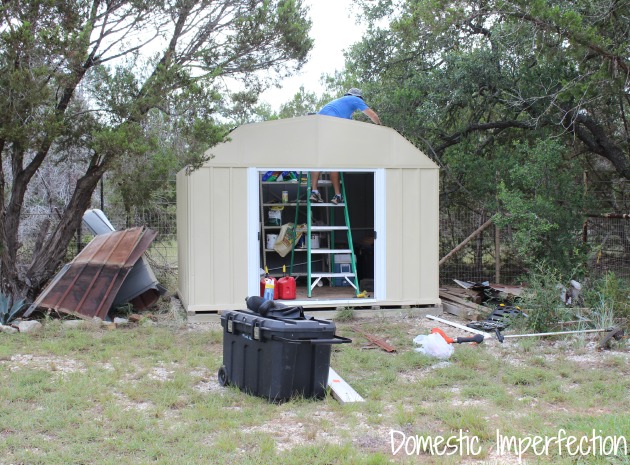
Eventually he got it on though, and we’re not going to have to torch the shed like he had been claiming was our only option.
Okay, last step for me to add a little barn flair back onto the shed doors. For this I grabbed my trusty ScotchBlue™ Painter’s Tape and an X-acto® knife. I eyeballed the design, taping off the X shape (door on the right) and then cutting out the extra tape (door on the left).
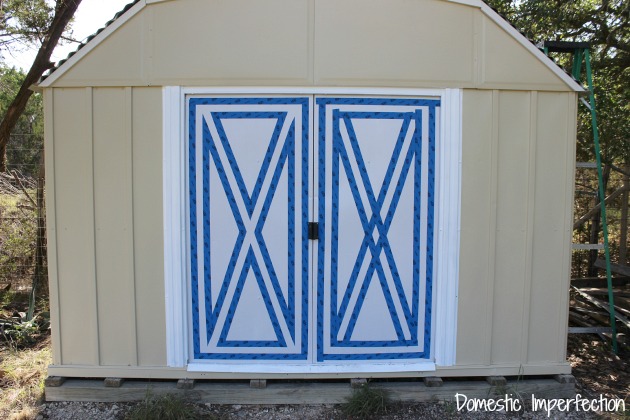
Then I painted the sections between the tape…
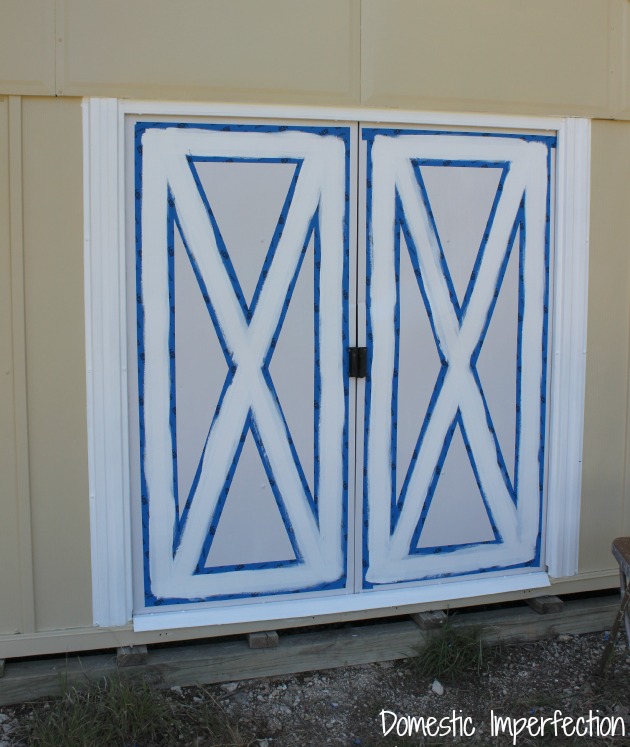
And before the paint was dry (very important!) I pulled all the tape off and admired my work.
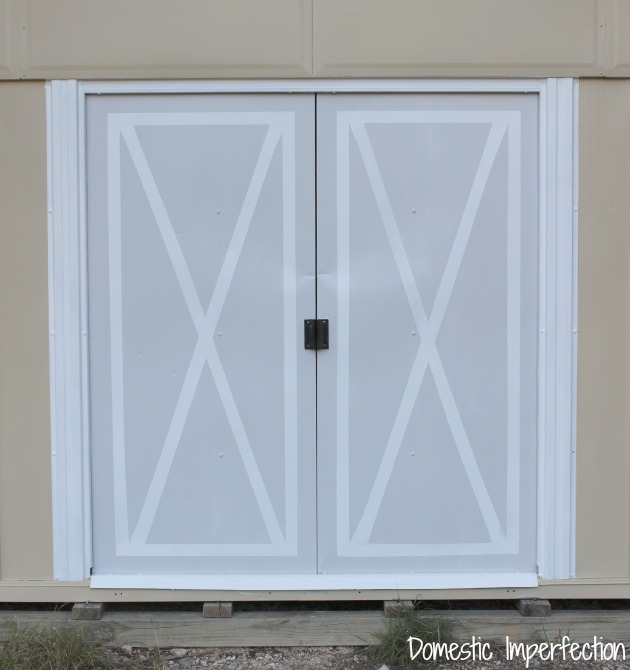
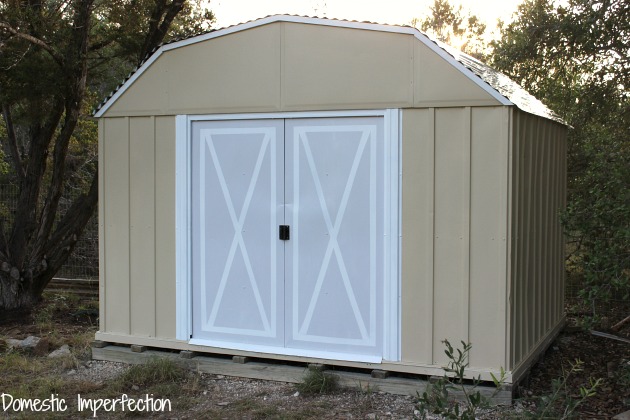
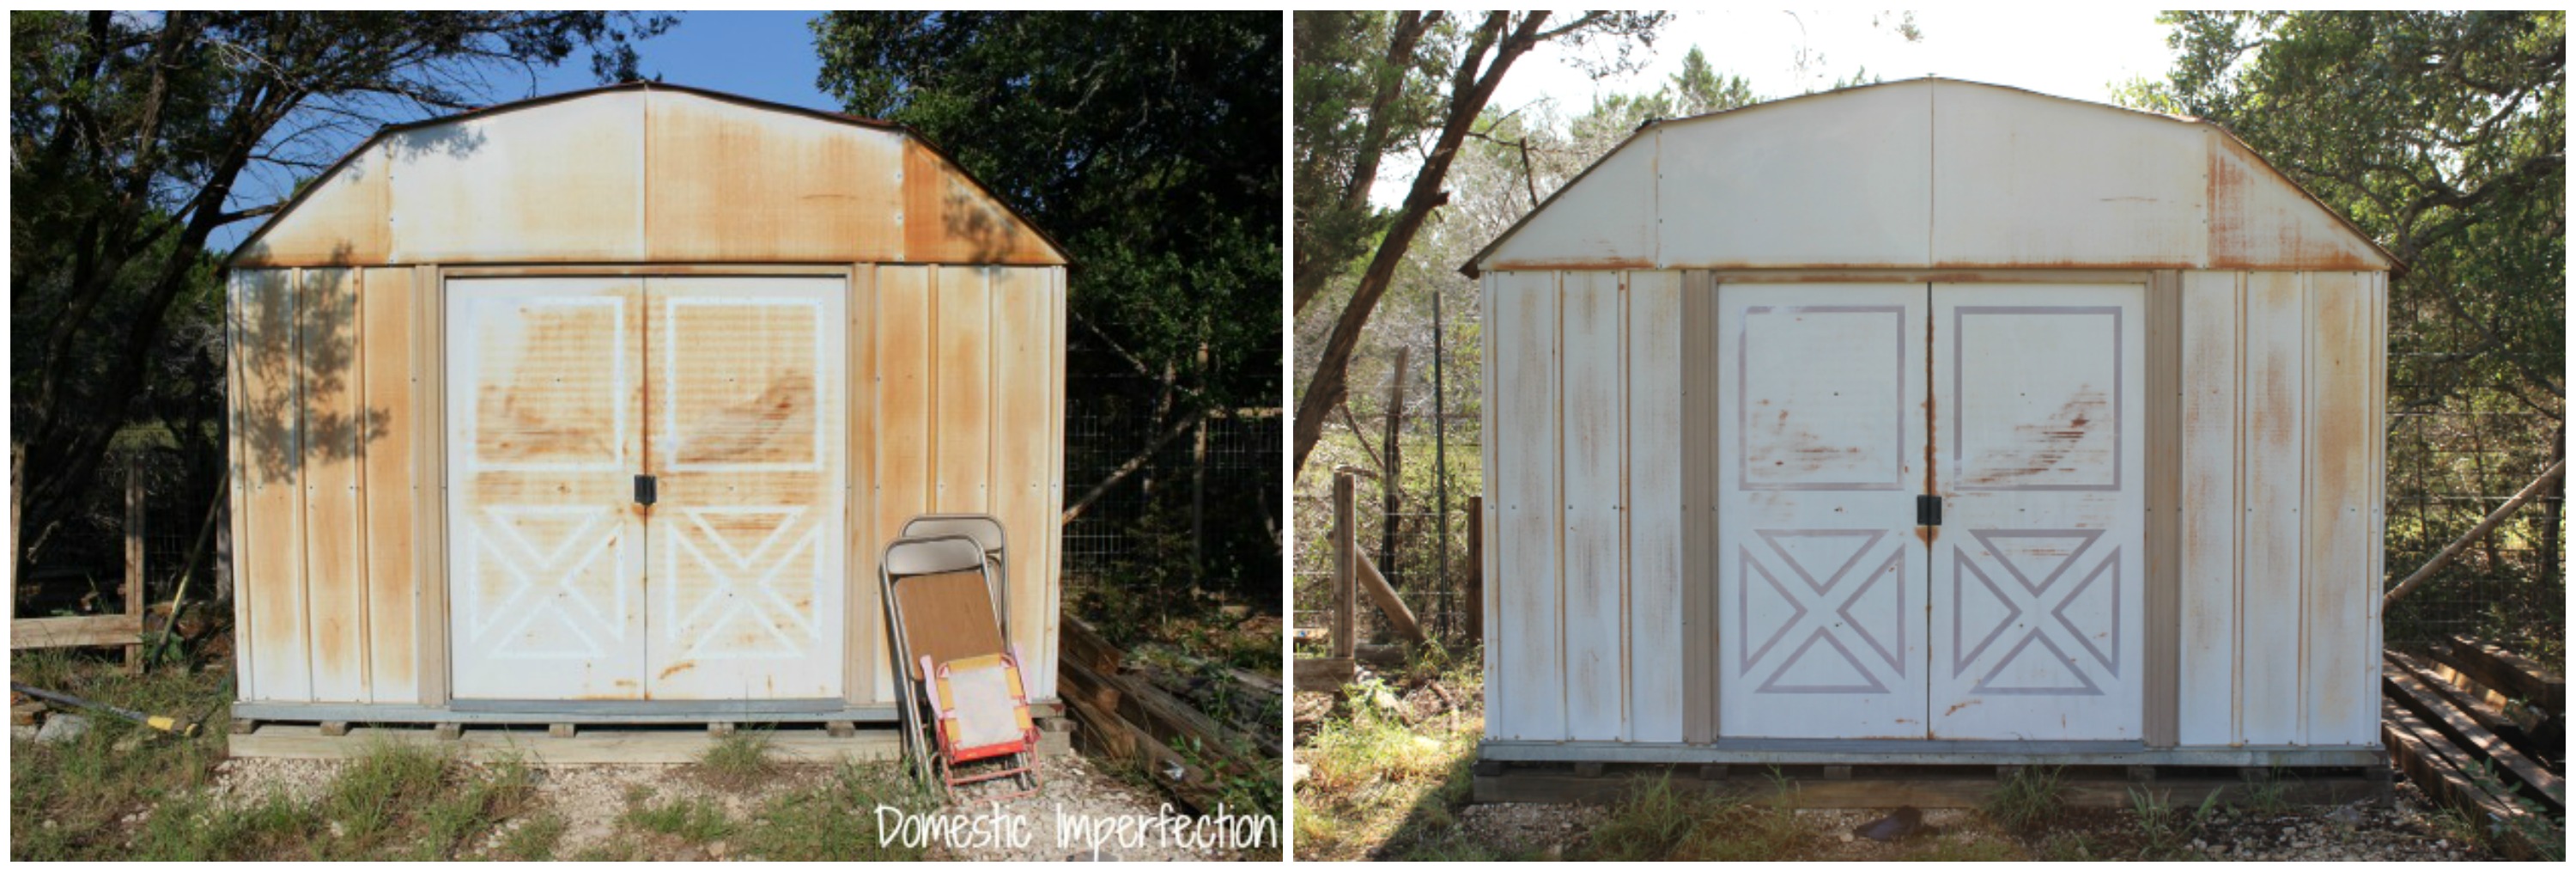
Now THAT is a painted metal shed. That is what a completed project looks like after years of avoidance. I have to say, it looks good…like really good.
Adam asked me very specifically to get a glamor shot of the roof, so here it is…
One last side by side, because that’s the best part of any project.
Update – I painted this shed in 2014, and it legit held up great. We sold the house in 2016 it looked exactly the same as it did in the after pictures. It’s now 2022 and I drove by our old house the other day, and this shed is still there and still looking pretty damn good.
Like painting things? Me too. Click here to see more painting projects!
WOW! What a transformation. The part about being glad the roof was not your idea made me giggle :)
Just what I was looking for! Thank you so much! Loved the way you showed the products and shared the fun details about your family! Great job! Beautiful!
LOOKS GREAT!!
It really looks awesome – your little guy was too cute with the splattered paint all over him (oops!).
I worry that water will be able to get in during a heavy rain, especially since there are virtually no overhangs. Not that we ever get rain. It really looks awesome – your little guy was too cute with the splattered paint all over him (oops!).
We just moved into a home with this exact same shed in the backyard (in the before pictures, that is!) You did such a great job painting this, I need to show my husband and try to convince him now. I’ll have to take some tips from your husband on how to persuade someone to paint a shed!
We used a spray-on product called Rust Reformer….which eliminated the need to sand the rusty metal. We were able to paint over it after that, and it’s holding up well…three years now :)
Ah, the angry cursing machine – best medicine-staying AC with dinosaur puzzles.
I hate to ask this, but are you sure the roofing material is put on the right direction and won’t leak? With the grooves running side to side, I worry that water will be able to get in during a heavy rain, especially since there are virtually no overhangs. Not that we ever get rain….
We never do get rain, do we? I’ve basically stopped going outside it’s so hot, and most of my plants are crispy and dead. To answer your question about the shed, no, we aren’t sure it won’t leak. It probably will to be honest. Taking the original roof off was a really bad idea (sorry baby), but at this point it is what it is!
I was thinking the same thing.. even if it doesn’t leak, with every little bit of moisture and dust that collects on those horizontal ridges will surely see more rust on the roof, than if the sheet metal were put on like the original.
That said, i don’t think it’s a terrible thing. I mean your talking years down the road, and if you look at it right, it’s just another painting project for someone to do in 20 years. “A busy person doesn’t have time to be unhappy”.
I think it looks great and the write up had me laughing and sharing to everyone I know. And I just came here to get ideas on painting rusty sheet metal.
This looks great! I have an old wooden shed that needs paint and new doors built, but I have not been brave enough to get out in the Texas heat – October will be soon enough to get to it :-) By the way, I hope you kept the old rusty metal roof material – I’ve see super cool projects done with it, and have one in mind with my own old rusty tin roof: build raised bed planters with rusty tin sides.
this is a nice way to paint metal shed. paint sprayer plays vital role in painting.
Wow ,beautiful job ,i would like to do the same may be i will have to buy a spray painter like you .At all ,you apply very well every product and the roof looks pretty good !
We just moved into a home with this exact same shed in the backyard (in the before pictures, that is!) You did such a great job painting this, I need to show my husband and try to convince him now. I’ll have to take some tips from your husband on how to persuade someone to paint a shed!
Great job :) I have a shed like that too, and it spoils my view ;) I will painted using your advice. Thank you.
that was a very nice job.. I am actually buying one off craigs that I was skeptical about until I saw your project.
thanks for posting.. :)
Ashley, what an amazing work that you and your husband did on that shed. How much paint and primer were used for that shed? Looking at the pictures of your project it reminds me about doing something similar on the metal buildings that my father has in his backyard especially the shed like one.
that shed looks good as new! i’m glad you used a handheld paint sprayer, however one tip i do have from being a professional painter for many years is, invest in a very good quality sprayer like one of the ones on here http://easypaintsprayerreviews.com/graco-paint-sprayers/ . with these ones you dont need to thin products which saves time and the quality of paint, you will also never need to buy another sprayer in your life!
I love spray paint!! I do wish there were a wider range of colors. I’ve learned to do several very light coats to avoid drips.
I know that it can be hard to paint rusty metal. I’ve tried doing it a couple of times and it hardly ever works out like I want it to. However, you seem to have mastered the art. I like how you mention a specific time to do it. I can see how that would make a difference!
Thank you so much! I actually used your blog as a guideline for my shed (which is actually like yours)!
Thank you so much for posting this. We have the same shed. It came with our home and is such an eyesore. I have been meaning to hire someone to work on it but now I think my husband and I can tackle it. We won’t be replacing the roof though. How long ago did you update your shed and how is it holding up?
Love what you did with the shed! Inspired me to paint mine this summer. Just wondering how much paint you used to paint the shed with?
Wow! Such a great metal shed transformation! The after is beautiful. Your hard work paid off! Is the paint still holding up nicely?
Great job. I would like to know how this has held up also because have a rusty metal shed to paint. I want to use latex primer also.
We sold that house last year, but when we did the paint on the shed still looked great. I have to admit I was surprised how well it held up.
Thank you for your reply :) I am going to do this soon. Glad to know the latex primer worked out!
This gave me hope. My rusty shed is in need of paint badly. These steps will help for sure. Thank you.
Amazing! how a rusty shed turn into a lovely shed it doesn’t look like it that it came from your parents.I really like the colors you did a wonderful job.I will try to look those materials that you are using in our local store.Thank you for sharing
Looks 1000% better, great job!! Now can you come paint my shed?
This was great! I’m in south central Indiana and will wait for the cooler weather to begin, but I’m inspired that I can paint our rusty shed! I might keep the roof :) and try to paint that, too. Again, thanks for the post! Now I’ll explore the rest of your site!
Definitely keep the roof!
Loved your story and it turned out great! I laughed at the commonality of our husbands. Thanks for teaching me to see the humor in it. love the doors!
Wouldn’t it have been cheaper and easier to buy another Shed? Home Depot $279.00 with out 15% discount .
Wow that looks great! Thanks for the great pictures and step by step process. I have a similar problem with my shed and am planning to repaint it and re-roof it. How’s yours holding up? Any rust yet? As for the roof replacement I was planning on running the ridges the same way as teh original (vertical) so water drained off correctly, but recently found that that will probably be more difficult since I’ll have to make multiple cuts and overlap them cover where the roof changes pitch. I see with the roof replacement you opted to just run the ridges the opposite way, how’s that working out? Any water pools? Doing it your way would make my roof replacement project way easier I think.
Thanks,
Amber
I’m about to tackle the same Endeavor oh boy here I go wish me luck LOL
I have a shed just like that, and I’ve been painting it for years. But I never really figured out how to do the middle of the roof. The metal seems too flimsy to climb up onto t. I just get spray cans of rust-ol-um, and get it the best I can. It’s probably not very clean when I paint it either. Can you give me advice?
Thanks!
Kathleen Chojnacki
That’s Shweetness
It looks great! You did a very good job. Although I can’t help noticing all of the very specific products you were using. Particularly very specifically. Kind of like you were working on sales for a company! Lol but that’s ok. They probably paid for all your products to get the advertisement in.
What a great article. When I googled the subject I never expected to see my shed! Thank you for you hard work and joyful project. Can’t wait until spring.
This is great! Thank you for including so many details. I’m about to paint my metal shed and I’m using all of your advice. Before I go to the store to get everything I need, I do have a question for you. Why the water based primer? Everything I’ve read on the internet said oil based primers are best for metal. Please enlighten me or correct me if I’m wrong. Thanks so much!
Great idea- I’m going to do the same for my shed- your project came our so good !
Looks great. I have two sheds about 20 years old. After pricing new sheds I figure I can paint ours and live with it.
Thanks for the pictures and tutorials.
Great looking shed you have. And wonderful family.
Very good. What do you charge? I have to paint my metal shed too.
Nice story. I’m working on my shed in sunny California in August now. I started in July about a week ago. I have a corrugated shed with paint on three sides. Two sides were painted before 1985, the other side faces my ncighbor. So when she painted her house I remarked that I should paint the bare side of the shed since her front door faces my shed. I liked her trim paint and she says I have a gallon you may have. The back of the shed faces the woods – no one will see it and it’s not getting paint. I brushed it down with an old broom, I primed the bare side with Zinseer primer I had on hand and I’m finishing the painting with two coats of outdoor paint good for metal, wood, masonry and what have you. It is taking two coats. I have to get on a ladder and hang out over a drop off so I used a rope I tied with a boline on a bite. That’s a climber’s knot I have used in Oregon and Yosemite. Who would guess I need this know to paint. Bob tied it off so I could lean out over the edge and not worry. I only go up the ladder a few steps because I’m over 71 years old. It’s a dark taupe paint color which blends in well with our oak trees. Thinking about a climbing plant for her side (Bougainvillea or Morning Glory) and making a trellis from some wood we have in a stack next to the shed. .
Nice work! I also replaced my similar shed roof with corrugated steel panels, however, my old roof was in good enough condition that I could attach the panels to the old roof edges. No more leaky roof! I also found that my 30 year old Arrow shed’s frame had sunk down into the yard quite a bit which resulted in much of the floor wood having rot. So I also replaced the floor wood…but before doing that I put 88 – 1ft x 1ft x 1-1/2 inch thick concrete pads under the shed from front to back side to side. I did this by raising the shed off the ground a few inches using an 8ft long pry bar on an edge of the shed frame and placing bricks along the whole perimeter. Then placing the concrete pads one by one inside the shed. Of course before I could do that I had to dig the shed frame out of the yard which was the hardest part. As I dug I encountered literally hundreds of cicada nymphs getting ready to emerge form their 17 year slumber.
By the way, my wife was also a naysayer about this whole spruce up the old shed project…but I prevailed!
Take care, Chris
I think that’s fucking awesome and the only thing that’s been holding me up from pulling the trigger is the roof can you not get a ladder and use the same product on the roof as you did the walls? And it’s good to know that you guys could last through not doing it and doing it.lol
I have an old metal shed just like this one and I cringe when ever I look at it. This fix sounds do-able. Thanks for sharing expertise and product recommendations!
What was the total cost of your project?