
Stenciled Farmhouse Table + Country Living Magazine
Are any of y’all familiar with a little magazine called Country Living? Yeah, I thought so…in this crowd that’s like asking a toddler if he’s heard of something called “blocks”. So a few months ago I received an e-mail from Country Living asking if I’d be interested in working with them and Minwax on a project for the magazine.
Now most of the time it takes me a few days (or weeks, even) to respond to e-mails after I receive them. This one though…I was all over this one like white on rice. Like dots on dice. Like stink on…well, you know. I answered it in the flashiest of flashes.
They commissioned me (they even called me an “artisan”) to build a farmhouse table, stencil, stain, and seal it using Minwax products. Then I was to ship the table to NYC for a photo shoot at Country Living, and it would be part of a Minwax advertisement in the September issue (which comes out today!).
So today I’m sharing a tutorial on how to stencil and stain a table (which will also be featured on countryliving.com). I blogged about this process a couple of years ago (paisley table) and that post is still one of my most viewed posts everyday. I used the same steps for this table as I did that last one, only this tutorial is more in-depth and answers a lot of the questions I still get about the process.
Step One – First things first, you’re going to need a table. Adam and I (though mostly Adam) built one, but finding one at a thrift store or garage sale is a great option as well. If you purchase a table you will need to sand it down to raw wood before doing anything else. I’m not going to give you a tutorial on building the table, but we loosely followed this tutorial from Ana White.

Step Two – Gather your supplies for stenciling.
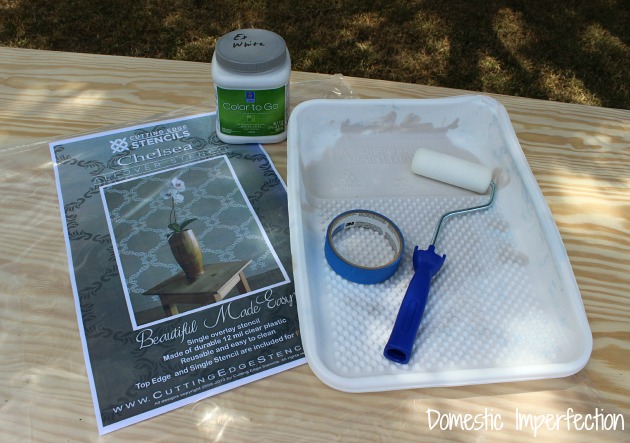
You will need a foam roller, painters tape, a paint tray, Sherwin Williams white paint in eggshell, and a stencil. I used the Chelsea Allover Stencil from Cutting Edge Stencils.
Step Three – If you’d like, tape off the edges of your table so that the stencil ends in a nice crisp line around the edge. 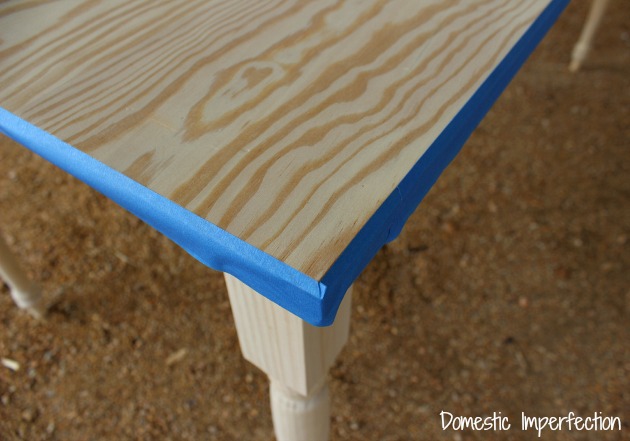
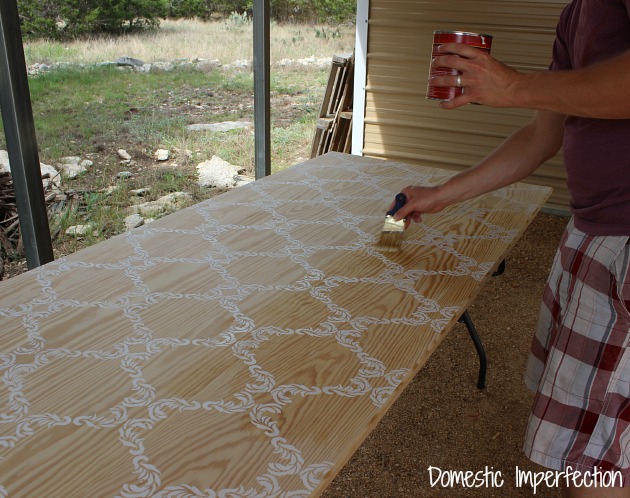
Step Four – Start stenciling.
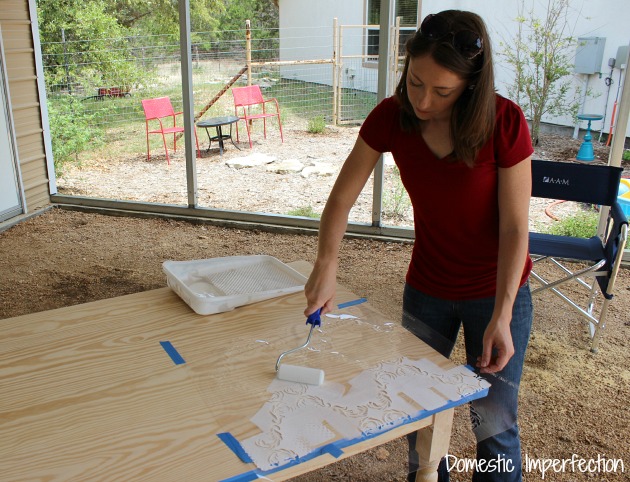
Before you start going at it with the roller you will want to make sure that the stencil is completely straight. If its off even a little the end result will be a crooked design and that’s just no good. With some stencils this doesn’t matter (like my paisley one), but with this particular pattern it did. After you have the stencil where you want it, tape it down and start stenciling. Just make sure there is very little paint on the roller…if there is too much paint on the roller it will creep under the stencil, mess up your design, and make you want to throw something.
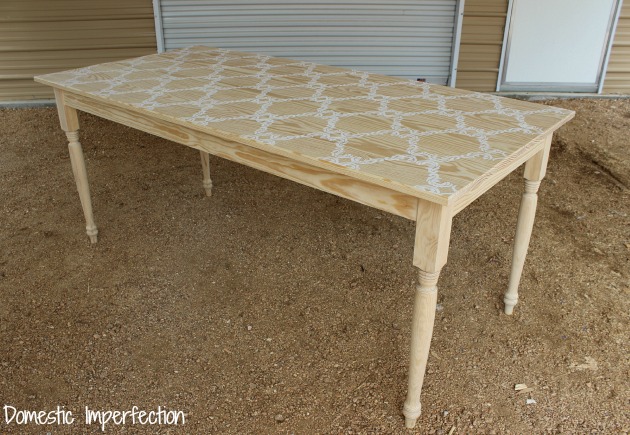
Step Five – Pull up your stencil, wait for the paint to dry, then continue stenciling until the entire table is covered.

Step Six – After the paint is dry you may want to give the top a light sanding to even it out. Don’t go crazy here, sand just enough to remove the raised edges left by the stencil.
Step Seven – Now it’s time to prep the table for staining by applying pre-stain.
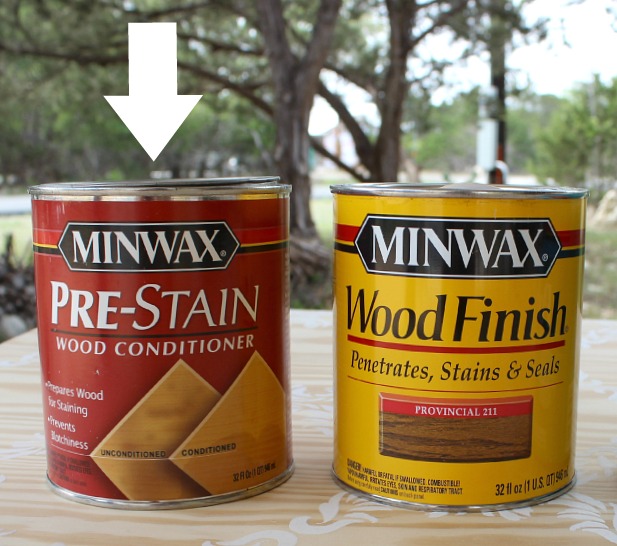
Pre-stain makes a huge difference and is very easy to apply…just brush it on and allow it to set for 5-15 minutes, then remove any excess with a clean cloth before starting the next step.
Step Eight – This is the scary step, staining over the stencil. Go ahead and stain the top, just like you would if you hadn’t just lovingly and carefully stenciled it.
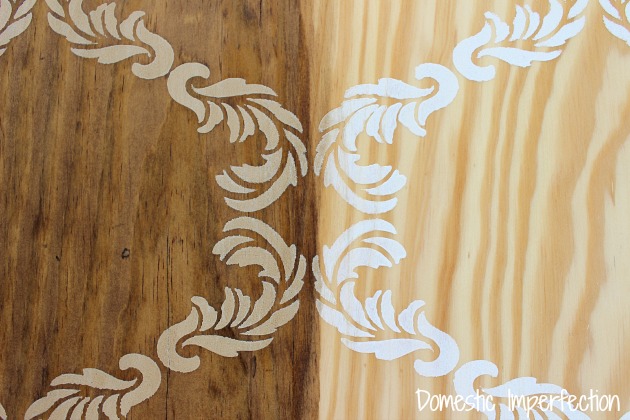
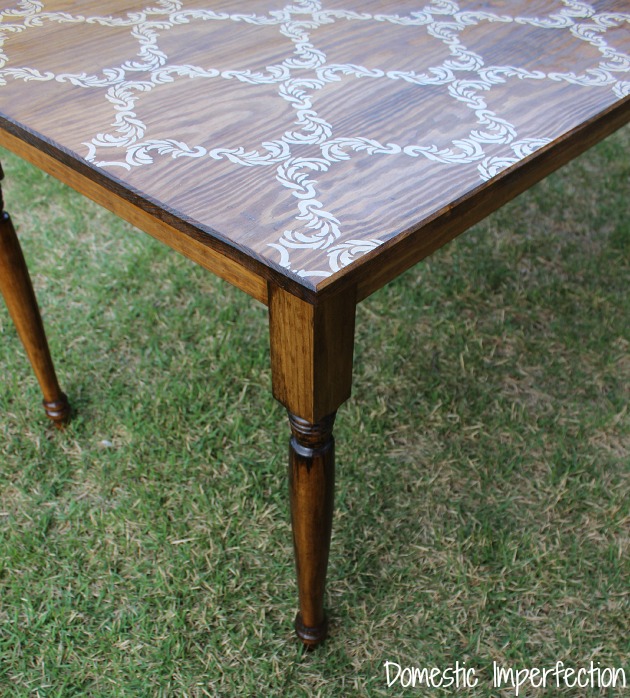
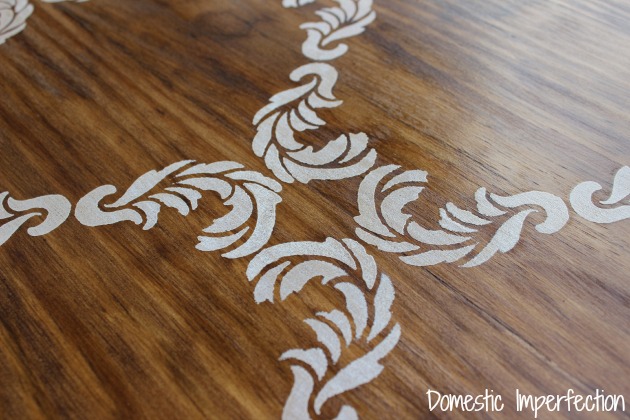
My husband brushed on the stain and I went behind him with a rag, buffing it off. Here it is halfway done, you can see what a huge difference the stain makes. I used Minwax Wood Finish in Provincial, but I also think this table would look amazing with a natural or gray stain.
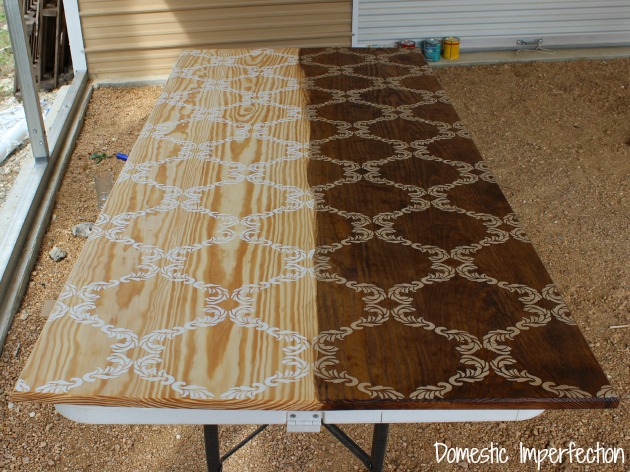
Here is a close up, you can see how the stain tones down the stencil. The type of paint you use will determine how the stencil looks after staining…if you use a flat paint it will absorb the stain and give a tone-on-tone look, if you use gloss it will reject most of the stain and the end result will be a brighter stencil. (I used eggshell.)
Step Nine – Seal the table. I used Minwax Fast-Drying Polyurethane, it’s an oil based sealer that is tough and durable. If you want something water based use Minwax Polycrylic, it’s easy cleanup and provides a crystal clear finish. Let the stain dry completely before adding poly. For best results give the table a coat of poly, gently sand it with 400 grit sandpaper, and add a final layer of sealer. This will give you a silky smooth finish.
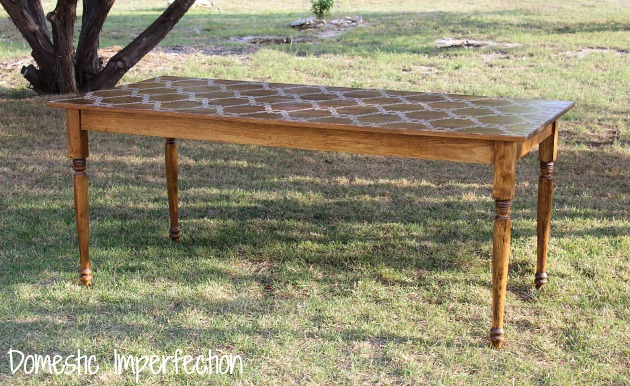
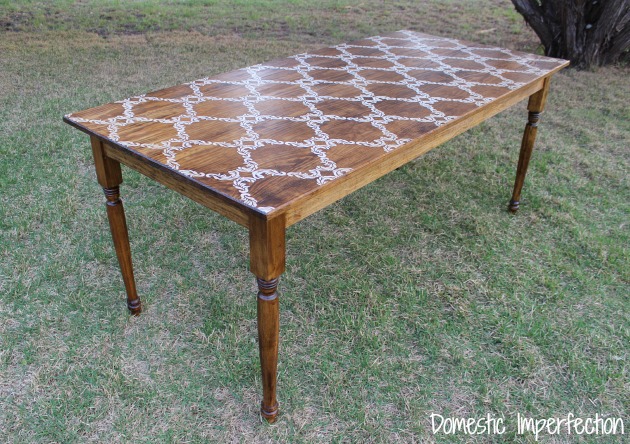
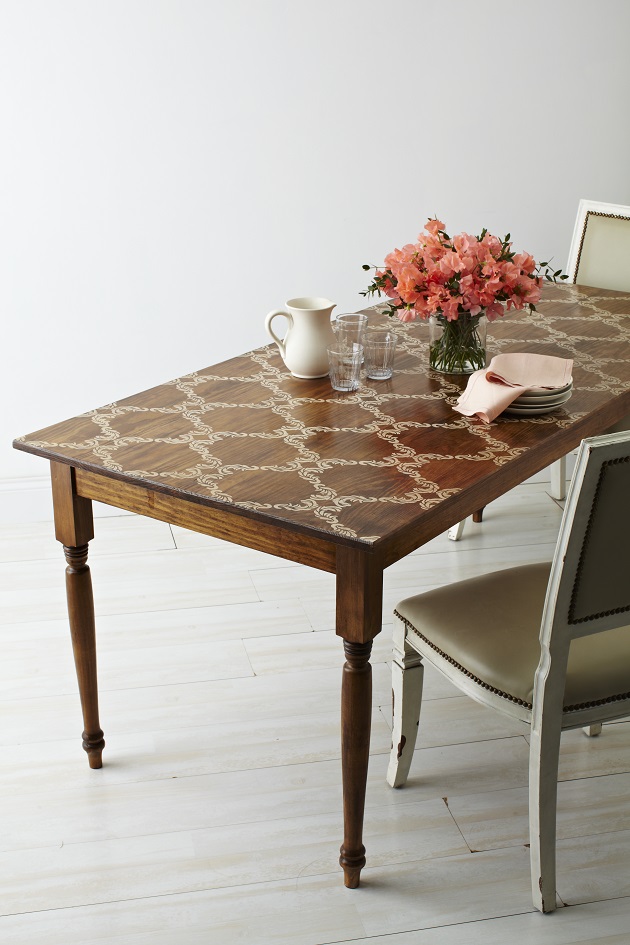
Here’s one of the photos Country Living took of the table…I daresay they’re a smidge better at photography and styling than I am.
So there you have it, how to stencil and stain a table (or anything wooden, really). Easy and beautiful! And next time your waiting in line at the grocery checkout, grab a Country Living and flip through it till you see my smiling mug in the Minwax ad!


Looks great! I love that you mentioned Pre-Stain Wood Conditioner. I don’t see it mentioned much in the DIY blogs I read, but I think it takes your DIY projects to a more professional looking finish. We use it at home in our projects and feel it makes a big difference. Love your blog and realness.
Very cool, Ashley, I get CL, and I can’t wait to see your work in there!
This is such a cool project! I don’t think I’ve ever seen a stenciled table before and I never would’ve thought this up on my own. I would’ve been freaking out with worry while applying the stain over the stencils.
This is gorgeous!!! And congrats on getting a spread in Country Living, my absolute favorite magazine!
holla! that is awesome!!! congrats!!!!
Congratulations. It’s a really beautiful project Ashley and it’s sure looks pretty all styled for the magazine. You should be very proud!! Congrats again!!
Congratulations on the magazine ad! You did a beautiful job on that table and your man did a great job making the table!
Really came out great. I am always on the lookout for something on a trash pile to play around like this with but stuck in condo and no space.
The table is beautiful! The stain over the stencil really makes a difference- I may have to try that sometime. ;) And congrats on the Country Living feature- I can’t wait to check it out!
I love how it turned out :) Great Job !
Wow this turned out really beautifully , Ashley! Definitely pinning for future reference…never thought to stain over a stencil. Love it and congratulations on your feature!
That is freaking awesome! You go girl! (and Adam too)
Wow, congrats, Ashley! What a nice opportunity! Your table came out great and looks beautiful!
Your talent, skills,creativity, and teamwork are amazing and inspiring. So proud of you both.
Beautiful Ashley. Really makes me want to redo our kitchen table :)
Country Living, too cool! I’m officially in awe. It’s like, the ONLY magazine I have a subscription to. You guys did a fabulous job on the table. I can’t wait to see the whole spread. Woohoo, you’ve hit the bigtime, baby!
Wow! Ashley congrats on the Country Living feature! This is so cool and I am so happy and excited for you! Y’all did a great job on that table as always! I will be sure to get me a copy of this issue too! :)
(((hugs)))
Cindy
Love this table and how it turned out. Shared on FB page today.
First of all, congrats – Country Living is much a fabulous magazine so I can only imagine how excited you were to be part of it. And I love your stenciled table – so beautiful and unique!!
Yay! Two of my Besties together- Country Living and your Blog! Well, now I know what went wrong with my counsel table top that I stained. I used primer (it’s white, right?) and it absorbed a lot of stain so it ended up tan. I didn’t mind the outcome but now I know for next time- cabinet and trim paint all the way!
Oh my word, girl! This is amazing!! I’m sharing on my FB page and I think I’ve pinned it about 10 x already ;)
Hugs, Jamie
Beautiful!! Congratulations!
The Pre-Stain Wood Conditioner should help keep the end (cut surface) wood from taking the stain so much darker than the surface does.
Hello,
I love this table. Do you recall the measurements of the top?
The Ana White link was 38×78. Did you do the same?
Thank you,
Cathy
Love this idea! I just have one question…Is it necessary to do three steps of “staining” for a small projects?? I am planning on making a welcome sign, only have the 2-in-1 stain and polyurethane…Would this be okay to use over top of paint?
Ashley, I’m stencilling a table that is already stained & has an old poluthane on it, But it’s in really good condition.What I need to know is how long do I wait to put another coat of poly on to protect the stencil. And should I lightly sand paper the stencil before the coat of poly or do that after the coat I put on.
Are you just stenciling over the table or also planing to stain? If you are just stenciling (which I would recommend, stain over poly would be a mess) then you don’t need to wait long to put poly over it. Just wait till it is dry (maybe an hour or so?) and you are good to go. As for sanding, you would have to be really really careful. When I sand the design it os over bare wood, if your table is stained THEN stenciled you are likely to sand through the stain and end up with a blotchy looking table. If your stencil is pretty smooth to the touch I would skip sanding completely, and if not I would probably add a layer of poly, lightly sand, and add a final coat on top of that.
I’m just stencilling over the already stained & varnished table. So perfect thanks for your input. This will be easy. It’s a table that was originally my parents so it’s about 40/50 or so years old. I think my older sister may have sanded & stained it a few years back. So now my daughter wants it and I thought I would surprise her with a stencil and redo on the poly. I was originally going to do the whole thing, sand and varnish but a friend of mine who has done this before said… “ya know it’s its in pretty good condition” So I took a better look at it in the sunshine and thought the same thing.
I thought maybe sanding it was because it was raw wood so that’s good to know.
So if it turns out good would you like a picture of it just so you can see? Thanks so much for getting back to me. I’ve never done this before so I’m a bit nervous. So if I put the stencil on with paint and I don’t like it what’s a good way to get it off?
I’m thinking of doing this on a table but with a tree branch stencil that I’d like to overlap slightly in various shades (one light like yours but also a bronze metallic and darker tone). Do you think the darker tones would show up under the stain? Should I lightly sand after each stencil application or once all three are done? I’m new to stenciling and a novice stainer of tables….