
9 Painting Tips & Tricks that Make the Job Easier
Some women have a lot of shoes, others prefer to spend their hard-earned money on nice purses. Some collect kitchen gadgets, books, hours at CrossFit, or cats. Me? I collect paint. My entryway closet holds all my painting supplies and is currently home to nearly eighty cans of paint, stain, sealer, and spray paint. I know, ridiculous…you don’t have to tell me. My point is that over the years, I have learned a lot about painting and have some tips to make painting a room easier, faster, and less messy!
9 PAINTING TIPS & TRICKS TO MAKE THE JOB EASIER
1. Skip the tape

Painters tape is great for a lot of things, but when it comes to painting a room painters tape is basically the worst. It takes forever to tape a room and you have to use a lot of it. If you have textured walls and ceilings (like I do), then forget about it…paint is going to leak under it anyway. If you have a steady hand (and even if you don’t) I recommend skipping the tape and using a good angled brush instead, (this one is my absolute favorite) this not only gives you more control but should save you a ton of time (and money).
2. Always get the stubby brush
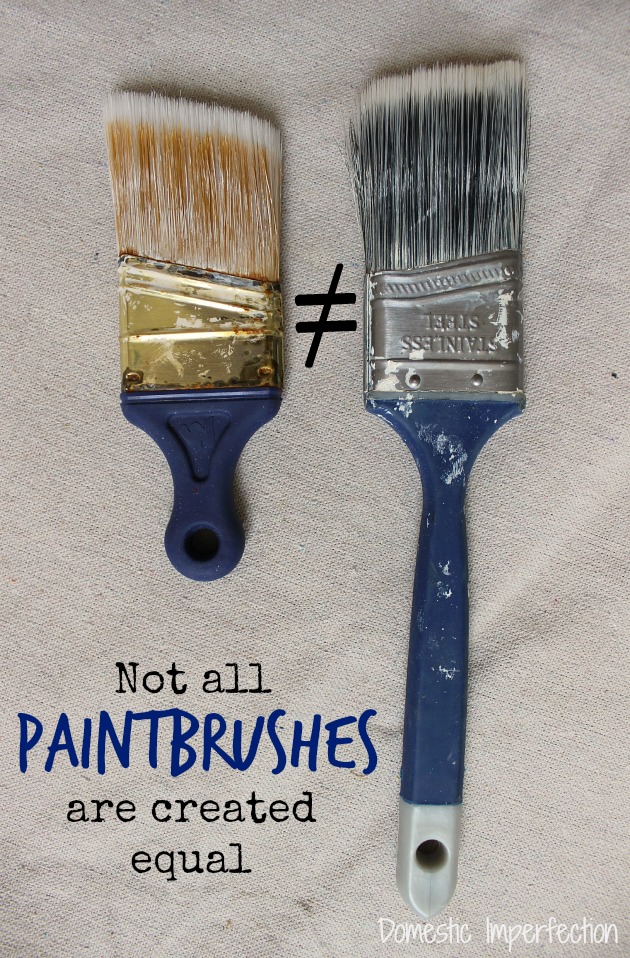
The type of brush you use when painting actually makes a huge difference.The cheap ones don’t give you a smooth finish, plus they shed like mad and leave behind bristles as you paint. I’ve tried pretty much every brush out there and my absolute favorite is this one by Wooster. There is something about the stubby handle that makes using it incredibly easy. The angle is perfect for cutting in and the bristles are good quality. It’s the only brush I buy now (unless I’m using an oil based product, then I use disposable foam brushes). Also, it’s great for getting into tight spaces, like when you paint furniture.
3. Use Floetrol
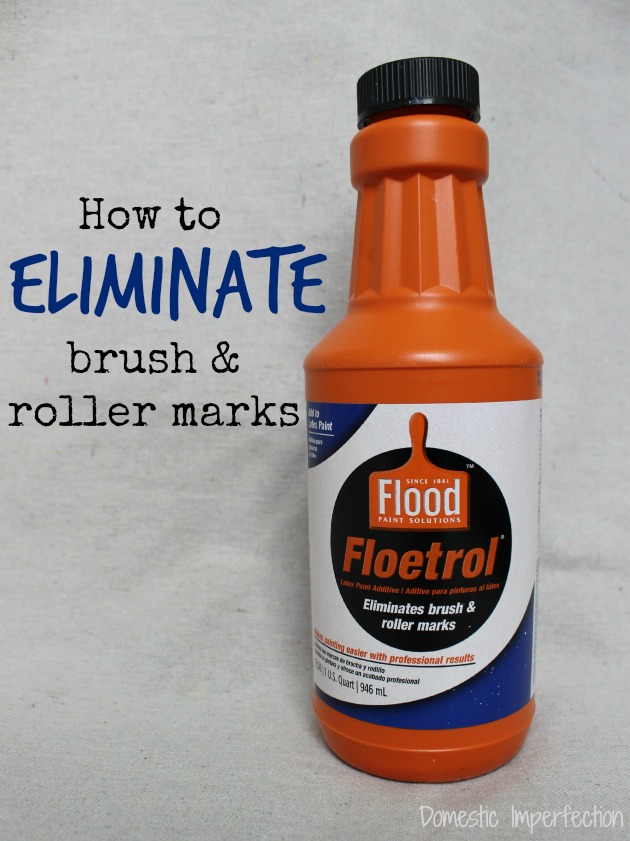
This tip is actually more for painting furniture, trim, and cabinets than walls, but it’s so good I can’t not include it. Floetrol is a liquid paint conditioner that extends the drying time of latex paint, which all but eliminates any brush marks and gives you a perfectly smooth finish. It’s fantastic. Also, it’s cheap and easy to find. It’s a must have for any DIYer.
4. You’re not too good to use a dropcloth
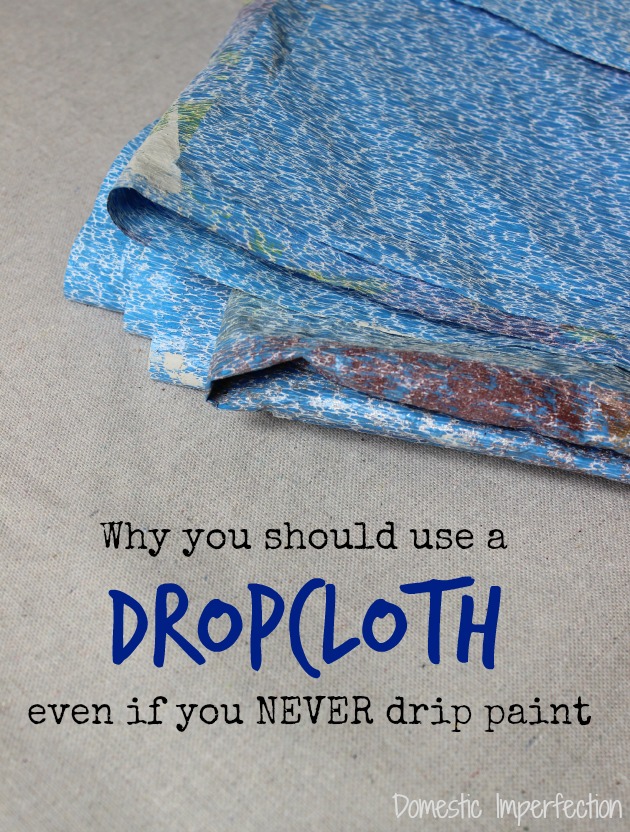
I like to take shortcuts. I like to start projects without doing proper prep work, just because I’m want to paint a little bit of my new color to see what it looks like…which of course morphs right into full-fledged painting. Using a dropcloth is not something you should skip though. Even if you have a wet rag to wipe up drips or never even drip at all, you still need a dropcloth. Reason being is that when you use a roller, each time pull it across the wall it spins and sprays teeny tiny flecks of paint all over your floor. Trust me….I have a few speckled floors and a speckled countertop. Proof…

These teeny paint flecks are so small you would never even notice them…that is until you notice them, then you will never be able to unnotice them and they will drive you crazy. They don’t come off easily either, or at all in my case. So save yourself a headache and use a dropcloth.
Also, while we’re on the subject, here is another reason dropcloths are important. Back when my husband and I were newlyweds we lived in a teeny tiny apartment in northern New York. One of the first things I asked when looking at the apartment was if I was allowed to paint the walls, to which I received a very quick “NO, absolutely not.” So later that week Adam and I are in our new apartment, painting. It’s cold and snowy outside and I’m wearing my usual painting clothes and a nice thick pair of winter socks. We’re about finished with the first wall in our new (carpeted) living room when the phone rings. I dash across the room to the phone and step directly into the paint tray with my super absorbent winter sock. I made it a couple of steps before I realize what happened, at which point I freak out, hop around on my clean foot, and fall to the ground, slinging paint from my sock sponge the entire time. Adam couldn’t decide if he wanted to laugh or be completely horrified…luckily it all happened over a dropcloth so laughing was an acceptable reaction. Anyway, this is another reason to use a dropcloth, since I’m sure this same scenario plays out in living rooms across the country. (This is where you nod your head in agreement).
5. Put your paintbrush in the fridge
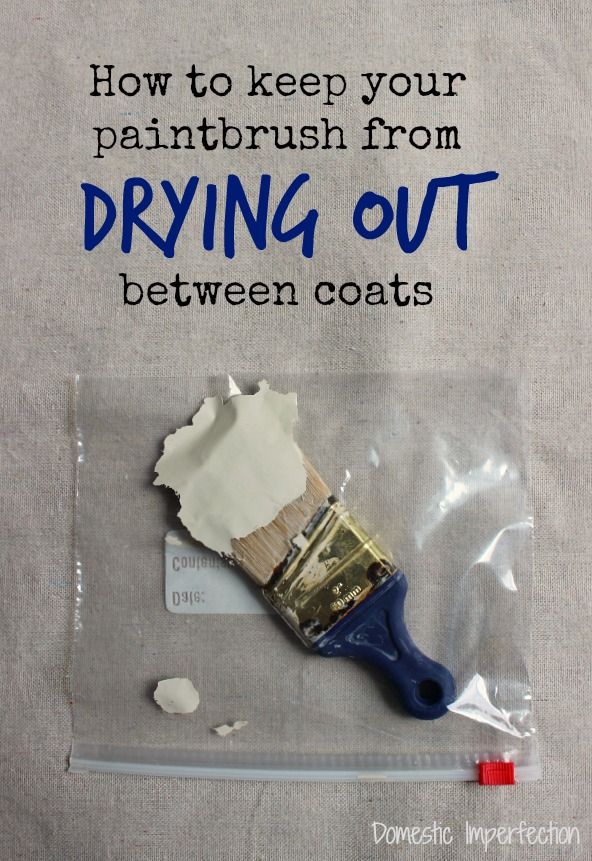
If your life is anything like mine, then painting happens in about five-minute increments over the course of a week or so. It seems that as soon as you get your rhythm and start making progress one of your kids needs a snack, or a drink, help going potty, or a full-on brawl breaks out over a pencil or a rubber band or something else completely ridiculous. When this happens you have a few options, you can wash out your brush and help your kids, ignore your kids and hope that yelling orders/threats will suffice, or put your brush down and hope you get back before it dries out. That is how painting worked at my house until I was reminded of a trick I used to do… put your brush in a ziplock bag and put it in the fridge. You can put it in there for up to a week and it will be perfectly usable. This saves SO much time (and paint). You can also use this trick with rollers, just wrap them in saran wrap or put them in a grocery bag with a rubber band around the handle.
6. Line your paint tray with tin foil
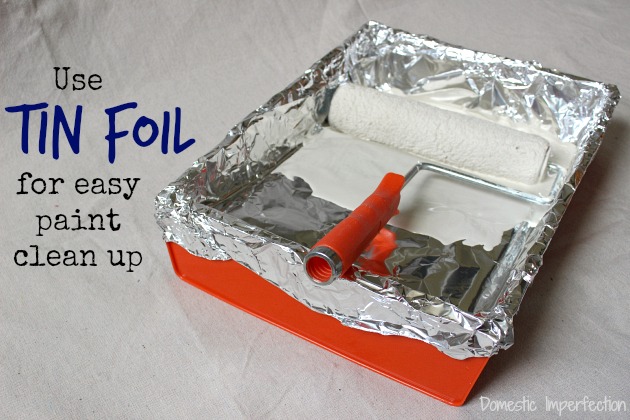
Here is another tip for easy paint clean up…wrap your paint tray in tin foil before pouring in the paint. Then when you’re done you can just ball it up and throw it away. I’ve also done this with trash bags, but I prefer tin foil since the bags tend to move around a lot.
7. Paint can lids with spouts are amazing

So you’re all set to paint your room. You crack open your paint can and pour the paint into your paint tray. Instantly paint is running down the side of your paint can and also fills the rim. You know you can let the paint sit in the rim or else you will never get it closed, so you run your finger around the rim, causing more paint to drip down the can. “whatever” you think “let’s just paint already”. When you’ve finished painting one of two things happen…either the paint left in the rim is still wet, and when you pound the metal lid back on the wet paint comes flying out and splatters on your face, OR the rim paint is dry and you spend an embarrassingly large portion of time trying to dig it out with a screwdriver so that the lid will close.
I’m here to tell you, there’s a better way. Take three of your hard-earned dollars and buy a paint can lid with a spout. The first time you use it you will realize that your pre-paint lid self was an idiot. The red paint lids by Shur-Line are my absolute favorite because the spout folds down completely flat and you can still stack your 57 paint cans with ease.
8. Any color, any brand

9. Always buy a paint sample first
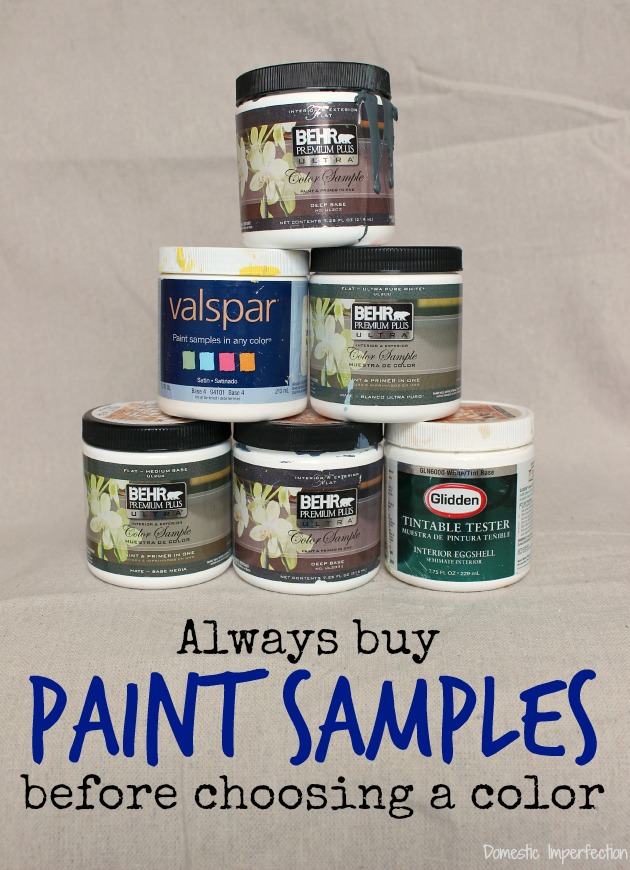
I don’t know why, but this has been a hard lesson for me to learn. I like to think that bringing paint chips home and taping them to the wall is sufficient, but you can’t get a true feel of a color with a teeny tiny paint chip. Samples are $3 each (at least at Home Depot) and are 100% worth it. That’s not all though…once you get the sample home, use the whole thing! Painting a single brush stroke will not give you a good feel for the color, especially there is already a color on your wall. I recently repainted the main hallway in my house and bought three paint samples, painted a small amount of each one in a few places, made a decision, and ended up hating the end result. Hence the reason I haven’t mentioned it on the blog yet.
So there you have it, nine painting tips and tricks that I learned the hard way. I feel like I need a tenth one to round it out, but I’m currently drawing a blank. I’m sure next time I paint I’ll figure out another one…that’s the way it seems to go around here. Anyway, go forth and enjoy clean, simple, frustration-free painting!
You may also like –


These are SO helpful!! I am a complete novice when it comes to painting. We just bought our first house, and all the walls. are. ivory. It feels like a hospital. So, I’ve got a lot of painting ahead of me. Thanks for the tips!
I feel you, when I first bought my house all the walls (and ceilings, and closets) were pink… it felt like I was living in a stomach! You will be a painting pro very soon!
I fully agree with the samples. I even tried to color match the samples with colored pencils and it was nowhere near right. Something you really want to be right on with the exterior of a Victorian home. Ironically, I just blogged about that today and ran into your post about of all things….paint. Small world.
Jeannie recently posted…..http://wp.me/p4crVx-a7
I do most of these things too! Love the stubby brush! The only thing I tape is around the floor under the baseboard (tucked a little under for carpet). Going to try the Floetrol, never even heard of it before.
I tape along the floor too, mostly because it’s smooth so the tape always works great.
You’re going to love Floetrol!
I, too, have fallen in love with the stubby.
Best. Paintbrush. Ever.
Thanks for the tips!!
Haha…stubby lovers unite!
I agree 100% with your brush choice. I have been telling my friends about this for years. First found it at Walmart. I taught a groom to be how to use the brush when he, his wife to be and I were painting their new house before they married and moved in. Best 6 bucks you can spend!
I live in Italy now, and every trip to the States I pick up a couple of stub bids. Two reasons, the don’t have ANY angled brushes, and I get hand cramps with a long-handled brush. They’re fantastic!! I never tape!!
*Stubbies
seriously, those paint can lids changed my life. lol.
Ashley, allow me to throw my 2 cents about painter’s tape and textured walls:
1. When I use painters’ tape, I run a small bead of caulk along the edge where the tape meets the wall, then smooth it out with my wet finger and roll paint over it immediately. Then, gently pull the tape before the caulk dries. You now have a truly perfect straight line. That’s for separating colors within the same room, creating stripes, ending one color on an outside corner, etc.
2. When I paint the walls and need that perfectly clean line along the ceilings, I run a bead of caulk all the way along the corner where the wall meets the ceiling. Smooth it out with wet finger (even though I have this special caulk.smoothing gadget). Let it dry completely. Now you have a smooth line that you can paint. Otherwise the line along the textured walls and textured ceilings never comes out good enough for someone with an OCD :-))))
I have tried Home Depot, Walmart and other cheap paint.. It drips more and does not give me that silky finish that specialty paint has.. Also if you check the label. You will see that the specialty paint like Sherwin WIlliams and Ben. Moore L & P have more pigments.. You do get what you pay for.. I have tried all of them.. but your other points were right on!
I completely agree, the specialty paints are better. For a lot of DIYers though those prices are out of reach…and I buy so much that I get Behr and have always been happy with it (especially the paint + primer).
I love Behr paint! I actually like it much better than Sherwin Williams.
I’ve never heard of the ceiling trick! My lines aren’t great where the ceiling meets the wall…they’re about as good as they can get, but there is just so much texture on both that it’s impossible to get a straight line. I’m hoping to cover it with crown moulding, but if that never happens your trick is a great alternative. I also do a similar thing with painting stripes and whatnot, but instead of using caulk I paint over the tape in the base coat color. Works pretty well!
I’ve seen this done with stripes and it’s awesome. But are you saying to tape the ceiling and add caulk to that? Not quite understanding your second tip.
One of your best posts to date! Thank you for all of your awesome tips! I have had to learn some of these the hard way, especially the painters tape, the drying paint brush, and cleaning the paint tray. I have been hesitant on using the Floetrol but you have now convinced me to give it a shot :) And I am going to go buy a stubby paint brush asap! Thank you for such an awesome post. I love reading your writing!
I NEED to try the stubby! I have teeny hands so I’m positive that would be perfect! I wish I had thought about the sample thing before I painted my kitchen 3 times! I finally ended up with a $5 can of oops paint that is perfect! You just can’t go wrong with dark purple! :) I did use the sample method with my living room though. Well the 2nd time I painted it anyway. :)
Yes, Lizz, get your tiny little hands on a stubby ASAP! Also, I’ve painted my living room and kitchen three times, my boys room, guest room, main hall, and master bath twice each! I’m not finished yet either. You’re normal…or at least as normal as I am…lol.
I was going to ask about the differences in paint types, #8, was it worth using cheaper paints but it looks like that got addressed by Fara and you. But, girl, I’m lovin’ all you shared.
Yep, going to Pin It so I Rember It!
Then I’ll need to Use It so I won’t Lose It.
Smile
P.S. Teeny Tiny Apt…..you’ve been doing this for a while hih?
Ashley, I feel like I’m living in your head! I have a tips for painting furniture with latex paint post (written in my head) and many of them overlap – – like the fridge trick and dropcloth. #greatminds But I definitely picked up some new ones, too! Like that awesome spout for paint cans? Gotta pick that puppy up during our next H.D. run. Love it! Also, your stories crack me up. Love your sense of humor, girl.
Thanks to you, I am now a stubby fan!!!
Great tips! Thanks!
Good idea to put 8 or 10 nail holes in the inner top lip of the paint can. This prevents paint buildup around the rim as it drips back into the can. The can lid covers the holes so there is so opening for paint to dry out. I don’t mind brush strokes on interior plastered walls with flats as it becomes part of the texture but no runs or drips. Don’t want brush stokes on doors , woodwork, cabinets and shelving though. I use high gloss enamel for these and enamel prone to brush strokes. I give a door a real quick light coat to make it a but sticky (don’t worry to cover completely, it does look sloppy) and while still tacky give it the finish coat. Worth investing in an extra priced 2″ and 4″ varnish brush to eliminate brush strokes too for enamels.
I don’t mind the extra time to tape some areas(not the ones you point out) because preparing the surfaces is 70% of the paint job. Latex does not stick well to oil based paint.
My local habitat restore sells un-tinted high quality paint for $10 a gallon (and I’m talking about super expensive Hawai’i here). Supposedly, I could take my $10 paint to my hardware store and they could tint it for me. Does anyone know if that is true?
Painting is all about getting the combination right with a bit of creativity. I hve tried painting walls several times but always messed up. I will try these tips and hope for the best result.
Ashley, these are great tips! I’m excited about trying the floetrol, and will definitely be buying a stubby. Good idea about the samples, too, especially the idea of using the whole thing up. I definitely need to do that! So many times I’ve bought the paint, gotten started and then not been quite happy with the colour, which is SUPER frustrating. It would be so worth the $3! Sometimes I guess I need things spelled out for me… ;)
Ha, girl, me too. I wrote the post and still have a hard time following my own advice!
Maybe the paint quality depends on which LINE you buy from a given store? My husband mixed paint at a specialty paint store years ago (back when they did it by eye and not by computer – he’s AWESOME with colors!) and later painted professionally for several years. We’ve never been disappointed with the paint we’ve bought from the “big box” hardware stores. Even colors he thought for sure would need multiple coats have been known to cover better than he expected. (We’ve not done furniture, though; just walls and trim.)
Also, even if you don’t have a stubby brush, you can still HOLD the brush that way – it gives much better control. Just in case someone already HAS a regular brush and doesn’t want/need to rush out and buy another. (Of course, if you just need an excuse to buy new tools…you definitely need a stubby brush. ;) )
I love my stubby! I too have made many poor color choices. I now paint my sample picks onto poster boards from the dollar store. Often cutting the sample board in half after its dry. This then makes it easy to move the samples throughout a room or from room to room. I have been, often times, certain I love a color until I move it to a different wall where it looks totally different. Also, this method allows you to place the samples right next to existing trim, flooring, adjacent room colors, or existing furniture giving a really clear picture of compatibility.
Love the tip on the poster board…doing it! I painted a large bedroom in a color I thought I’d love and it’s awful in there…ahhh we’ll.
Awesome! Question though- do you have any tips on what kind of paint to use on plastic? I want to paint the white plastic drawers (sterilite storage cart) that I got and then label the drawers with Vinyl, but I’m not sure what kind of paint to use that would actually stick.
Thanks!
I would try the Krylon Fusion spray paint made for plastic.
I love, love, love the stubby WOOSTER paint brush!!!. Also the paint can lids. I’ve been painting since I was a teenager and I’m now 62, you are never too old to learn new things.
One thing I just got was a small hand held plastic paint holder with a magnet in side to hold the brush so it’s not sitting in paint. I love it too.
These are awesome tips, I have tried painting but always lack in finishing touch. This tips will prove handy in my next painting project.
I totally agree about the paint samples. My boyfriend is always asking why I “waste” money on samples. Bought a few samples and ended up hating the color on the wall, so they’ve been a lifesaver! lol. I just used a sample for a DIY project last night. Gotta use them somehow!! :)
I have tried having Benjamin Moore colors mixed at Home Depot, but they were never quite the same. I buy Benjamin Moore Aura now because I’m in my forever house; if I were in a starter or rental, though, I would go with Behr or Clark and Kennsington at ACE Hardware. One more tip: I write the date, paint name, and amount it took on the back of a switchplate in the room, using a Sharpie marker.
Nice article Ashley! Agree with you all… the Wooster stubby brush is the only way to go! I sadly tried a (normal size) Purdy recently and was so disappointed (although I just learned Purdy has a stubby too, but not quite as nice as the rubber handled Wooster).
Quick tip- Krud Kutter might be able to clean up those latex spatters! Spray on, let sit a few minutes and hit it with a hot sponge (or mop in my case), works like a charm.
Anyone have thoughts on spackle dust clean up? I usually just sponge over, but have an issue weith these walls bubbling up so I don’t want to add more moisture… I thought I would take a chance and sweep, vacuum, and Swiffer my walls and ceiling. But I’m afraid the Swiffer might have oils or silicones in it… ideas? suggestions? anyone?
I discovered a new trick for cleaning my paint brush recently. I always clean with dawn but the goo gone was sitting right there so I sprayed the brush after the usual cleaning and was amazed how much better it looked! And I always wrap a psper towel around the bristles to help dry and to keep their shape.
DOES THE FLOETROL WORK ON CHALK PAINT?
Great tips! You’ll never regret spending the $60.00 on paint from Benny Moore, PPG, or Sherwin Williams. It’s worth every penny and their colorants are higher quality than the big box stores and won’t fade as quickly. IMO
For your paint on the floor, bc I don’t use a drop cloth and have wood floors, 2 options… mineral spirits + rag removes oil based paint or I take a cheese spreader and lightly scrape them off. If it’s waterbased vinegar and water. None has damaged my floors. It’s always easier to leave paint in drops if you spill some because they literally pop off.
Can the Floetrol be used with chalk style paint.
IF you are going to have Benjamin Moore paint mixed at Home Depot, for goodness sake, bring in the chip and make sure it’s the right colour! I work for Benjamin Moore, yes other stores have access to the formulas but their paints are developed differently and don’t always work!
And in the case of the store I work for, sometimes the competitor fan books are not up to date in our system. Some newer color collections take a while to make it into the pool.
I am surprised that you said to skip the tape. When my grandmother taught me how to paint she was very adamant about taping the room. The better the preparation you did, the easier the painting went. She could tape up a room in fifteen minutes. It took me a little more time than that. I will have to run this by her. It was fun to read, thanks for sharing.
After 9 years as a professional painter (working for a company that specializes in hand painting high end custom homes, not run and gun spray work in rentals), one of the things I adamantly agree with in this article is that cutting in with tape is NOT the best method. Not only is it time consuming, but it also gives bad results in most cases due to paint leaking under the tape, no matter what brand or type of tape is used.
One thing that painters tape IS good for though, is protecting painted baseboards from roller spatter, since the method I was trained in put the final coat on the walls after the trim had already been finish painted.
I too love the purple handled Wooster. There is a great yellow handled version that has natural bristles for oil-based paints. Also, the Goo Gone brand latex paint clean up is great for the dreaded “floor speckles”. It’s effective, yet super gentle on hardwood and vinyl flooring surfaces. Love this article! Wish you were one of my paint customers. :)
Windshield washer fluid is an inexpensive alternative to Flotrol. Works great as a thinner for latex – brushed, rolled or sprayed. Get it at your local dollar store.
I recently had my hardwood floors replaced in my home. Sadly, I should have repainted the walls before the wood floors were installed. In dealing with this scenario, I think it might be best to get experts to paint my home, so that my floor doesn’t get wrecked.
You can get a roll of paper to cover your wood floors, I found mine near the paint dept. at Menards. What I got is red colored, although not sure about size. I just spent 4 hours covering along the sides of the rooms with the paper, and will fill in the center with newspaper taped to it. I did use painters tape to hold the ends together at the corners of the room. As much time as we put into cleaning the floors and hand sanding them, I really wanted to be careful not to get any paint on them. It should do the trick for you too.
All-time best blog ever. I paint a lot, too, and these are all freeing! Thank you, thank you for sharing!!!
Our local Ben Moore store has a large table where people can leave cans of sample paint they do not want to keep (some people!). I have scored dozens of cans of grays and blues which I unabashedly stuff into my coat pockets and purse as I pretend to be “shopping” for that luxuriously expensive brand. Then I go home and mix up a batch of homemade chalk paint with it, or add a little Kilz to it to make a custom color, all my own. I have actually painted an entire plank wall “ombre-style” using seven different grays that some stupi—I mean–generous person left on the Orphaned Samples table. And a few dozen 1980s golden oak arrowback chairs. For free, y’all. Except for the cases of mason jars I keep buying to store all my custom colors. Two full floor-to-ceiling shelving units worth. (Yes, I will get help.)
You are hilarious! I love to paint too and love all of your tips. Thank you.
I am very picky and protective of my brushes. Big Lots sell a great 2 1/2″ angle stubby brush for $3. I hope they continue to have these. Great brush. Paint- I buy samples on clearance and use to tint my Opps! mixed wrong paint to the color I want.
Awesome tips with great back up points… It’s so true …. Why do I keep avoiding a spending a measly three dollars for paint can spout. I know I can’t pour the paint without dripping it-every time! Thanks for this great post
Like you, TONS of paint on hand and years of experience, yet have to give you props!! Some things I didn’t know and am grateful for. Thanks!
A paint sample sounds like something to maybe look into. Well, for me it would since I do want something for the painters to do. The painters themselves will be doing the painting project for me starting tomorrow.
Wow, these are some really great tips! I had never thought about it, but I guess I’ve never even gotten paint on any painter’s tape. So I guess I could save a lot of time and energy by forgoing that next time. And I’m right there with you as far as speckled floors! Half of my kitchen floor has little maroon spots because I thought I was too good to need a drop cloth. Thanks so much for sharing!
Tip #10: Clean your brushes (water based paint) in water with a small amount of fabric softener. The paint comes out a lot easier, and the brush bristles stay soft. I buybuy cheap fabric softener just for this purpose.
Tip #11: Use a 5 in 1 tool to remove excess paint frfrom a roller. Place the curved edge of the tool against the top of the roller, with the bottom edge of the roller either in the top of the paint can, or another containercontainer. Apply pressure as you scrape down the roller. Do this until most of the paint is removed from all around the roller. Then use the water and fabric softener to finish the job. Saves a ton of paint, and time. BTW, if you don’t have a 5 in 1 tool, go RIGHT NOW to Home Depot, Lowe’s or wherever, and purchase one. They are time and sanity saving, must have tools. Buy the most expensive one you can afford, as the cheaper ones tend to rust and bend.
Tip #12: Try not to use hot water when cleaning brushes. It will loosen the bristles and make them fall out.
[email protected]
How much do you add to your paint? Small area
It’s interesting that you say to not use tape when you paint. My mom always taught me that it was the best way. It does take a lot of time to do it. I’m going to have to try your method the next time I paint. We’ll see if I have a steady enough hand.
Very helpful tips. Well worth a read.
Thanks for shareing :)
Glad Wrap’s “Press’n Seal” is my go-to for painting (and a multitude of other things). I line large paint trays with the disposable liners, but my small paint trays are always lined with the Press’n Seal wrap. Use it to wrap brushes or rollers before putting in the fridge. It is way more air tight than the zip bags and fits any size brush or roller! I’ve also used it to block off fabric on my chair when I was spray staining the legs. I’ve sealed off carpet edges when painting baseboards. Don’t use it on wood floors as it can leave a sticky residue there.
Great article!! I just thought I would share a note about sampling …Always remember that if you put samples on the wall, you will need to sand it down and in some cases put primer on it as well. We recently painted a house that had samples all over the place and it caused a ton of extra time prepping and painting! You can also purchase sample drywall boards to help with decisions. (I just learned the hard way, so I needed to share :)) ps. Stubby IS the best brush ever!!
Hi, this blog is GREAT!!!! Thank you. I am a HOME DEPOT paint dept specialist.I recently started reselling repurposed furniture and other items. I am also always looking for great helpful ideas to make my customers projects easier…. that being said, I have one item I wish to clarify. .. when you come into Home depot, to get a paint color from another store PLEASE BRING A PAINT CHIP!! Often times there are numerous colors with the same name . All.slightly different. We look for the name , then cross reference the number codes. Then if that doesn’t work we can put a color chip.in our spectrometer, take a “picture ” of it and produce a color match . Much easier for everyone, and a happy satisfied customer!!
Again thank you so much for the great blog
Great .. Thanks for sharing this valuable article
I never realized how many things there are to know about painting before beginning the process. I am looking to repaint my bedroom to get rid of all the nail holes and change the plain, white color. I have never painted a room by myself before, and I really appreciated this article. Thanks for sharing.
I completely concur with the specimens. I even attempted to shading coordinate the examples with hued pencils and it was no place close right. Something you truly need to be spot on with the outside of a Victorian home. Unexpectedly, I just blogged about that today and kept running into your post about for goodness’ sake… .paint. Little world.
Here’s one that dumb founded me. I love, love ,love buying the oops paints. 25 dollar can of paint for 3 bucks? YES please. Say you find one you love only would like it darker or more blue. So my old self would just pass…. New self found out you can take that discounted oops paid up to the counter and have that paint darkened or make it more blue and you still get that discounted price! I make the oops section my first stop at Lowes every time now! Yes, you are welcome! (Lol)
That is a great tip! I knew about the oops paint, but I didn’t know they would tint it for you for free!
Great brush choice, and amazing tips! I absolutely love how in depth you go in with all of your tips as it makes it so much easier to understand the best way to make a home into something unique and personal to one’s own taste! Thanks so much for sharing such a fantastic post!
These tips are awesome especially as i am attempting to diy paint our kitchen cabinets. However I have question about Fluetrol. Do you add it to your paint before painting or when the paint brush starts dragging paints showing brush strokes? Thank you and so love these tips and glad i found it before i start painting.
Hi Ashley, Thank you for your help and tips! I recently spent 9 weeks helping my daughter redecorate her 3 bedroom rental. It was a mission and a half! So my tips: The cheapest undercoat and/or paint WILL make the job much harder and take far longer than you want. If you have a good eye and a steady hand forego the masking tape because paint DOES find its way underneath especially if you’re painting an older home with uneven walls. When there are multiple pinholes and scuffs on the walls from a rough tenant then bite the bullet and pay to have walls skim coated by a professional. Acrylic paint spots on vinyl flooring can be removed easily enough with methylated spirits, though I’m not sure how it would work on laminated flooring.
DETAILS FOR THOSE WHO WANT TO KNOW: Daughter bought CHEAP undercoat which was applied to ALL trims. 3 days later it hadn’t cured and could be easily scratched with a fingernail. Obviously topcoat couldn’t be applied so it had to come off. This was a slow and laborious job which took a lot of manhours to do. Masking tape took HOURS to apply and despite being very careful with the paint it still managed to find its way underneath so it had to be tidied up by someone….with a steady hand and a good eye…lol. Most walls had so many holes that they looked like Dalmatians once we’d spot patched them. They should then have all been sanded and primed or undercoated but due to the sheer number of patches we missed a few which of course stuck out like a sore toe when the paint dried. We also missed many holes even though I kept going back and back over walls to find them all. A skim coat would’ve cost a bit but saved on much time and disappointment.
We had more dramas than this, but we also enjoyed a few successes, the house is ready for a new tenant, and it has received positive feedback from professionals because we persevered and perhaps more importantly we changed to a better quality paint so the end result is much better than expected. More tips: Seek advice from professionals or experienced DIYers. Don’t assume you know what or how to do things. Really think things through. Be prepared to roll with changes. Don’t think the cheapest way will save you the most in time or money. If changing from dark to light, or from oil based to acrylic then ABSOLUTELY talk to professionals first. Wishing all you DIYers out there the very best success! ! ! PS I will do it all again just as I always have, because I can, and I love the sense of accomplishment and the tough times are soon forgotten:)
Using a REAL LAMBSWOOL paint roller will cut down on paint spattering by a good 90%! They are so worth the extra that you have to pay for them. I would never paint a wall or ceiling without one, the results are amazing, and they never shed!
Oops, sorry for the double post, I thought the first post didn’t go through … I obviously couldn’t remember exactly what I typed either! LOL
Using a REAL LAMBSWOOL paint roller will cut paint spatters by at least 90%! I would never paint a wall or a ceiling without one! They are worth every extra dollar that you pay for them, they clean easily and never shed. I was absolutely amazed the first time I saw one used by a professional painter, and have enjoyed using them myself ever since.
So i just saw a FYI for DIY people from This Old House…
You buy the zit pads from any store and it has to have Salicylic Acid in them. But they take up paint (even old paint) off of wood floors. Not sure how well they work on other floors but they said to try it out on a not seen place first to make sure no damage. But the paint did come right up!
Painting your home or workplace is not an easy task.You need to consider so many things before painting your home, such as which color suits your walls,weather old paint is properly removed and most important safety measures involved while painting your home.You can hire a painting professional who will definitely help you to solve your problems.They are experts therefore they know the best quality paints,latest equipment and modern technologies.
These are great tips! Dropcloths come in handy for mishaps. They’re always good to have just in-case!
Thank you for these wonderful tips
Thoes were some really good tip. Thanks Ashley.
Thanks for the great tips!
Great tips! I learned a couple of things I didn’t know before. I have to agree with the Sure-Line paint cover. I saw one in the store and picked it up on a whim because it seemed like a good idea. When I finished painting today, the paint can top was bent out of shape and I couldn’t get it back on. I remembered the Shur-Line top that I bought and easily snapped it in place. I can stack paint cans, pull the spout out to pour paint and don’t have to worry about rusty cans that I can never get clean enough before I open them and get bits of dirt and rust in the paint. No more paint in the crevices of the can, either.
So much benefit for so little money!
Thank you
Thank you those were awesome tips, I’ve used some of them for years but now I know more. Thank you again
You really have some great lessons. I especially like the tin foil one; I use tin foil for roasting for easy cleanup-you gave a forehead slap moment. Thank you now gotta go get my stubby brush.
My husband and I are going to be painting our RV soon. I am definitely going to tell him about your tips. I knew about wrapping your paint brush but not putting it in the fridge. Thank you. I’m sure these tips will make my painting project that much easier.