
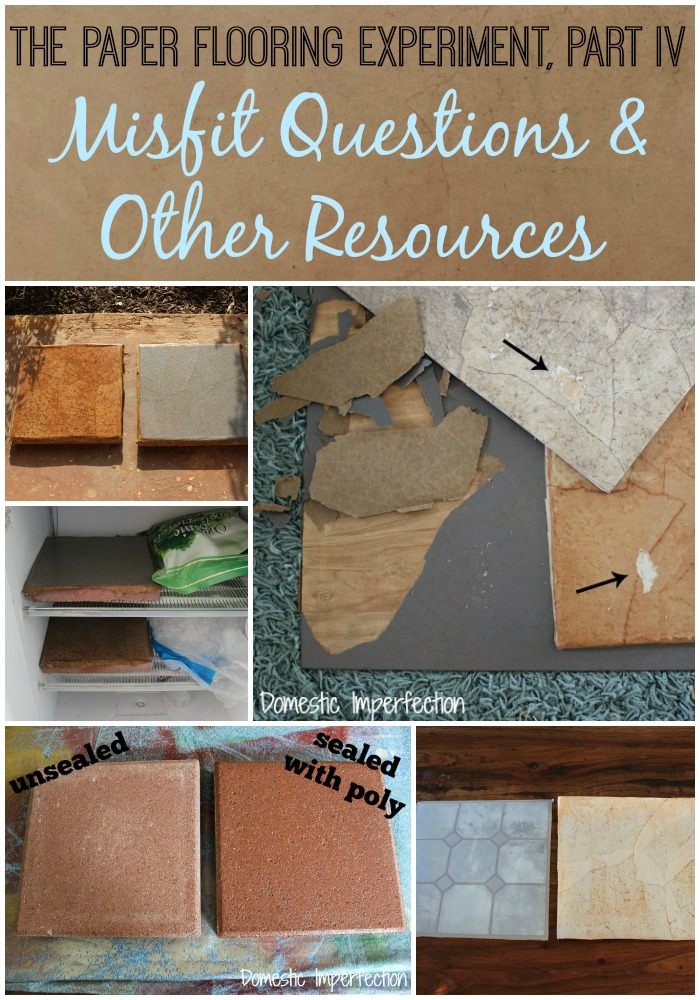
Paper Bag Flooring, Part IV – Your Questions, Answered
If you are considering a DIY paper bag floor for your home, you have come to the right place! This series will answer all your questions, including questions you didn’t even know you had. This is the final part of this series, you can find the other parts below –
- Paper Bag Flooring – A Tutorial
- My Paper Bag Floor – One Year Later
- Experimenting with Paper
- Experimenting with Stain
- Experimenting with Sealer
Part IV -Your paper bag flooring questions, answered
Can I put a paper floor over tile?
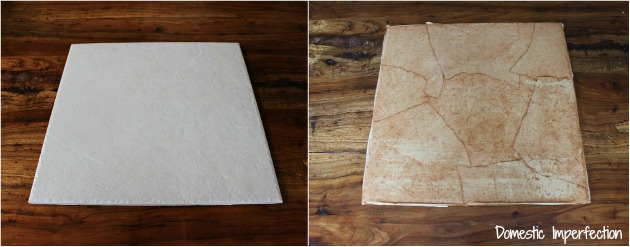
Yes, it actually works really well. This tile has some bumps and ridges to make it look more natural, and it shows through the paper and looks pretty cool, almost like real stone (if my stain job wasn’t so terrible). Just know that if you paper over tile the grout lines will very clearly show. I don’t necessarily think that’s a bad thing, but some people might not be so thrilled.
Can I install a paper floor over linoleum?
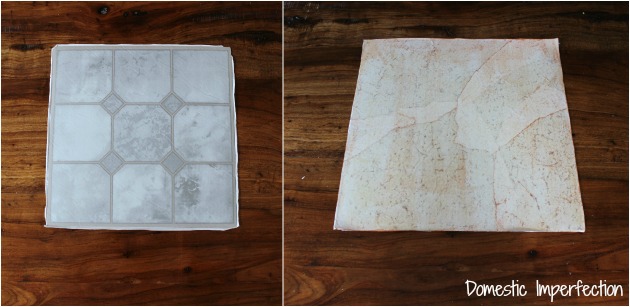
Maybe. I’ve seen blog posts where people paper over linoleum and it goes on just fine. Mine went on fine and looked great, then I went to try and remove it and it peeled off perfectly and easily, like a sticker. So if you have linoleum you will either want to remove it or sand the stink out of it so that the glue adheres better.
Should I seal the concrete before I start my paper floor?
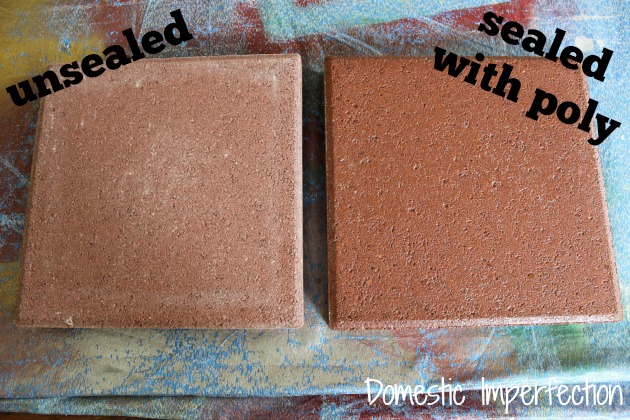
When I papered my boy’s room the concrete floors were already sealed, so this issue didn’t even cross my mind. Then not long ago I had a reader e-mail me and said she had papered her concrete floors and it was a wrinkly disaster (feel free to leave your story in the comments Lizz!). She later discovered was because the concrete was unsealed and ended up having to tear the whole thing up (which wasn’t easy). I felt SO bad. While I was experimenting I decided to try this for myself and papered two concrete pavers, one left raw and one that I put a coat of poly on first. The one with poly went on smooth, the one without went on a wrinkled up. It stayed that way for a few days, but then laid down flat and looks just like the sealed one. This is one a rough porous paver though, so that probably had a lot to do with how mine dried. Anyway, I would seal the concrete first. Trust Lizz.
Can I put a paper bag floor in my porch/patio/sunroom?
I usually just answer no to this question, because I don’t think it would hold up at all. I think the same thing about a concrete floor that is moist or sweats (like a basement). So I took my two concrete pavers, sprayed the underside and topside with water, and let them bake in the sun for a few days. Then I sprayed them again and threw them in the deep freeze.

The result? They actually held up really well, even with the unsealed edges. My experiment was only a few days of rough conditions, not months or years like they would have to endure if actually installed…but in a three season sunroom or something this might just be a good solution.
How hard is it to remove a brown paper bag floor?
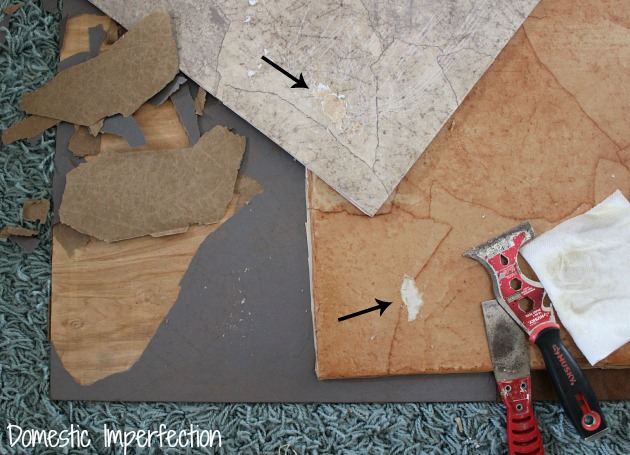
Yes and no. The builders paper (the thickest paper) came off in sheets when I scraped it, but the Kraft paper on tile and art paper on wood weren’t going anywhere. ( spent about a minute scraping each section). So if you think you may want to rip this out in the future, use a thick paper. Also, adding moisture didn’t seem to make a difference.
And that’s the last of my experimenting! Here are links to all the parts to my series…
- Paper Bag Flooring – A Tutorial
- My Paper Bag Floor – One Year Later
- Experimenting with Paper
- Experimenting with Stain
- Experimenting with Sealer
And just in case you want even more information, here are link to blog posts where people share their experiences…
- Lovely Crafty Home – brown paper flooring guide
- An Oregon Cottage – Kraft paper floor with video tutorial
- 4 You with Love – paper bag floor using Rit dye
- Yankee Magazine – light colored paper floor
- Moss is Awesome – paper flooring in a bathroom
- Lovely Crafty Home – paper flooring over linoleum
- Simon Says – checkered paper flooring
- Corn in my Coffee Pot – paper flooring planks
- Holly’s Corner – paper flooring advice with lots of pictures and detail
- My Repurposed Life – paper bag technique on furniture
- A Purposeful Path – paper bag trial and error
- Freckle Face Girl – paper bag that looks just like wood
- Taryn Brooke – paper bag stairs
- Lovely Crafty Home – paper bag floors with poly only


Phew!
Now go have yourself a stiff drink.
Ashley, you definitely deserve a reward for your exhaustive research!
What a great post! LOVE all your experiments. Thanks so much for including a link to my rit paper bag floor! You’ve totally made my day!
What a huge project. You did a wonderful job! I’m sure both you and Adam will be glad to have the results out of the freezer, oven, microwave… ;)
Thanks for mentioning me Ashley! I feel like I’m famous. Haha. We tried this flooring with the plan to cover our entire downstairs floor. I was beyond excited because I don’t know anyone personally with this in their house. We started by ripping up all the carpet and linoleum. The kids were able to help with that part so that was fun. :) We rented one of those floor maintainer sanding machine thingies. Hubby went to town on the floors and got the concrete all even and pretty. We decided to do the paper in the kitchen first. BIG MISTAKE! We probably should have started with the much smaller area in the bathroom first. So we ripped and glued for the better part of 6 hours. We even made some of the papers look like our great state of Texas! The whole time we kept oohing and aahing over what was going to be the most beautiful floor ever. We saw some wrinkles but kept telling ourselves that they would go away. That’s what the blogs said. (I read a few of them beforehand.) Well the wrinkles did mostly go away after the glue dried. When we stained it a day or two later, I was in love! It was so beautiful and the Texas shapes stood out all neat and cool. More wrinkles popped up. :( Then I did the poly. I let it dry for 2 hours between each coat because that’s what the bottle said. I did 4 coats total because the bottle said that after 4 coats you need to sand it before adding more (or something like that) and 4 coats seemed like plenty. So we waited…a full week! (Because the bottle said it would take that long to fully cure and so did the blogs I read). That is a really long time to have to use a makeshift kitchen in your living room. :) As the week went on we expected the wrinkles to disappear. They just got worse and worse! They were BAD! So we did the bathroom thinking maybe we didn’t smooth out the glue and paper correctly. The bathroom was going to be much better! Or not! I took a lot more time smoothing out and making sure it was perfect. Once the poly came into play though, wrinkles happened again. We finally realized that it had to be the moisture in the concrete that caused the wrinkles. Just for fun, we decided to experiment on a spot in our living room. I got out some old paint we had and painted a good size square on the floor. Then went through the whole process with the flooring again. That time it worked. NO WRINKLES! This all took almost a month of our time because well, we have kids, hubby has a job, kids have activities, etc. We planned on redoing the kitchen and bathroom and then working on the huge living room area. Hubby tried to scrape it up by hand because I couldn’t at all. It would have taken him (very strong and patient and capable though he is) a very very long time to do it by hand. So we rented the big floor maintainer machine thingy again. This time with a scary looking attachment that had bolts or something on the underside to scrape up the flooring. HOLY SMOKES! IT TOOK FOREVER!!! Well 4 hours of forever, but when you’re really tired and don’t want to hear a loud machine and have to wear a dust mask and it’s late at night, 4 hours is forever! It was very hard to get up. Hubby still had to go back and do around the edges by hand. In the end, we decided to not do it at all. It was so much work and we weren’t completely sure our new experiment would work out in the end. I was very sad, but I was also tired of not having a kitchen and living with ugly concrete floors for so long. We put down tile. Not as pretty at all but functional and not carpet. We are however, planning on doing the paper flooring on our stairs. And since Ashely did this awesome experiment with all the different papers and polys, I feel much more confident about doing it and I’m excited to get to it…once we can afford it. Tile is not cheap. I’m sorry this is so long. It just all came out as I started typing even though I had every intention of keeping it short!
Hi Ashley!
I was just looking at some stats on my blog– saw that I’ve had quite a few hits from the link you’ve so graciously added to your post…:) I just wanted to say ‘THANK YOU!’
It looks like you’ve done tons of research and homework on the paper floor movement. I am so pleased with my floor.
When I finally get ready to do the floor in my vintage camper– I’m going to use the same method there. I love it.
thanks again for the link up!
Pat
We are about to give this a go over our concrete floor. Iv been looking at blog posts for quite some time and quite confident, but Lizs story sounds like a nightmare.. I will do a test area first and prime the (new) concrete first… BUT we have underfloor heating and I cant find anyone who has done ths over a heated floor – concrete or wood. Any body got any relevant info? I think it should be alright if everything is temperature resistant…..
I was so excited to find this technique because I was considering acid staining my basement, which I’m converting to a studio, but to do the 1200 sq foot would cost upwards of $6000 to do by a pro. I am considering doing it myself, but this sounds easier and less expensive. However, after reading Lizz’s experience, I’m scared to. I figured HAVING a sealant on the concrete would inhibit adhesion. I guess I will have to test it first, but how would I test the Bona Traffic sealer? I wonder if I can combine only a portion of it with the hardener to see? Ahhhh, this floor project is becoming a royal pain. LOL I appreciate all of the information you have provided here. It has been very informative and may have saved me HOURS of work and getting similar results to Lizz. That would not be good. Thanks for your posts!
Also, I wonder if an epoxy sealer would be better.
I have to say I like the look of the paper floor, but do not recommend it in the bathroom. If you have a leak anywhere, and the water gets under the edge of the paper, it will stain. Unfortunately, this has happened to me, and I’ve been in the process of repairing the problem for months. I put the paper down with water based sealer, and it looked great. I even did several coats. But for some reason, water still gets through. Now, I’m trying some polyurethane (oil-based unfortunately) over the water based poly. When it dries, I’m going to put water on it and see if it penetrates like it did with the water based. Hoping for a miracle!! :)
Did it work? I’m thinking about it, too.
Ashley,
Thank you for all your hard work, research and willingness to share it with all of us! I am looking into inexpensive flooring options for my kitchen/living room and I LOVE the look of the brown paper floor. Your website has been really informative! I hope to dive into DIY Brown Paper- probably kraft paper ;) – Bag floors this summer. Thanks again!
I have a question and hope to find an answer soon…before I decide to undertake this project. I am a renter. So, I struggle with how to make temporary improvements. The 30+ year old, high-gloss linoleum that is in my kitchen, dining, hall and bath areas is in great condition, but ugly. I read your advise on using this method on linoleum and was encouraged when you said it peeled right off when you tried to remove it, and assume you tested this with the Builders paper. This makes it temporary, but would it hold up to daily wear?
Did you end up doing this? I would assume that the stain would seep through to vinyl flooring and wreck it, and even if it didn’t, the glue would be hell to remove and the process would probably dull the finish. I’m interested to learn if those assumptions are correct!
I did not. I was not brave enough to make the attempt if there was any risk I couldn’t restore the linoleum floor back to its original ugly but functional condition. As a renter, I always have to consider consequences of making any alterations.
So, I have to leave the horrid, beige, supermarket-like linoleum as is.
As for my floors, I tell people, “The bad thing is when they’re clean, they still look dirty…The good thing is when they’re dirty, they still look clean.” In other words, cleaning them makes no apparent difference. I just do it to be sanitary, not to enhance appearance.
Thanks Ashley for your research, it helped me a lot. I started with the smallest area in my house, the hallway and I liked the look so much I’ve now done the whole house except for the bathroom and kitchen. No more crappy carpet! I’ve learned a few tricks along the way. I happened to use 70lb craft paper that I got at an art supply paper. I thought that thicker would be better. Also I cut the paper into different sized circles with a circle cutter. The thicker paper is harder to crumple up but if you mist it with a bit of water it crumples easier. As far as stain goes, I would never recommend using water based stain. It just goes on streaky. I got the best result with gel stain, wiped on with a rag. Also if you want to make a pattern with the stain (using taped areas) you’ll need to use gel stain, otherwise the stain just seeps under the tape (even “Frog Brand” painters tape). In order to get the paper to go on without wrinkles, I “paint” the floor with watered down wood glue (I’m gluing this onto OSB subfloor) I use a spray bottle to wet the paper with water, lay the paper down and painted over it with more glue. I’ve put up to 14 coats of water based satin polyurethane which worked well because you can walk on it in about an hour. It really is quite durable and if anything does happened to it, you can easily patch it with more paper. I did make the mistake of putting down a plastic office chair mat that had a very sticky side. I meant to protect the floor but it lifted up the paper when I moved it. :-( Another thing that I noticed is that, if you want uniformity you need to glue it all down at once because if put paper over top of dried glue areas, they will be lighter in colour when stained. You can’t worry too much about uniformity though, because no matter how much I experimented it comes out differently each time. Oh yes, knee pad are REQUIRED equipment!
I’d love to see pictures!
Hi there! Was there any additional prep on the tile? And did you use the same glue method? Or a different application?
No, I don’t believe I did anything different on the tile than I did on the concrete.
Thank for doing all this work! Very informative. This section looks like it has 5 pages (I want to see if anyone asked about or commented on actual paper bags), but the page numbers aren’t live links. Thought you’d want to know.
A) What about a concrete basement floor with no moisture barrier underneath, Ashley? My house was built in 1961; no plastic laid on earth before concrete was poured.
B) Bumpy surface? Until we extended the living area to the “daylight basement” (windows & doors on 3 sides), it had crappy carpet (we removed) over what we assume by the 9″ squares was asbestos tile. Thus we cannot sand it down to do pretty epoxied or stained concrete — asbestos remnants would go airborne (also too $$$). It’s not a smooth surface anymore, after plumbers & waterproofers jackhammered parts of it; the newly refilled areas are a rougher type concrete. Laminate estimate for 1300sqft was $10k and linoleum was $7000, so, um, no. I’ll tile the downstairs bath & linoleum the playroom, but I’m thinking in the guest room, den, laundry room, and hall, paper flooring would cover the smooth vs rough concrete enough to not really matter anymore — as long as furniture will slide across the floor when scooted, I’m good. I *might* decide to briefly sand the new rough concrete first…just…ugh, time.
C) Could I use a light colored oil based stain or a gel stain in a color like pickling white?
D) What do I need to do to prepare the concrete floor prior, given its just dirt underneath? If you think this floor is a good candidate, my thought is maybe DryLoc Extreme painted over concrete. My waterproofers said Kilz is “mold food” and DryLoc Pro & regular aren’t as tough. Do I do anything under the DryLoc paint?
E) So DryLoc Extreme, then next I decoupage glue & paper on (brown paper rolls from Lowe’s paint dropcloth section), then oil based stain, and for a sealant, I am confused what your final verdict was. Two-part Bono Traffic mixed in small workable batches — or no?
F) When I had a sealed concrete expert out give me an estimate, he mentioned issues with breathability. Don’t recall much, but the gist was that a concrete floor needs to breathe and the finishes you use on it can stop that necessary process, causing moisture problems. It’s why he said the pretty marbly-pearlescent epoxy finishes weren’t right for my floor. Any idea about Bono Traffic or your other fav (I think it was oil-modified waterbased poly) and how they interact with a concrete floor’s airflow? For that reason, I had considered using boiled linseed oil as a finish until the concrete got ripped out and refilled with the rougher bumpy type in some places.
G) Curious if anyone’s heard of decoupaging other types of paper, such as old coffee-table art books, poetry, newspapers, magazine images, etc, or fabric, onto a floor in this same manner? I’ve done on shelves with pages from an art book — with beautiful results — but not a floor.
Thanks,
Tara
This was incredibly helpful! Thank you for putting in all that hard work!!
I have bought all the stuff to do my paper bag floor but I am an older person and don’t think I can lay it all-in-one day can I do it in separate days
You can absolutely lay it down in separate days…it took me quite a few days to do mine.
Has anyone tried the brown paper bag on metal? I have successfully put it on my porch floor which was concrete and on my bathroom subfloor. It worked well in both spaces.
I think I’ll try to apply it to a metal sheet and see how it does in the elements. Any advice or tips? Anyone tried this?
Thank you and this article is amazing❤️☀️