
The Paper Flooring Experiment, Part I – Paper Options
Well, today I’m kicking off my first series! I wasn’t originally planning on making it a series – I was going to post the whole experiment in one big post, but quickly realized it would be the most ridiculous, long-winded, information-packed post ever. So big that it would be hard to actually find the information you are looking for. So I’m going to divide it up into five parts…. papers, stains, sealers, surfaces and removal, and conclusion. Like a science fair project on steroids. I’ll just plan to post one a week so as to not totally bore those of you that have absolutely no interest in this. Also, my opinions change throughout the process, so don’t base what you are going to do off of just ones of these posts. Just because a paper goes on great doesn’t mean it stains well, for example.

In case you’re new here and have no idea what paper flooring is all about, here is the gist. Paper flooring is a cheap and beautiful alternative to more expensive flooring types. If you need new flooring and are adventurous, like work, are on a budget, and enjoy being hunched over for long periods of time… then this might be for you. You can read my full tutorial HERE (and my one year later post HERE), but you basically rip up paper, crumple it, glue it to your floor (using a Elmers glue and water mixture), stain (optional), and cover in a stinkload sealer. There are SO MANY different ways you can do this, different papers, stains, sealers…they will all look different and may wear differently depending on what products you use. Because of this (and the popularity of my original tutorial) I’ve decided to do all the dirty work for y’all and experiment with different combinations. This isn’t an exhaustive list (because that would take forever and be crazy expensive) but it’s fairly thorough and should hopefully be helpful.
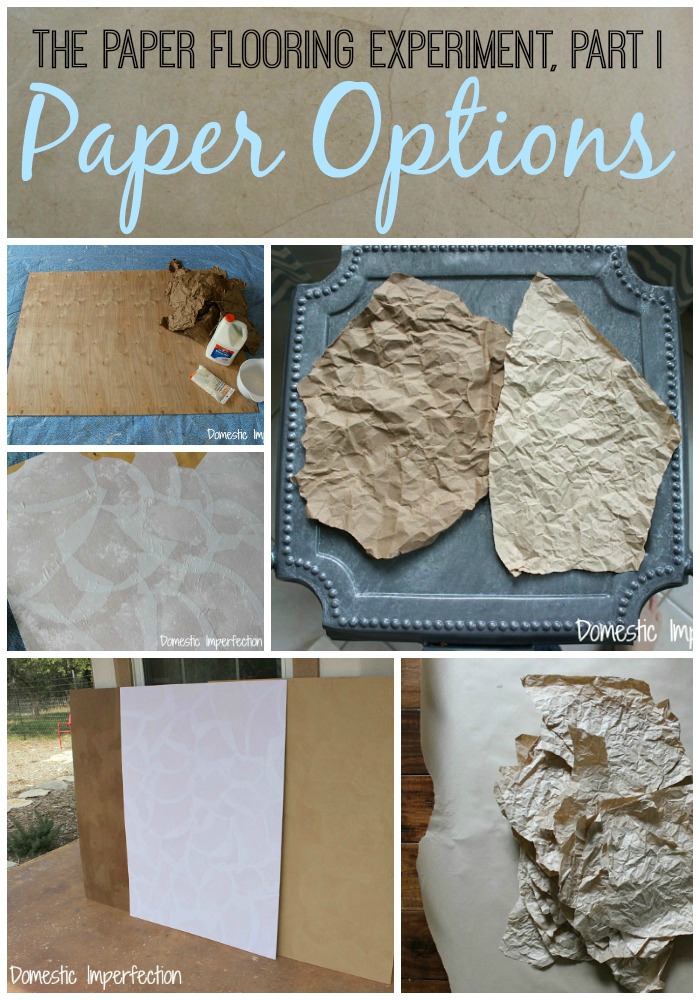
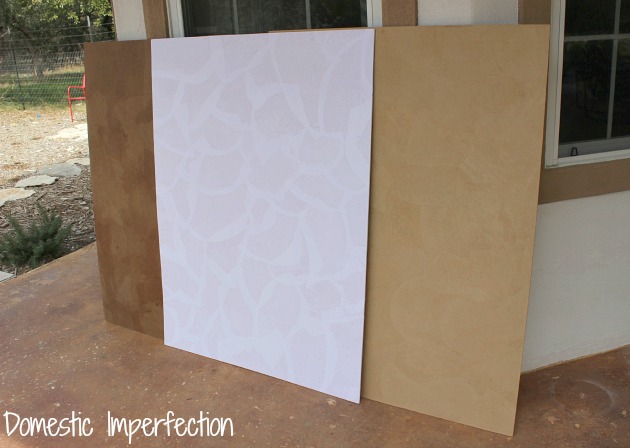
So here we go…paper options. I used three different types of papers for this – builders paper, brown kraft paper, and white art paper.
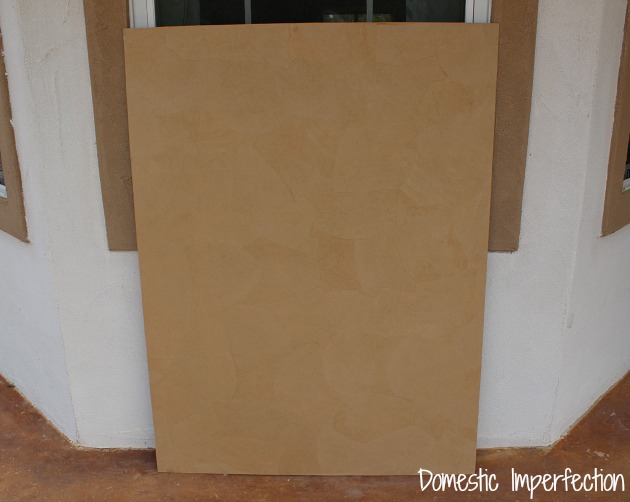
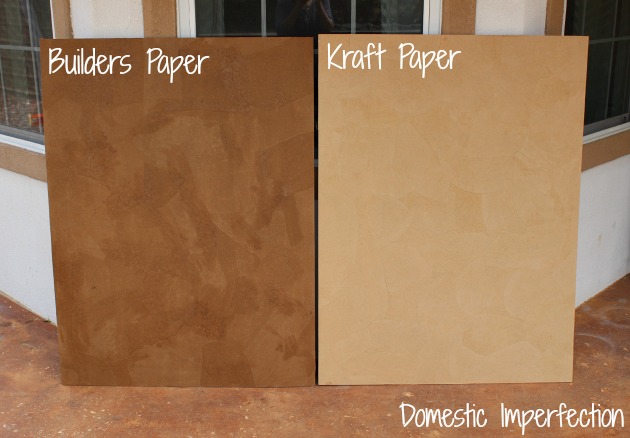
Builders Paper
You can pick this paper up at Home Depot near the paint section, it costs about $11 for a 140 ft roll (it will last you forever). This is the paper that I used in my boy’s room. Here are my observations about it…
- The thickest of all the papers.
- The darkest of all the papers
- The most difficult to rip and crumple (especially crumple). I had to ball it up, flatten it out, and ball it up again to get the amount of wrinkles I was looking for.
- Tore and got holes sometimes while crumpling.
- Doesn’t appear to have different sides, but when it dries the sides look slightly different (some are darker than others).
- Uses the most glue
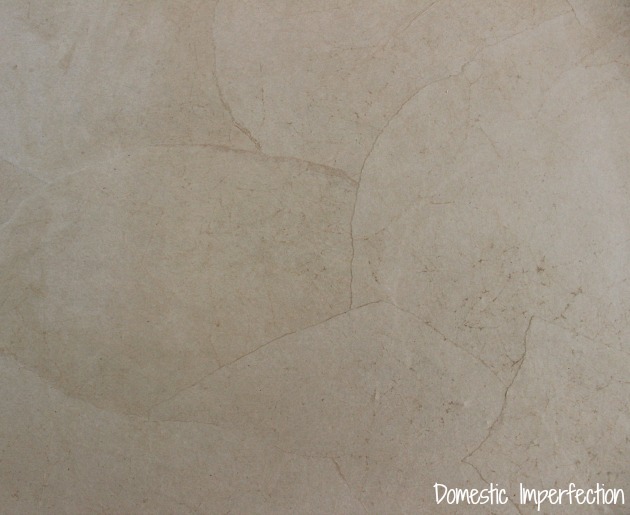
I papered a scrap piece of plywood, and will be using these boards for all my experiments. The paper looks a little blotchy here… I had to go over a few spots after it dried to seal them down. I think my first batch of glue was too watery and the two batches look different when dry. So measure your glue – 50% water and 50% glue.
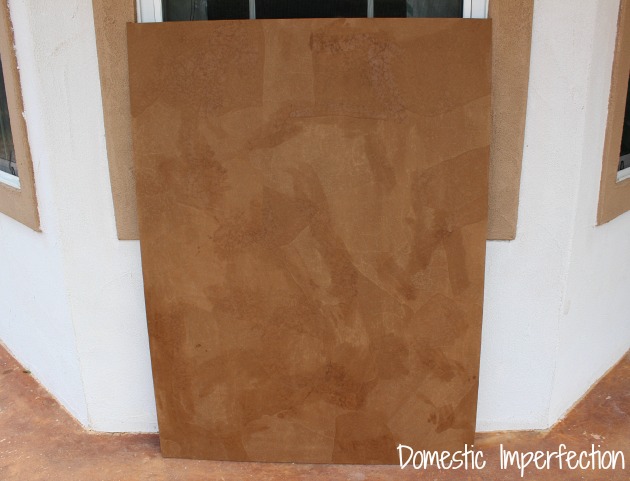
Here’s a close-up. You can’t really see where it was crumpled, that part doesn’t show up until you stain it.

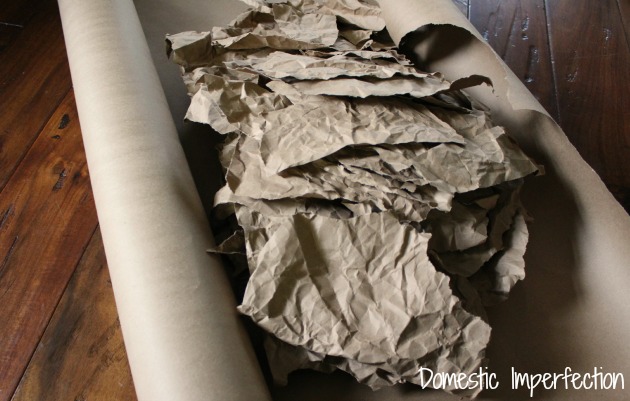
Kraft paper
This is the other brown paper you can use, you can buy it on Amazon. It’s $13 + shipping for a 100 ft roll. This was my first time using this paper, here is what I learned…
- Medium weight and color
- Really easy to rip and crumple. I want to say that this part went about twice as fast as with the builders paper.
- Never got holes or tore while crumpling
- Has two distinct sides (one is waxy) but they dry looking the exact same
- My personal favorite to work with
- Spoiler alert – it stains terribly, but looks great natural
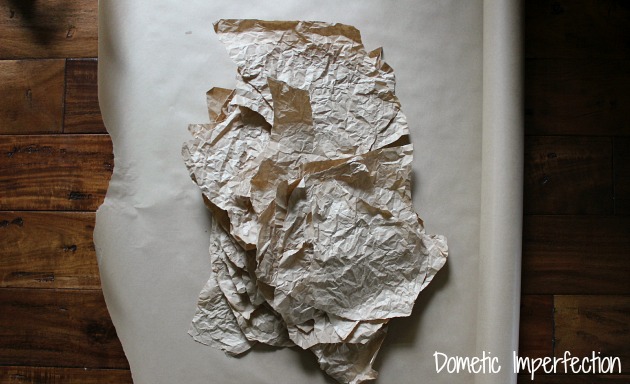
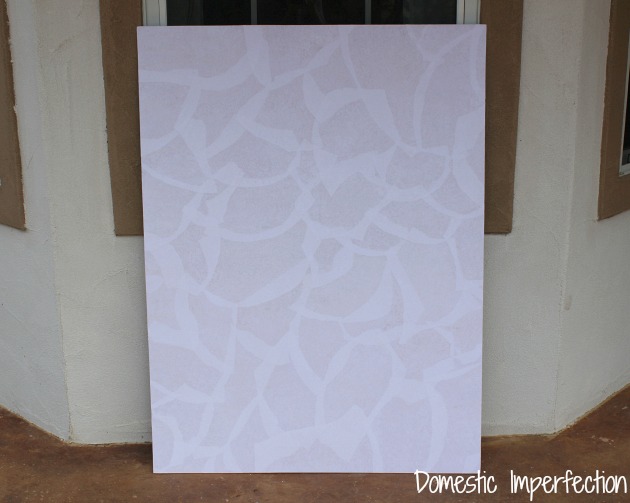
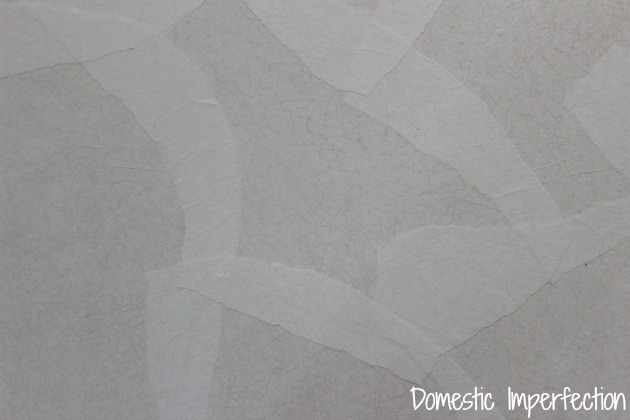
Art paper
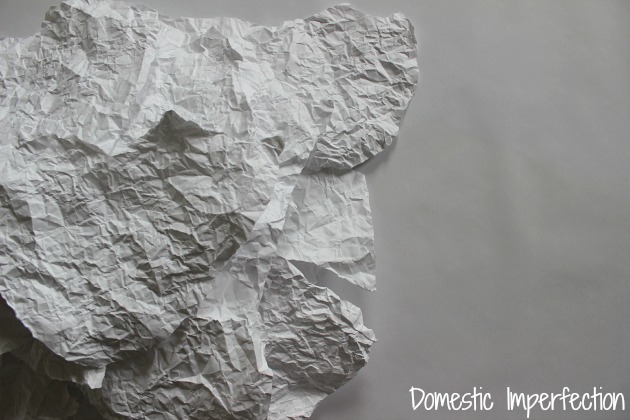
I also tried out a plain white art paper. I bought it on Amazon – it costs $17 for 50 ft, making it the most expensive paper (still insanely cheap for flooring though!). The best part is that it comes in 23 colors. 23 colors! The possibilities are truly endless with this, you could do white paper + different stains, colored floors, rainbow floors, ombre floors…whatever. Here is what I discovered about the white paper…
- The most lightweight of the three
- Easy to rip and crumple
- The two sides are exactly the same (though the colored ones have a white side and a colored side)
- The paper is fairly thin and because of that I had to be more careful during the application process
- Had the most wrinkles after application, though most of them smoothed out after they dried (since the paper shrinks as it dries)
- Somewhat transparent when dry (but spoiler alert though – it stains beautifully)
While this paper looks fine after stain, it’s thin. That won’t be a problem after sealed, but a thicker white paper might be easier to work with. Also, this next picture clearly shows you how much I overlap the paper.
Comparison
Here are a couple of side by sides for comparison…
One of the questions I get asked frequently is “do you think I could use ______ kind of paper?” After using all these papers I pretty much concluded that you can use just about anything. Scrapbook paper, wrapping paper, construction paper, book pages, actual paper bags… whatever. If you put the sealer directly on top of them and don’t mess with stain then there wouldn’t really be any risk of messing it up.
So that is all about your paper options…next week I’ll post about experimenting with stains. Let me just tell you, it did NOT turn out like I expected.
Links to the other parts of this series –
- Original tutorial
- My paper floor, one year later
- Paper flooring experiment part I – paper options
- Paper flooring experiment part II – stain options
- Paper flooring experiment part III – sealer options
- Paper flooring experiment part IV – misfit questions
- Guest room paper flooring (and why I’m disappointed with it)

As someone who may very well undertake a project like this in the not-too-distant future, I certainly wouldn’t mind not waiting five weeks to hear your full conclusions.
Thanks very much for posting this.
Thanks for the feedback…I may try to gt them out a little faster. I haven’t finished yet, only papered and stained…still collecting sealers. I’ll do my best!
Don’t stress yourself on my account. If I weren’t fully aware how difficult it can be to find time for such things, I probably wouldn’t be reading this blog in the first place. I realize I’m a beggar here; thanks in advance for whatever you can post, and for demonstrating the idea in the first place. It’s definitely an improvement over our carpet, and over several of the replacement options I’d considered previously.
I’ll hurry in a very relaxed manner :) You probably only need to read the first three to do your floor though, the fourth one is just for weird situations and the fifth will just be repetitive if you are following along. And I agree with you about carpet…we just ripped out the carpet in our guest room and it was SO gross. We hardly use that room either, I couldn’t imagine if we still had carpet in our living room!
I have recently found your blog. I love it! You have a lot of energy and some really great ideas and on a budget. You are an amazing young woman. About the paper floors…I’m thinking of using paper bag and want to know do you put it down on the bare cement flooring? Do you prepare the floor first? I have read your post about 1 year after the flooring project but not the tutorial. That may have my answers.
Cool! I love a series. I also like that your opinions will change as we go along, sounds very interesting. I shouldn’t be so excited about this but I’m renting and can’t do anything. Paper away!
I love this! Thanks for all your hard work. I don’t want to wait until next week. ;)
This is great! Thanks for a doing all this work for us. :)
You could also use book pages. These people did: http://talltalesfromasmalltown.blogspot.com/2013/03/home-improvements-living-room-before.html
I think I’d like to try this on a wall—–what do you think? I would use a satin or very low-gloss finish polyurethane. We live in the woods in a log sided home, and I think it would fit our rustic decor very well. Any warnings or ideas??
I did on wall it’s unreal ! Looks like Leather !
I am currently decopouging brown paper bags to my dinning room.walls using the rip and tear affect. I paln on painting those a gold metallic. And now would love to do the floors like you did. I loved it thanks.
Can you putcolor in the glue instead of staining? Has any1 tried and if so, how did it turn out?
Have to put out a warning about using different colored paper! A couple of years ago I planned to floor my kitchen using white butcher block paper with a pattern of black diamonds made from black kraft paper. Didn’t work. The black paper ran. I improvised and dunked black paper into the wet glue mix and then squeezed it onto the white to create a marbling effect. That worked. I had previously used green “masking” paper from Home Depot for a different project. That didn’t run. The masking paper is easier to work with and less weighty than builders paper. I would just warn anyone using colors to test the paper for running first.
I thank you for this! While I don’t plan on doing a paper floor, I do use paper in my decopauge craft projects, creating decorative mirrors, boxes, even tables.i appreciate the reviw of the different types of papers. My favorite is the real “papery” soft kind that comes in handbags. Not easily found lately and I’m always searching for a larger supply but so far no luck. I appreciate all your hard work!!!
Hi!
I would like to try and do my bathroom floor it is approximately 2 and a half feet wide by 3 feet long.
would you know if I can use newspaper instead of people bags?
Thank you for your time
Perfect! You are a savior by doing all this work just to make it easy for us! Thank you so much! My son tore his carpet out of his room, didn’t plan on it but his new puppy made that decision for him. I’ve had it with looking at an ugly cement floor so this is absolutely perfect timing! Again, thank you!!!
I put a paper floor in my Coachman 5th wheel trailer over 10 years ago – and when I sold the RV recently – the floor was still gorgeous. We lived full time in the coach for 5 years so it got a lot of wear. Lots of scuffing with shoes and liquid spills. It held up beautifully. But – I did not use the types of paper you experimented with. I found plain white wall paper with no design. It had adhesive that you just have to wet and apply the paper to the wall. I used the Elmers White Glue as you did in your tutorial, ignoring the adhesive on the back of the paper. I tore the white wall paper – which is quite a heavy paper. It tore neatly and looked wonderful when it was down. After I got the whole floor done I painted the surface with floor paint, two coats. I used a lovely green paint which got lots of compliments. Then I put Polyurethane over the top of the paint , eight coats – I wanted it to last! Every couple of years I put another coat of Poly on the floor. It held up beautifully. I got the plain wall paper from Home Depot – but I went back and checked and they no longer carry it. Maybe it is available on-line? I haven’t had a chance to check that out yet.
We sold that RV recently and got ourselves another older coach. We now have a Cruise Master by Georgie Boy Motor Home. I have started working on the floors in this coach. I have completed the bedroom area and the hallway and working my way to the living room/kitchen area. I am using the kraft paper from Home Depot. Really hate this stuff. I am going to finish putting on the kraft paper and see how I like it. If I don’t like it I will go looking for that plain wall paper on-line, cause I want this floor to last at least 10 years – just like the old RV. I sure hope it is available somewhere.
I love the paper flooring. I have done it to two Mobile Homes and it was probably the only reason the homes sold as quickly as they did. The floor is easy to clean and maintain. Just keep a can of Poly available to re-do patches or the whole floor every so often. I have used High Gloss Floor Poly for each of my projects. This is a project that is labor intensive – but you have the satisfaction of seeing the job done and looking great! And cheap to do!
Have you tried scrapbook paper? Have you not crumpled up the paper first but rather just ripped sections and laid it down?
I am kind of confused with coloring I want purple for my granddaughter room floor how do I mix it or do I use white paper.
Use what appeals to you.
Let’s feature a talk some time about binary options trading and what we’ll
be able to do to helps it be better for any one.
What you think about wax paper. It come precut & boxes are easy to handle. Of course they would come from dollar store.
DO YOU HAVE TO CRUMPLE THE PAPER?
Hey, I used this technique on a dresser top a year ago. Kraft paper and stain…it turned out wonderful !!! Thanks for the idea….my BF did all the tops of her bedroom furniture after seeing mine. Our next project is kitchen countertops…..CAN’T WAIT to try colored art paper….
I expect that it’s okay that I share this with some of my clientele, this
will help their understanding of binary options trading drastically.
I think it’s beautiful Do you think w could give it a marbled look? I mean to the white paper?
What about magazine pages?
Can you do this on laminate?