
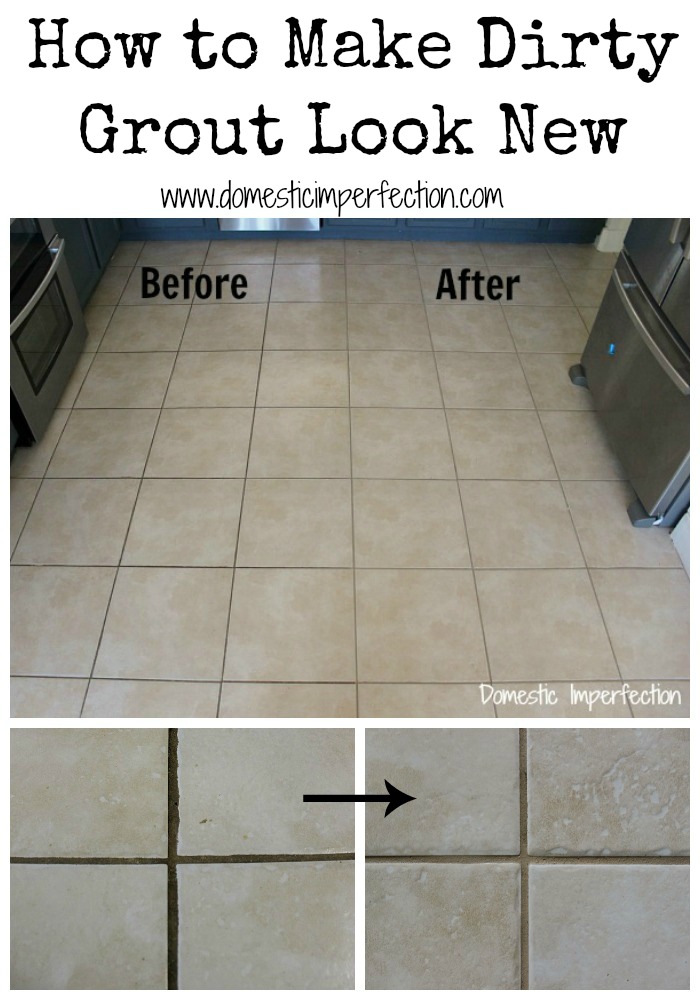
How to Make Dirty Grout Look New
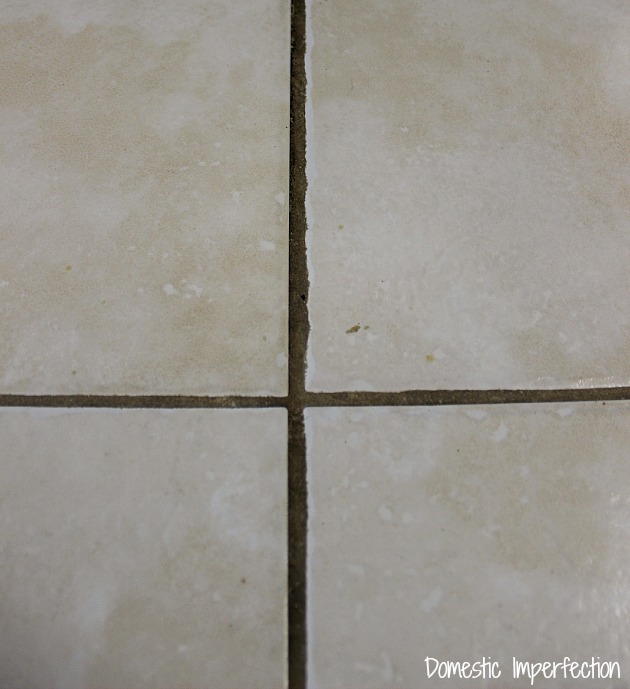
Way back when, sometime during our kitchen remodel, I talked about replacing our kitchen floor. I’ve never liked the tile… its a subtle pinky/flesh color, it’s shiny, it NEVER looks clean, and I just generally think it’s ugly. It’s the cheapest builders grade tile you can buy and the grout looks terrible. Some horrible person must break in at night and rub dirt on it, because surely my little family isn’t this disgusting.
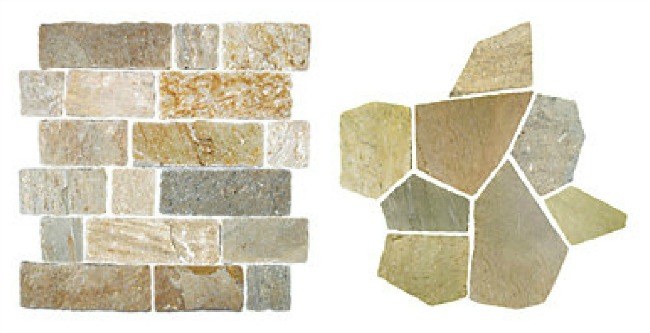
If money was no option and I could wave a magic wand and have it done then I would pick one of these two floors from The Tile Shop. Baoding Creme Brick Boading Creme Broken Random
Aren’t they gorgeous? (Click the links to see a less terrible photo). I think I’m liking that brick one the best, I just want to reach out and touch it, maybe loving nuzzle my cheek against it. It would look SO ridiculously awesome in my kitchen, dining room, and entry. It’s natural stone, rustic, has texture, neutrals…even pops of my blue and yellow, kinda. Behold.
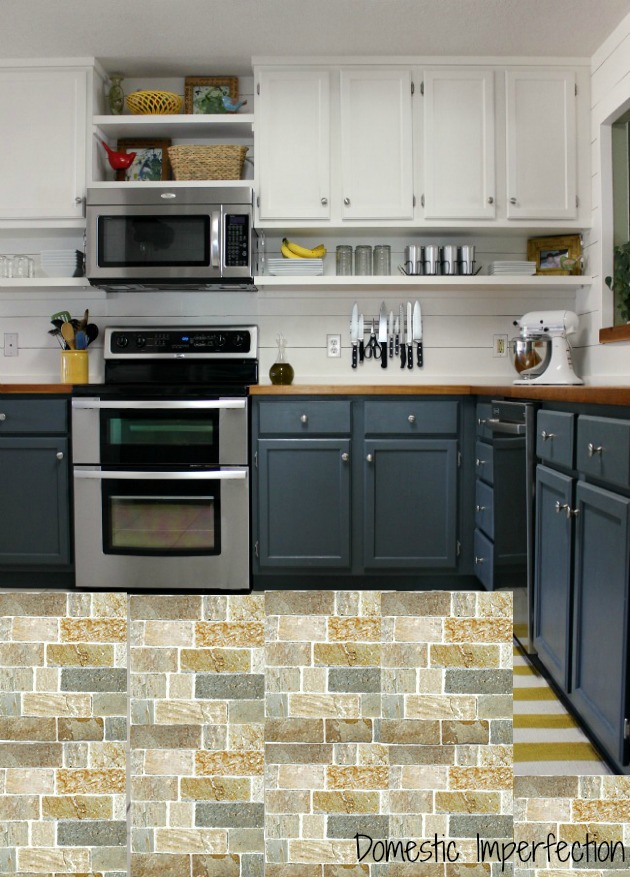
(I know, I have some serious photoshop skillz. Is that a mock-up or the real thing? It’s hard to tell.)
However, money is an issue. And time. And I just can’t justify ripping up perfectly good tile in order to spend more than we want on new floors. No matter how much I want to…I’m just too darn practical.
So, whats a poor practical girl to do? Paint her dirty grout, of course!
Seriously y’all, paint can fix anything. Really, I just painted my shower, so now painting grout seems totally normal. Here is the product that makes this whole thing possible, Polyblend Grout Renew. It’s a grout paint and sealer all in one, comes in a variety of colors, and only costs $12.
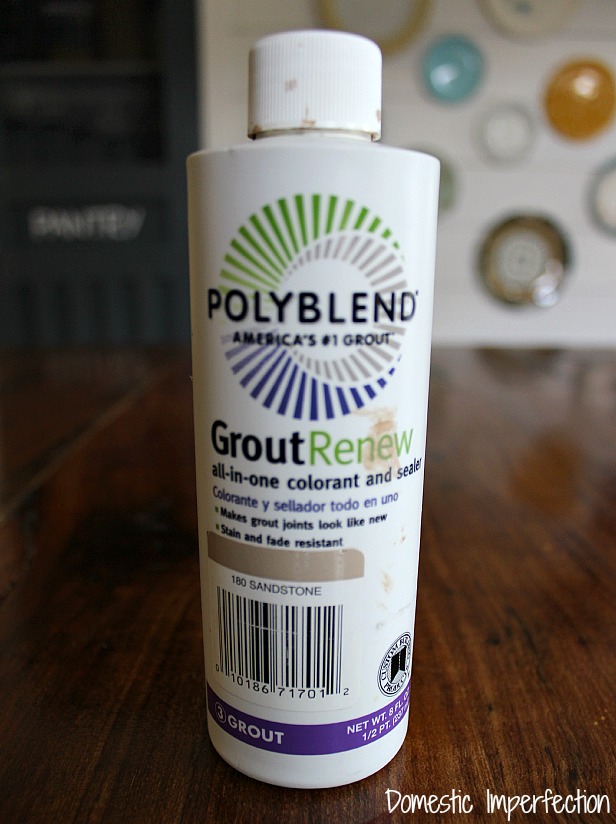
I did about 400 square feet (my kitchen, dining, and entry) and didn’t even use half the bottle. That’s what I call a good dang deal.
So here is the process. It’s really simple and straightforward, except what worked best for me was the exact opposite of what the bottle says to do. So there’s that.
First things first, cause I know ya’ll are wondering…”did you have to clean/scrub the grout beforehand?”. No, I didn’t…not even a little. Not even a simple wipe-down so I could tell myself I was proactive about cleaning the grout before I painted. All I did was sweep.
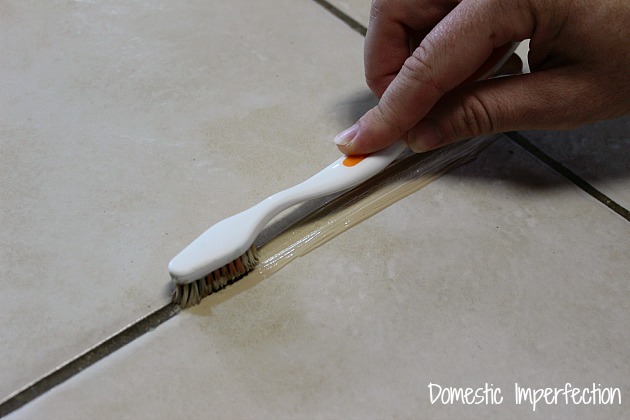
After you finish not cleaning you’ll need to gather supplies, which consist of an old toothbrush and the grout paint. Pour a dab of paint onto the toothbrush and scrub it into your grout.
According to the bottle you are then supposed to immediately wipe the excess paint off the tile with a rag. Simple enough right? Except that whenever I would wipe the excess paint from the tile it would also wipe away about half of the paint on the grout. No matter how careful I was, the paint would rub off and I could see I was going to need to do at least two coats. Not cool. Other bloggers didn’t seem to have this problem, so who knows… it could just be an Ashley thing. Wouldn’t be the first time.
I carefully read the back of the bottle again, paying close attention the part that said “do not allow Grout Renew to puddle or dry on tile surface, wipe it off as you go”.
But then I got to thinking… I have literally painted every surface in this kitchen multiple times, and along the way I have spilled SO MUCH PAINT on the floor. I’ve found that if I just let it dry instead of wiping it up I can peel it up really easily. So I decided I was just going to paint a big area, let it dry, and wipe/peel/scrub it up later. Like a giant grout painting rebel.
I let it dry for anywhere between half an hour and three days (cause life gets in the way) and I didn’t have a problem getting it up. A few minutes before I was ready to start scrubbing up the extra paint I would run a wet rag over the area to loosen it up a bit. Then I used a moist dishcloth, gave each line a good hard wipe, and the paint came up fairly easily.
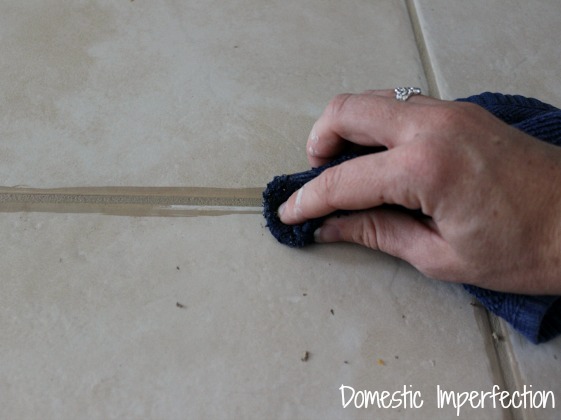
None of the paint on the grout came up though, even if I scrubbed the dickens out of it. I was pleased. The whole process is easy, though a bit tedious and time-consuming. I’m not going to lie though, I kinda enjoyed it. After working on so many hard DIY projects it was nice to just mindlessly sit on the floor, listening to music and chatting with the boys. I’m pretty sure that makes me weird, but that’s okay. I own it.
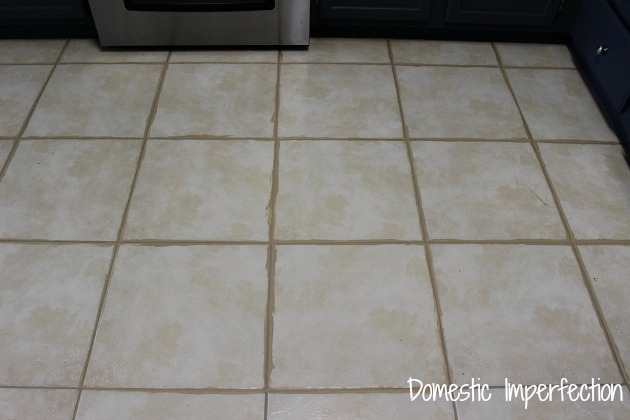
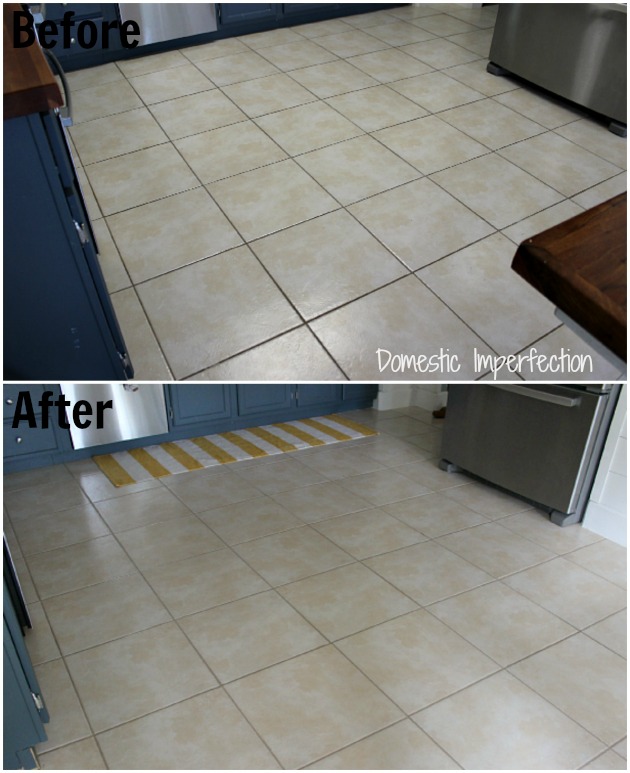
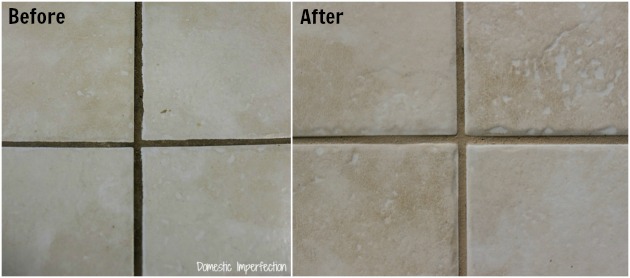
So that’s the whole process! I still don’t like my floor, but it looks so much better. Clean at least. It (the grout) should stay clean too, the paint is also a sealer so it shouldn’t stain like before.

Just FYI, don’t use this product if you have unglazed tile, the grout renew will stick to that just like it sticks to the grout, and that would be bad. Also, try it the correct way first, where you immediately wipe the paint off. This way happened to work for me, but if you can get the original way to work I’m sure that would be easier.
Kitchen Remodel Links
Shop the Look


girl, i LOVE when i see your posts pop up in my rss feed. you never disappoint me! your floors look fantastic now!! just be glad you at least have real tile floors – mine are old, blech linoleum. and i can TOTALLY see your vision from your (excellent) photoshop pic – those floors would look GORGEOUS in there!! but for now, awesome job on the grout fix up! :)
Yeah, I like to leave ya’ll hanging with my posting schedule. Will it be one day till my next post…or twelve? No one knows! Thanks about the floors, I am grateful they are at least real tiles. Hey, you could always put a paper bag floor over yours! My friend Kelly successfully painted her linoleum floors… http://www.viewalongtheway.com/2013/01/how-to-paint-vinyl-or-laminate-flooring/
thanks for that link – THAT is a great idea and wow, the wheels are spinning in my head now… stencil or stripes? colors? one more thing to add to my fun-do list! :) thanks Ashley!! :)
wondering if this would work in drive way
It looks really good, and your photoshop skills are awesome :) only recently discovered your blog and I love it!
I bought several bottles of this stuff to change our blech dirty brown grout into white, and could NOT figure out how to avoid wiping up everything without wrecking what I had just painted on the grout. Now I’m excited to give it another try!!
looks amazing! This is good information to file away – we have been looking at houses and while our current home doesn’t need this – some of the ones we have been looking at could definitely use this! I will definitely be bookmarking this one for future reference!
Love it! Our kitchen counters could DEFINITELY use a few coats of this stuff! Who puts white grout on kitchen counters? Seriously?!
I need this STAT! My bathroom floor is horrendous. This would help a bit but seriously, the tiles are almost 60 years old. Need I say more?
Jeanine
Wow, it really does give that tile a new life! I had tile like that and I’ll bet I could have wiped paint right off of it too. But it had quite a slick surface.
Great tip!
That’s such a crazy awesome project! I’m amazed at the before/after pics!
And seriously… you’ve got some crazy Photoshop skills, lady. ;)
That’s nuts! I have the same bottle sitting at home [maybe a different color?] and I have yet to use it. I must’ve been waiting for you to pave the way for me ;]
Wow what a huge difference! Great job :)
Fabulous results…good job.
http://frugaliciouschick.blogspot.com
Well I can tell you that it isn’t an “Ashley thing” to wipe all the grout that you worked so hard to put on the tile right back off!! I I used this exact same stuff and I gave up after doing one wall for that very reason. I nearly used an entire bottle just trying to get the coverage I finally did, so I have to say thank you for the tip I feel like such a dummy for not just giving that a try instead of wiping it back off right away. Heck, the tile is over 35 years old, so who cares, right? Well, actually I do because as you said money is a big part of the reason for doing this vice replacing the tiles! Our white grout had turned brownish yellow and looked so horrible due to previous owners of house being heavy smokers…Everything was yellowed and disgusting! It’s starting to look pretty good now, though! ;)
Thanks for the info on the grout stain. I went out and bought Snow White color for my kids gross bathroom grout… I can’t even speculate what color it was originally. It worked like a charm your way. It would have been very time consuming to do it the “real” way. The only thing I changed is I didn’t let it sit overnight before wiping it off. I just let it dry a few minutes and then went back over with a wet cloth and scrubbed with the harsher side of a two sided kitchen sponge. And voila! Not only is my grout white but my floors are quite clean now that they were handscrubbed. Thanks again!
Glad it worked for you! Having grout that doesn’t look disgusting makes a world of difference, doesn’t it? I honestly hate my floor less now…it just looks…clean. It’s kinda weirding me out, haha.
So, I totally have this same tile in both of our bathrooms and I hate how dirty it looks! I bought some of this grout renewal magic and I had the SAME problem! I had to go back and do some of the areas because it wiped off way too easily. I also left it for a few days and hubby ended up scraping it off (I would’ve eventually gotten to it ;) Weird, but I am so happy with how it looks now!
Awesome! I bought this stuff months ago, and just never got around to it. Thanks so much for your blog! Two days before Thanksgiving, I decided to give it a whirl. Wow! So easy and what an impressive result! I never would have attempted it 2 days before the holiday. Thanks so much!
Is this grout renew good for counter tops? As in ok for food to be on it? Unfortunately my kitchen counter tops are tiled.
Just to add my 2c worth. In my last house I had reclaimed terracotta tiles (from a French barn, yeah I know stupidly expensive but I loved them) which were unsealed because I didn’t want my dogs to slip on them. They got filthy and the grout even more so. I developed a system which renewed them completely. I made a strong mix of biological (enzyme, I have no idea what you call it in the States) powder and hot water. I slopped it liberably over the floor, shut the door and forgot about it for an hour or so (or even left it overnight), then I rinsed it off with clean water. The enzymes had eaten the dirt. Win!
Thanks so much for sharing this project!! My kitchen and bathroom tile grouts drive me nuts, going out to buy it this week :)
I just now found your blog [from Southern Hospitality] and this grout paint is just what I need! I have scubbed and scubbed but the tile still looks dirty. I am trying this product this weekend!
Love your home and your decorating stlye.
So I have never been a blog follower or reader frankly, but a co-worker told me about someone who had craft paper floors and I was intrigued. I Googled it and stumbled upon this amazing goldmine of a blog.
In fact two days after finding this my fiance brought up getting someone to clean the grout in the kitchen. I had just read this post and informed him there was no need, the grout wasn’t dirty just an ugly color! I then told him for $12 I could make this floor amazing ($88 less than the professional cleaners I might add). Two days later I had changed the whole look of the kitchen by using black grout on the floor. The walls are an amazing shade of red in this kitchen with white trim so the black just makes everything pop!
I did try a lighter shade first (bc he was very hesitant to trust the black would be amazing) and in doing this I discovered that the light colors gave me the same problems of coming up if I wiped as instructed but the black I could wipe off almost the same second I applied it and I stayed beautifully with only the need for a second coat here and there.
Thank you for this inspirational blog and advice! It has really given me the confidence to do all the projects I’ve wanted to do! Now i just need to convince the fiance to let me paint the kitchen cabinets white instead of the dated 70’s wood stain color they are. Thanks again and can’t wait for the next project!
This grout colorant works fantastic, but you really should get the floor (grout) cleaned first. The problem with “painting” over the dirty grout will make the colorant not last near as long. With a properly cleaned (and dried) floor, this colorant and sealant works FANTASTIC and will last for years. If you’re around the Tallahassee, FL area, I can take care of this for you.
Hey Ashley, you are right, these Baoding Creme Bricks would be perfect, but they are really expensive. I like your low budget idea of restoring old grout. The best thing about Polyblend is that it is cheap and contains grout sealer, which makes is very efficient protection from stains and moisture. Great job!
I would love to try this to clean my grout tiles. Thanks for the tips!
I tried this to my grout tiles and I love the results! I would recommend this to my relatives and friends. Thank you Ashley!
I’ve used these tips since reading this blog on my own tile and grout. It worked like a charm! So from there I have used it on many of my clients homes. Thank you for sharing!
That’s amazing! Our kitchen counters need this desperately! Thanks for the great idea!
I had reclaimed terracotta tiles from a French farm in my last house, I found a way to get the grout really clean. About once a month I made a strong solution of enzyme washing powder and spread it liberally over the floor. I left it to soak until it was nearly dry, and then rinsed off, lifting all the water off with a towel under each foot and walking like Charlie Chaplin round the floor. A pain, but it kept it from ever getting really grotty. In winter I would do it with the underfloor heating on. (those terracotta tiles are super absorbent.)
Hi Irene!When you seal your wood canvas with Gesso you have to allow it to dry ceeplotmly. I usually do multiple ones that way they are ready to go when I’m ready to paint on them.I usually do at least 2 layers of Gesso on all sides including the back (3 layers is ideal) for longevity.Once the Gesso is dry, then you can sketch on on it.I sketch on Vellum or Tracing paper first so all the erasing and corrections are done on that and not on the wood. Once I’m happy with the drawing then I transfer it using another piece of Velum that I have rubbed ceeplotmly with a 4B pencil, you can purchase transfer paper, but I just make it my self.By transferring the drawing, you keep the Gesso clean and then begin to paint.If you do not want to deal with transferring, you can always add a layer of clear coat to the pencil sketch that is on the wood, let it dry and then start painting. The lead will be sealed and will not mix with your colors.I hope that helps.You’ve given me a nice idea for a blog post and I’ll be explaining it using pictures.Take careMaggie
I guess finding useful, reliable information on the internet isn’t hopeless after all.
Now I know who the brainy one is, I’ll keep looking for your posts.
Great post full of great pointsI m new here.i was looking for this list in google but didn’t anythink worth trying.Fortunately i visited this Blog and find what i wanted.Thanks for sharing it.So much inspiration! Thank you for all of the time it took to put together this great resource.
http://www.trueclasshandyman.com.au/our-services/tiling-and-painting/
Awesome post! I badly need this. Thanks for sharing.
I have honestly never really paid attention to the grout in my tile floors before. That is, until someone commented on how dirty it was. Thanks for the tips on how to clean the grout, judging by the pictures you have here, it works great.
The Photoshop skillz comment was the best LOL. But really, great job — the before and after pictures look amazing. Definitely not bad at all for a $12 bottle!
Great tips for renewing dirty Grout. Polyblend works amazingly.After cleaning floors it may feel us like whole house is shining.Thanks for sharing blog on such a awesome product.Keep it up!
Grout cleaning is the most important part of house cleaning.I tried many cleaning products,but stopped using after some time.While PolyBlend grout cleaner is awesome and have very good results.
Never leave the grout dirty and paint over it because it won’t last as long. I found sometging that is a great cleaner. It was a lot of work but I want to be sure the paint lasts a long time. You can also tape around the grout edges so you don’t get paint on the tile.
Please let me know which grout sealer you are using. I love your tips. Our grout is 10 year old and it looks so dirty now I want to give fantastic look to it.
This was a so nice and interesting
information in this article
paint renewal
thank you
for sharing this
Information.
Your claim that your tile is just generally ugly is pretty funny. It’s easy to see why that tile color would displease you.
I used this exact product to reseal our shower grout. Less than a year later it is completely flaking and peeling off. And yes i did clean the grout thouroughly before hand. Also had the wiping off issue. I let it dry and went back with a razor blade. The whole thing took hours of labor with no real results. I am now considering your tile painting technique. Thanks for the tips!
Hi, your floors look great and I am curious and to how well the grout paint has held up. Any problems with it eventually coming off? Do you still clean it the same way as any other floors?
Thanks!
I followed your method instead of what the bottle said, and it turned out great! Thanks for being candid, it was certainly helpful!
How has the painted grout held up? Any cleaning issues?
I’VE GOT HALF OF MY HOME DONE. VERY TEDIOUS. THE RESULTS ARE AMAZING! YOU WON’T REGRET DOING THIS. I TALKED TO A GUY THAT WAS A TILE MAN FOR A HOME DEVELOPER. HE SAID MOST NEW HOMES DON’T COME WITH SEALED FLOORS. SAID HE’D USED IT IN HIS PERSONAL HOME AND I GREAT STUFF. HE ALSO SAID HE DID THIS EVERY 3 YEARS. HAD A LARGE FAMILY AND DOGS. LOL!
Thanks for a humorous and necessary post. I seriously have issues with tile and grout. We moved 9 months ago. And there is gross tile EVERYWHERE!! And the grout is just nasty!! I’ve tried grout cleaners, all these homemade cleaning pastes and even gel bleach toilet bowl cleaner straight from the bottle. And my floors still look nasty. I NEED to try this!!
Thanks!
My grouts were in a bad shape – all shabby and dirty. I called Fresh Tile Cleaning Melbourne and asked if something could be done. They agreed to provide guaranteed results with grout restoration and I accepted their rough estimate. To my surprise, I got all the grouts restored at a very minimal price as compared to the cost I would have spent in case I had to replace the grouts. And my floors look lovely. Thanks!
Tile cleaning is one of the most trouble making and annoying task, which I think you guys also never want to perform. I had hired professional tile cleaner for cleaning my tiled room and those guys came the same day of booking and clean my tiled floors and give it a clean, shiny and attractive look. If anyone of you looking for a professional tile cleaning company then I recommend Deluxe Tile and Grout Cleaning Melbourne.
I m working lady with a joint family and yesterday I organize a party for my son birthday and seriously I don’t have time to spend on cleaning of tiles and grouts. So that I hire a professional team from Fresh Tile and Grout Cleaning Melbourne and these guys come within 2 hr and clean my floor and after the job which they perform my floors look so clean.Thanks to them. These guys perform I highly recommended job!!!!
Tiles were the dirtiest parts of our home until we contacted Koala Cleaning for a professional tile cleaning. They not only helped us to get rid of tough water stains and debris accumulated on our tiles from years but also helped us with some really useful tips that are still helping us to maintain the shine of the tiles. Along with the brilliant services, the thing that made me love this company is the use of chemical-free cleaning agents. We have toddlers at home and were worried about the effects of chemicals on them, but on having a look at their cleaning agents, we were sure that the cleaning process won’t harm our kids. We would recommend this company to all the homeowners who are looking for a reliable and effective tile cleaning company in the area.
Thanks for these terrific tips about cleaning grout. I really appreciate it. I’m going to try Polyblend Grout Renew on my kitchen floors. None of the other products I’ve tried have worked. Your floor looks wonderful after using your advice. When looking for ideas on how to clean grout, I found this article: https://housetipster.com/housetips/376/easy-steps-to-replacing-grout
It has some helpful tips also about how to effectively clean grout. Thanks again! :)
All of your tips are very useful to clean dirty grout .A lot of thanks for this post and If you have some more, please do share them as well.These tips are quite essential. Great post .
I’m gone to inform my little brother, that he should also pay a quick visit this web
site on regular basis to take updated from newest information.
Where can I get the grout renew from
I bought mine at Home Depot
Curious…hw did the painted grout hold up over time??
For years I have used a good quality floor paint to paint grout. Be sure your grout is clean, then paint the grout with a tooth brush, wipe paint off tile. Lasts !
So easy to get the paint color that you want (paint store will mix paint for you). And it will last!
I have used the grout renew on all of our tile. We have tile on most of our main floor and also the master bath. It doesn’t last forever. I re-did our kitchen grout in 2020 when we were stuck at home (it was looking dingy again after 2-3 years). The high traffic areas get the dirtiest. It’s time to re-do the half bath and part of our hallway. I bought contractor knee pads this time! I think I will try your method this time also. I kept accidentally wiping off the paint in the grout lines, too. I did our master bath a couple years ago but chose the wrong color. I bought a better color and will hopefully tackle that, too, this spring. I clean my tile floors with a steam mop. No chemicals, not even vinegar and baking soda because we have a dog who licks things off the floor.
Hi ,
I saw your shower paint job, but could I use this Poly Blend Grout renew for a shower. Its beige tile with yucky grout that does not come out clean- no matter what products I use on it. This seems like a great answer instead of dremeling the grout out and replacing with new grout.
I don’t have any personal experience using this in the shower, but I think it would be a great solution.
Wow, what a transformation! I’ve been dealing with grout issues in my own home, and your tips are a game-changer. It’s amazing how something as simple as cleaning your grout can make the entire room feel new.
On a related note, clean grout isn’t just aesthetically pleasing; it’s also beneficial for indoor air quality. Dirty grout can harbor mold and mildew, which can release spores into the air. These spores can be harmful to breathe in, especially for those with respiratory issues. By keeping your grout clean, you’re not just improving the look of your home—you’re also making it a healthier place to live.
Thanks for sharing your insights. I can’t wait to give this a try!