
How to Make A Plank Wall
Update: If you’re actually looking to follow this tutorial, then please read this planking tutorial as well. It uses the same technique but turned out much better and was a smoother process.
I’m so excited to be writing this post…it means we’re working on our kitchen again! The last significant kitchen post I did was nearly a year ago…. which means that most of y’all didn’t even know that we are remodeling our kitchen. So allow me to do a super quick review of what we have done so far.
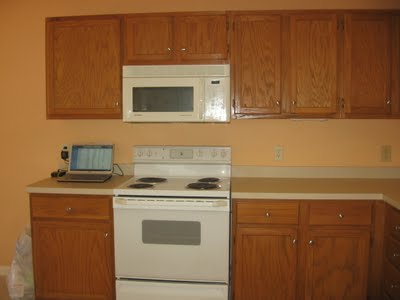
First, we have the before pictures…

Nice, right? The first thing we did was buy new appliances (after painting it, of course)…

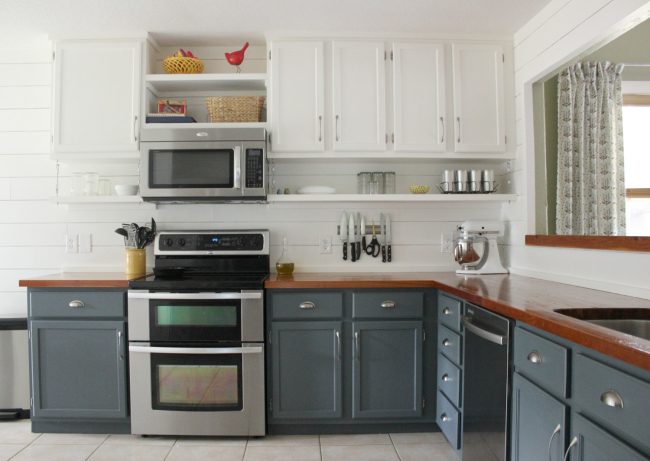
After those were in I got the itch…the remodeling itch. The new appliances looked so nice and the rest of it looked so terrible. Adam surrendered to my pleas (really, there’s no point in fighting me) and we started with painting and raising the cabinets. This is what It looked like after our first big kitchen weekend…

Next thing to go was the countertops…

And that brings us to a couple weeks ago. Now I have always loved plank walls, The Lettered Cottage has them throughout their house and I’ve always thought they added so much character. However, I live in a fairly new house and underneath my sheetrock is not planked awesomeness just waiting to be revealed. So one night I was perusing Pinterest and found a picture of a beautiful plank wall in a new house. I clicked over, read her tutorial, and got excited. I showed Adam…and he thought it looked awesome too.

Our conversation about it was pretty simple…
Me – “Baby, doesn’t this look awesome? She has a tutorial and it looks fairly easy”
Adam – “Wow, that does look good. You wanna do it in the kitchen? I like it way better than the beadboard.”
Me – “Heck yes I do! But I want to do the whole thing…kitchen and dining room, floor to ceiling. “
Adam – “Sounds like a plan.”
And then something amazing happened….we actually did it. In a timely manner. And I love it. Go us!
So here it is! (Before you grimace, this is NOT the finished product. It is just the first step in a three-step process…we still need to paint and add trim.)


So here is how we did it.
(I know I keep saying “we”, but rest assured, my only part in this project was standing around (aka. wrangling kids) saying things like “This is going to look awesome”, “it feels so cozy now” and “ohmygosh I’m terrified to paint it and ruin everything.”)
Materials needed –
- 5mm 4×8 underlayment cut into 6-inch strips (the hardware store will usually do this for you)
- Nail gun
- Spacer for making the gaps even (you can use a nickel, comb, framing square, etc.)
- Sandpaper
- Chop saw
- Tape measure
Tutorial –
First we bought the supplies, which is really just plywood. Here is what we bought…

It’s the cheapest, thinnest plywood we could find. We bought nine sheets, so it cost us less than $100 to plank the entire kitchen and dining room.
Here is the beautiful part of this project and the reason my husband was so willing to do it….the hardware store will cut the plywood into strips for you, for free. We had them cut into six-inch strips, long ways (so 6 in by 8 feet). It was A LOT of cutting and would have taken forever to do on our table saw. It took them awhile to do at Home Depot, even my boys got tired of watching the “big machine”. I think I’ll wait awhile before I show my face in there again. Haha, just kidding…I’ve already been back twice.

This next step we didn’t do, but hindsight is 20/20. What you should do next is paint the wall the color you plan to paint your planks. If they are going to be white them paint the wall white, because painting between the cracks afterward is a nightmare. Also, take the time to run a piece of sandpaper over the edges, the final product will look much better if you do.

Putting it up was pretty simple. It took us a while because he had to cut around windows and outlets and all that jazz, but if you want to do a big blank wall then it would go really quickly. You just slap a plank up against the wall and secure it with a nail gun. The spaces between the planks are a little over a 1/8 inch…we used a comb to keep all the spaces the same.

The vertical seams are butted right up against each other because I want them to show as little as possible.

As far as the outlets and switches go, we chose to cut around them. It would have looked cleaner if put the planks behind the outlet covers, but then you have to move the actual outlets out be flush with the new wall depth. We did that with the beadboard and it was a pain, plus the outlets were always loose and the covers wouldn’t stay on. Not worth it, it’s a plank wall after all…imperfect is good! Update – we ended up fixing this and they look way better, here’s how we did it.

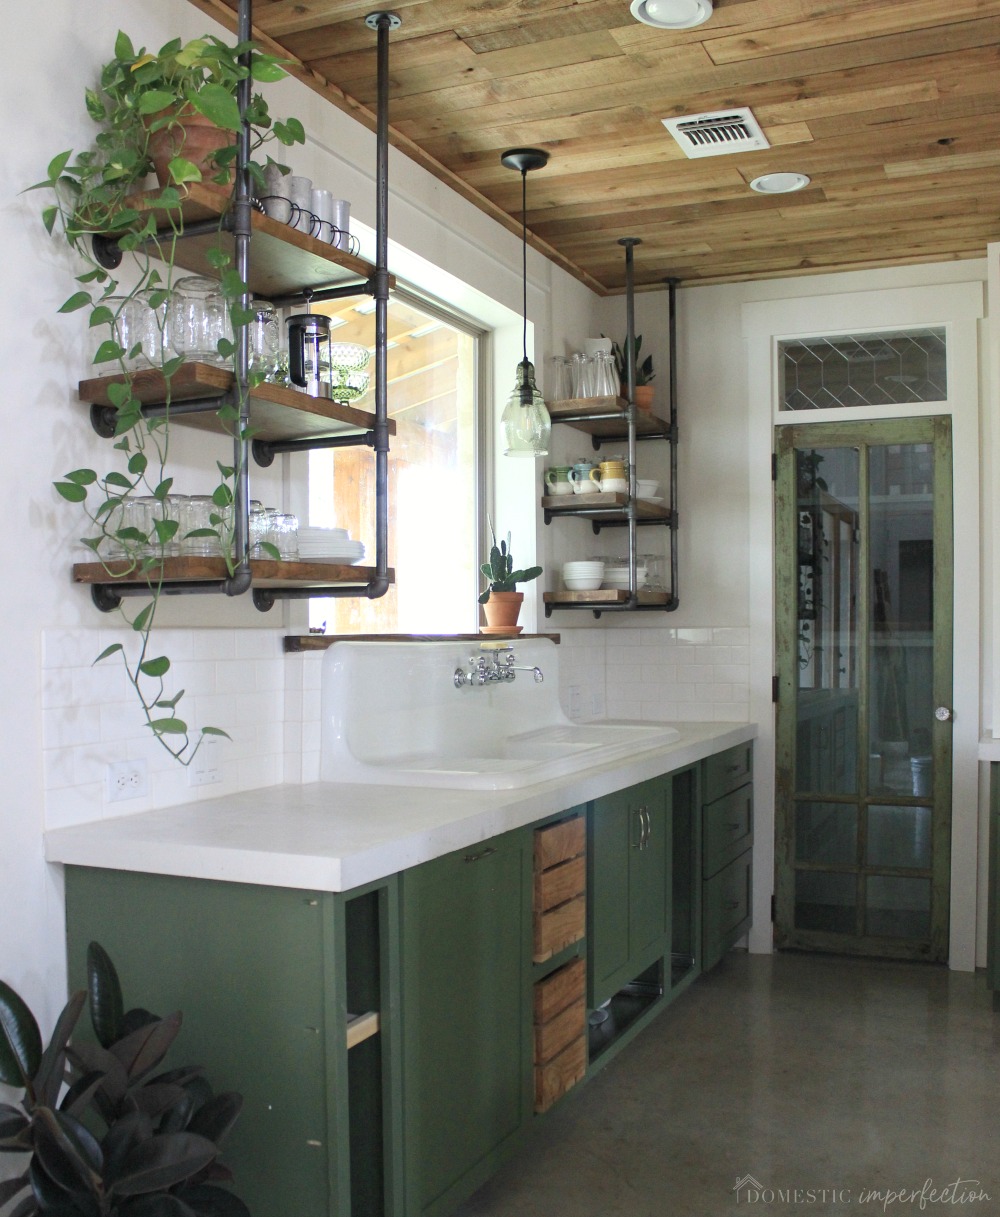
That’s pretty much the process! We have rounded corners in our house, so this is what the corners currently look like.

After I paint we will add trim to make everything look nice and clean. Not quite sure how yet, we’ll cross that bridge when we get there. For now, here are a bunch more pictures…


My original plan was to paint them white, but I have a confession…I really like the wood. It feels like a cozy little cabin to me, like I should be cooking over an open flame and wearing a bonnet. I might just like it because it is new and different, but I just can’t bring myself to paint it. I don’t want to leave it wooden either, because it will always feel unfinished and would probably get old pretty quickly. So I’ve decided to whitewash it and get the best of both worlds…white, but still showing the knots and “woodness”. Update- whitewashing was a total fail, go here to read about the process of painting the planks.
Kitchen Remodel Links
Shop the Look


WOW! This is so awesome! It looks great. Now I’m trying to figure out how to talk my hubby into doing this :) Great job!
Hehe, indeed, I wasn’t even aware you had started this since I started following your blog earlier this year. It does look fantastic and I’m sure it’s scary to paint it. Can’t wait to see what white-washed looks like. We are moving into our new *old* house next week and I’d say, oh, 75% of the walls are planks (as in, 1965 planks) and the CEILING is planked as well. I’ll probably start some kind of blog, mostly for me, to show. Not sure what I want to do with them, but I will watch your progress with wrapt attention :)
I am in the process of planning to build a new house and really love the planked wood look…I plan on having vaulted ceilings and would love to plank those too in my combined living and dining …how difficult is that and I want it painted all white for a cottage look…
It. Looks. SUPER GOOD!!!! You must be thrilled. Great job guys. The dining room looks especially fabulous… but I think it’s because I love your windows :)
I love the walls! I would also be afraid to paint it after all that hard work!!! White wash sounds great. Will you be painting the top cabinets now or leaving them white?
The top cabinets will be staying white. At least that’s the plan for now :)
Wow, I can’t wait to see what it looks like once it’s whitewashed! We have thick vertical planks on our walls in the entire kitchen and living room. While I like it-it does lend itself to the cabin look like you said-there is just SO MUCH BROWN. The floors are brown, the cabinets are brown, the walls are brown, the trim is brown. I would like to lighten the room up a little, but am afraid to paint because I have no idea what that’ll look like and I’m not brave enough to find out. Whitewashing may be a solution for me because it’s sort of a middle way!
I’m afraid too! But I;ll gladly let my walls be your guinea pig!
That really looks awesome! I’m thinking a stain and no paint would be a good answer. Love the wood look. It’s so natural! Great job!!
WOW! Wait… let me say it again WOW!
Thank you so much for linking up to the party… this project is AWESOME!
I am so excited to see your great progress with this. And the COST!! That’s amazing!
In our last house we had a cedar-lined basement – walls, built-in shelving and ceiling (floor was carpeted.) Like the Rachel said in the previous comment, it was so brown and also very dark. The quality of the wood was really high so my ex wouldn’t agree to paint, so we whitewashed and it looked way better. So much lighter! You’re starting with an even lighter wood, so it should be gorgeous. And if not, you can always paint over it (which you can’t do in reverse.) I think it will be so beautiful with your blue cabinets, I can’t wait to see it!
I’m getting my house ready to sell right now, so projects galore are all around. I’m considering turning my existing blog into a crafty, project-y blog, so I will have a place to put pictures and such. I will keep you posted! :)
Cheers!
I’d love to see some of your projects! Let me know if you do :)
Woohoo!! Awesome job! The plank walls totally look fabulous! I really love the natural look in the dining area. If it were me, I’d poly those in a dull and leave them natural. (my friend did her ceiling too, & it feels cozy & clean) & I love, love, love your idea of white washing the planks in the kitchen!! Hubby did a great job! Nice to have a man around the house!! Love your blogs! Gets me so enthused! Keep em coming:))))
Thanks Deborah! My husband is awesome, I don’t know what I’d do without him!
That looks really great! I wish hubs and I had time to do these sort of things in our home!
You do! Adam works and goes to school and just does projects when he has free moments…this project took nearly two weeks. And for that two weeks the entire kitchen was covered in a thick coat of sawdust and was blockaded from the kids with our upholstered ottoman. The whole house was dusty and we ate in the living room. Aren’t projects fun? Haha!
Wow! What a great tutorial! Looks awesome! I’d love for you to share this at my blog party, Twirl & Take a Bow at http://www.houseontheway.com. It’s every Tuesday through Sunday. This would be a great addition! Hope you can stop by!
Leslie
EEEEEEEEEEK!!! I love it! Guurrrl, you guys rock! I’m definitely with ya on the whitewashing. Let the wood show through! Also, painting that grout will look awesome!!! Use that stuff I used…you guys can knock it out in an afternoon! Can’t wait to see the floating shelf & chair reupholstering too! I always get so excited when I see a new post from you because I know it will be awesome!!! xo ~ Virginia
Looks so good!!! Question, did you sand the plywood before applying or sand after you had it all up? Or did you not sand it at all?
Thanks Stephanie! I’m not planning on sanding at all. If there’s a rough edge I’ll smooth it out but other than that I’m just going to let it be.
I have to say, I don’t really like the Pinterest picture all that much – I don’t like the white. But I love your wooden walls, and I think whitewashing will be great; I’d be tempted to do a colorwash, myself, I think, or a colored stain. What a beautiful job you guys did!
Looooove it! Our first house had a completely planked room, with cedar (ya…) and I loved that room!
I am impressed that your HD would cut them all for free. Ours gives you the first two cuts for free, but every cut after that is $.25 or $.50. It still might be worth it though to not have to do them all yourself. I think the whitewash is a good idea. I am a fan of cabiny in a cabin, but not so much in my everyday life. And I do think whitewash would look better than pure white paint. Good luck! Thanks for the post.
I’m surprised too! I expected them to change their tune after cutting a few strips…but they didn’t. Maybe they were giving me preferred treatment because I’m their most frequent customer, lol.
Wow y’all that looks amazing!! Now I’m inspired to do that in our office! Great job!!
Please don’t go white washing…… The planks look so awesome as is …. Can’t you do the staining n polyurethane magic you’ve created in the past ????? N also pleading to change that grey on the lower cabinets …..
Apologies if my suggestion is annoying…. But its simply an opinion girl ….
Love love love your blog.
I can’t leave them as is. I admit they look pretty nice in pictures but in real life they are far to imperfect and unfinished. I am going to do some test strips though to try out a few techniques…I’m pretty set on whitewashing, but it wouldn’t be the first time I changed my mind! What color would you change the lower cabinets to? Not saying I’ll do it, but I am curious. And don’t worry, your allowed to have your opinions…I’m not offended by them :)
your kitchen looks beautiful. The white cabinet paint you used, is that white white or kind of antiquish white? Also I would wait for your post on what you do to the floor tile grout. We are gifted with the dirtiest floor tiles and grout by previous owner. The grout cleaner guy told us that we don’t have caulk betn baseboards and tiles so grout cleaning would cause water damage to walls and floors. So we are living with ugly dirty grout for now…
The white is Bistro White from Valspar…color matched at SW. It’s a brighter white, but not blinding. Everything white in our house is painted with the same color. I’ll do a post on the grout, I’m just going to copy what she did in this post … http://www.livelovediy.com/2012/08/how-to-restore-grout.html
Can’t wait to see what it looks like whitewashed! I have the same thing not wanting wood, but not wanting to cover it up — so I really want to see what whitewashed looks like!
~Angela~
OMGosh! How fantastic! I can’t wait to see what it looks like white washed. Thank you for sharing. Visiting from French Country. Would love it if you would share this at my Make it Pretty Monday party at The Dedicated House. http://thededicatedhouse.blogspot.com/2012/08/make-it-pretty-monday-week-11.html Hope to see you at the bash! Toodles, Kathryn @TheDedicatedHouse
Ashley. YOU. ARE. AWESOME! I can’t wait to see the finished project as well! Also, I love that you are so much like me and mine…we take a LONG time to finish something cuz we’re cheap…uh, thirfty! ;)
I LOVE the look of this! Great job!
Oh My Gosh! I love this so much. Can’t wait to show my husband!!
I’m so envious! Now I know what to do with my bay window area in my kitchen THANKS! I would love it if you would visit and share this on I Freakin’ did it Friday @ Miss Information!
It looks so good – I’ve been wanting to do this in my laundry room. Now, I REALLY want to do this!
I really like the look of the planks! What a great idea! I cannot wait to see what the finished product. Also, thanks for keeping it real and showing every stage of the progress. I like when bloggers share every step of the process.
Oh, no, oh no!! Is this a sign that I’m suffering from Domestic Imperfection Envy? That I’ve come down with “I Can Do This, Too-itis”? Does it say something about me that this makes my pulse quicken, but a new pair of shoes (never – they come from Goodwill!) doesn’t? The reason I’m wondering is because I DREAMED of you, the plank wall, Adam and yes, even the organized pantry!! So funny. It was a long, detailed dream, in color, no less, and had all kinds of details that you and Adam would probably truly lol over. And it came complete with the embarrassing scene which we’ve all had, in which we dream we find ourselves in…oh, say, a college physics classroom, facing a final exam on a subject we know nothing about. :-) Or have forgotten if we ever did. This isn’t the best place to tell you about details, since others are interested in the actual wall, and how y’all did it. Or perhaps interested in seeing another reference to FNL and Tim “I’m a Hunk and Can Act, too Riggins”. If I figure out how to share the story with you, I will.
I love the walls – they are beautiful, and I think I might leave them just as you are thinking. I am wondering if I did the same if it would catch lots of dust and/or pet hair, making it difficult to clean.
My husband works at Home Depot, developing training to improve customer service, so I love that you’ve had such good experiences there. Even as I write this, from Atlanta, HD employees are gearing up to do the great job they always do after natural disasters, such as what will likely happen with Hurricane Isaac. Strictly volunteer duty, hard, dirty, often hot work, but they have to turn away volunteers. :-)
LOL, you dreamed of us and our plank walls? I love it! And Tim was in it too? I’m dying to know details now…you can e-mail it to me if you would like/get a chance :)
I am drooling! I love that look and you guys did an awesome job!
What a neat idea. I agree with the cabiny feel but those stainless appliances kinda detract from that. So, yes, whitewashing (or something) needs to be done.
And speaking of appliances, your huge fridge looks like it is kinda hangin out in left field there. Maybe because it is so big? I wondered, have you ever considered building it in ala Young House Love? Looks like a fairly easy project for a DIY-er such as yourself. Just offering an opinion :)
Your house is looking awesome and I eagerly anticipate your updates. Great work!
I’m in the midst of painting the planks right now (whitewashing looked terrible) and I have to admit that they look much better and pull everything together. As far as our fridge, it is kinda lonely and huge over there. I remember reading that post on YHL and am going to have to go back and reread it now to see it it would work for us. Thanks for the suggestion :)
I totally agree with you Fran, metal and wood I guess is not a good combination. Try to use metal wood wall plaque it is a perfect for your stainless appliances.
Very nice! Maybe the honey will go for this as a compromise for what I want one of our walls to be done in. I worked at a place a long time ago that they had cut brick size pieces of varying thicknesses of plywood and put them up randomly covering the entire wall. It was varnished keeping the original light wood color. It looks pretty awesome. When ever I mention it he shakes his head and walks away.
Haha, shakes his head and walks away…sounds familiar. That wall does sound amazing, though the plank one would be much easier. I bet you could sweet talk him into it :)
OHMYGOODNESS! I LOVE it! I don’t have a wall in my house I could do this on – so I’m totally envious of your whole project! And kudos to the HUbs for participating!
That’s a great tutorial and your walls turned out gorgeous!!! I have this linked to my plank walls post too today, I’m rounding up the really good plank walls for inspiration!
wow, now that is something!
Oh me oh my, I’ve been wanting to do this upstairs, and I never thought I could get my hubs to do it, but I just showed him, said look she gives a tutorial too. And guess what, he said OK. Yikes I can’t believe he said OK. Did you husband have a talk with mine? Must be my lucky night. I love how your did both rooms, it looks great and adds so much character to the rooms. Can’t wait to see it painted. Thanks for sharing your creative inspiration with Sunday’s Best – you helped make the party a success!
Congrats on getting the go ahead Cathy! I love it when my hubby says yes :) It really was pretty simple. Not that it didn’t take us nearly two weeks, but that’s because my husband works and goes to school and the two babies really slow things down. I’m in the midst of painting it right now (whitewashing looked horrid!) and I love it even more than the wood.
Wow! This looks fantastic! i don’t think my man would be so agreeable to the undertaking of such a big project. It would happen, there would just be so much more convincing first! lol Ironically, he is also named Adam! :P
I am featuring you tomorrow during the Best DIY Projects Link Party. Thank you so much for visiting and sharing your project over at The 36th AVENUE. Love it!
Beautiful!
AMAZING. I want to run to the big box store and but me some bunches of wood.
Wowser! Looks like a lot of work, but I love it so far. Can’t wait to see it all finished!
This looks great!! I have been thinking about doing it in my bedroom. I can not wait to see it after you’ve finished it out!!
Wow! That is beautiful! I love it and I love the fact you didn’t actually use planks. You would be broke. I can’t wait to see what else you have in store!
Thanks Kim! Yes, actual planks would have cost a fortune and the project would have never happened. BTW, I’ve been seeing your kitchen reveal all over blogland and just have to tell you that it looks amazing. Great job! And congrats on finishing….I’m not yet convinced that we will ever finish ours, lol.
I have NEVER seen this done before. Yay you for finding it and I am crazy for how it looks. Talk about adding character. Nicely done. Thanks so much for sharing Ashley
hugs,
pr
I’m so glad you decided to whitewash them. I love things painted white — cabinets, furniture, and even the planked wall I installed in my friend’s house but when I saw your pictures, the wood just felt right.
I’m so sad to tell you this, but the whitewash looked terrible. I did one wall, stepped back, and thought “What have I done!?!” So now I’m painting them white. They look really good actually, but now Adam’s getting the itch to redo the floors in something darker and more rustic. Love that man, lol.
I LOVE this! I have been wanting to do just thing in my bathroom and, let’s be honest, a wall here and there throughout my whole house because I love the look of the plank walls. THANK YOU so much for sharing the how-to!
Your welcome :) I love it too…I think I’m going to incorporate planks into my master bedroom makeover.
WOW this is gorgeous! I’ll be featuring it later today!
Love the planked walls. Looks fabulous. This will be one of the features at Wow tonight.
AAA.MAZ.ING! I’m giddy with anticipation for the reveal!!!
I love the wood, and the white wash. You have SO inspired me! Adding this to my “to do” list, thank you!
YOU & YOUR HUBBY ROCK!!!!!! This is such wonderful inspiration for me!! Thank you & I look forward to the finished pics!! :) again, THANK YOU
Guess what I did today? And it’s all your fault. Ha! We used your suggestions and planked our dining room ceiling today. Here’s a link to our progress post – I linked back to your post.
http://rindymae.blogspot.com/2013/01/gettin-my-plank-on.html
Thanks for such a descriptive post! Off to get some rest so I can be back at it tomorrow!
Hi love your walls! I am particularly interested in how you decided to vary the vertical seams they look great. I gotten all the supplies but am frozen with fear of not varying the seams in a random enough manor… please help:) Thanks! Kate
I just wrote this whole comment about how we used a comb, then I re-read your comment. VERTICAL seams. Hmmm, I don’t think we thought about the vertical ones all that much. Here’s what I’m assuming my husband did…While your doing your wall you will end up with a lot of waste, so when Adam was going to run into a spot where the seams lined up he just grabbed one of the extra pieces and used that to uneven things up, if you will. I wouldn’t really worry about it too much though, you can’t see them all that well when it’s all said and done. We did end up with a little cluster of seams in one spot, but I covered it with a plate wall, lol.
Since this area is not visible to the eye, chances are that you can rip off the
wooden bottom of the cushion and not worry about how it looks.
Use a whole lot of paint- Nothing spells spring than redesigning your home with the newest cans
of colors. A table is adequate in many spaces, especially if
you want to keep the room open and bright.
I am totally planning on doing this in my living room from my pass through on down and all the way around. However, I have a couple questions. Did you use any kind of adhesive or just nailed it to the studs? I am a reader of This Old House magazine and they are big fans of painting all 6 sides of a board in a project like this to prevent warping. I really would hate to do that because it would only be that much longer until I have a finished project I can love. So have you had any warping of the boards or is not a problem in this situation because they are thin enough? If they warp, you could just add a few more nails? And, is there any reason I couldn’t just use the bottom board as my baseboard or will I have to reinstall my baseboards? (The flooring is carpet so I shouldn’t have a gap to fill.
We didn’t use any sort of adhesive or nail them into the studs…my husband just used a nail gun and put six or so nails in each plank. They seem to be in there pretty solidly. I’m sure painting all six sides would be better, but we didn’t. Just the front and the sides that show in the cracks. I do recommend painting the wall first though, because painting in the cracks afterward isn’t easy or fun. Nothing has warped, the wood we used is so thin I don’t wee how warping could be a problem, but even if something like that happens another nail will fix it. For the baseboard, you can do whatever you would like, but I think having baseboards makes it look more finished. You don’t have to remove them though, just start the planks above the baseboard. We only removed ours because we were replacing them with thicker stuff. Good luck with your project and e-mail me (or comment again) if you have anymore questions!
I love, love, love this and I totally plan on doing this in my living room, but I have a couple questions. Did you use any kind of adhesive or just finish nail it to the studs? I am a reader of This Old House Magazine and they are huge fans of painting all 6 sides of a board to prevent warping. I’m thinking that it’s thin enough that if it did warp, you could probably just add a couple nails going in at different angles to take care of it. What do you think? Has there been any warping since installation? And also,if I put my bottom board at floor level can I use it as my baseboard or will I have to reinstall baseboards over it? (My living room is carpet so there shouldn’t be a gap that would need to be covered)
This looks absolutely amazing! I really need to do this in our upstairs guest room! I’ve been eyeing some plank walls but I love how this one is white/tonal. We have an old farmhouse so I know this would match up perfectly! Thank you for sharing! :)
I’m concerned about the planks shrinking over time. Do you for see this happening? Thanks!
Thanks for shrgina. What a pleasure to read!
We’re attempting to put up two plank walls in my 11-year old son’s bedroom this week. (He’s a horse enthusiast and wants his room to look like a barn). We purchased our wood at the Home Depot last night. The two guys who cut it for us were great! Just FYI, we tried Lowes first. The closest wood we could find there was about $2 more per sheet, and we were told they could not cut it for us. Their policy is that they only cut to fit pieces in the customer’s car. After hearing that, we drove down the street to Home Depot, purchased the exact same wood you used, and waited for about 20 minutes while the guys cut the 10 sheets. They were able to cut the sheets two at a time, so it went a bit faster than we had expected. We’ll hang the wood Wednesday and paint Thursday. Fingers crossed it looks as great as yours when we’re finished!
Very nice! I always loved planked walls. A suggestion for future wall overlays: they sell plastic extensions for outlet boxes. They’re affordable, and allow you to make your outlets flush without them being loose. They also sell plastic outlet boxes that can be adjusted in & out of the wall, but would require cutting drywall in your case to switch to this style of box. But if you’re covering over the wall anyway, that is not such an issue.
What did you use as your baseboard?
The baseboard is just a 1×6.
SUPERB idea, How did you attach, with pneumatic brad gun every so many inches or use chalk line to mark studs? What is the spacer used in the one photo? I am thinking about doing this using a natural wood clear coat finish- I see you have not kept your sides of the material going all one way, as this was going to be whitewashed? Thanks!
We are about to do the same thing in our kitchen. I was thinking about buying shiplap, but it is really expensive. This idea is great. We have the same bay window in our kitchen. It looks really similar to yours. How did you handle the weird angles of the walls in that section? What kind of trim did you use to cover the seems on the angled part of the walls in that spot?
I am thinking about planking my kitchen walls, but I am wanting to stain them instead of painting them white. Would you reccomend using a waterproof sealer? I am just nervous about the wood getting wet or not being able to wipe easily. Also, I saw that you left a small gap in between the planks, is that something you would reccomend regardless of how the planks are being finished (painting vs staining). I guess if you didn’t space them they might just all blend together. Thanks!! Oh and your kitchen is amazing and it was a GENIOUS idea to create the open shelf under the raised cabinets!!
Thank you Stefanie! If I were to do wood planks I would probably seal them with a matte poly after staining (Varathane makes a matte water based poly that works great). I would also recommend the gap regardless, I agree that they would just blend together if you didn’t. Though if you are leaving them wood I would paint the wall behind them a brown color first, or else it might end up looking weird.
Back in Febuary we had water damage to our home due to an ice dam. Our ceilings had to be redone (yay! no more popcorn ceilings), as well as some wells. Six years ago I painted every well in our home with a faux finish and loved it. Unfortunately, they no longer sell that type of faux paint. Our painter said he could do a faux finish. Hubby and I went to check on the progress and uh…no he does not know how to faux…at all. I told him to ‘just paint it.’ I was disappointed, to say the least. We’ve been back in our home for over a month, now, and I still haven’t hung anything back on the walls. I know it’s because I don’t like my wall plain. I’m talking circles around the hubby and he’s asking, “what are you wanting to do?” I haven’t told him, yet, because he has a tendency to say, “it’s fine just the way it is.” Fortunately, planking the walls the way you’ve done looks like something I could do. I’m going to start with our laundry nook, first. It’s my least favorite part since they repainted. I have dark trim, which I might add, isn’t done very well at all. I’m going to replace that, also. I know it’ll look funny for a while, just having part of it completed. I want to do just plain trim, like you did, and white. When we were comtemplating what to do with the walls, after the damage, hubby said, “just paint them ‘medical’ white.” I should’ve listened to him. He’ll get his wish…sort of. I have a question, though…at your outward corners, did you just overlap the planks a bit to make them even, or did you put up a trim? Also, did you butt the planks up to your trim around your doorways?
We added trim to the outward corners, but I think butting overlapping them would work if you did it just right. All the corners in our house are rounded, so not adding the trim would have looked a little odd, like they are sticking out. For the doorways we jut butted them up to the trim. Spackling and caulk are your friends when your planking! Also, we planked my kids room about a year after we planked the kitchen, and I did it a bit different and it turned out much better. Here is the link to that post -https://wildfireinteriors.com/2014/02/planks-and-trim-in-the-soon-to-be-cowboy-room/
That looks amazing, well done on creating an awesome space. Can you nail gun the planks onto plasterboard walls then without a frame? Inspired!
Thanks
Katie
I love this and am planning on doing it in my kitchen! How is the planking holding up behind the stove? Just curious if you have had any issues with the heat or cleaning them?
Ashley…..ahem…..if you still have that itch, will you come do my kitchen? I love the way your plank walls look. Beautiful.
Just wondering how it’s held up? Did it shrink at all or warp?
We sold this house a few years ago, but when we did the plank wall looked the same as the day we installed it, no shrinking or warping at all!
I love this so much!! Amazing. Im moving soon and am definitely going to do this xx