
Decor | DIY | Furniture | House 1 | Paint Projects | Woodworking
Stenciled Toy Box
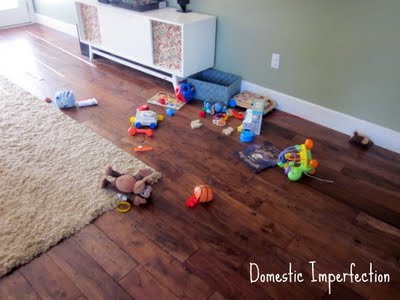
For a very long time now we have needed a toy box. Our current “tiny toy basket” just wasn’t working for us anymore. I could show you a picture of it all stuffed neatly in there, but lets face it … 90% of the time, this is what our toy situation looks like.
The first step to building a toy box was to nag proposition the husband to do all the manly labor. I gave him the dimensions and my best “helpless pregnant woman” look and to work he went. That helpless pregnant look is priceless.
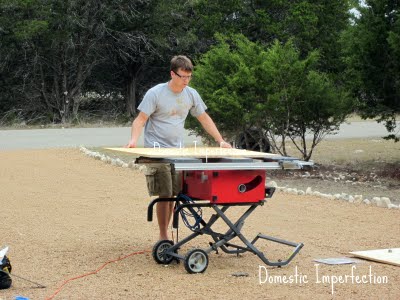
As you can see, doing work at our casa isn’t the easiest – we don’t have a garage. There are plans to build one eventually, though it’s going to have to wait awhile since they cost money and all. Fortunately for you we are now accepting donations.
.
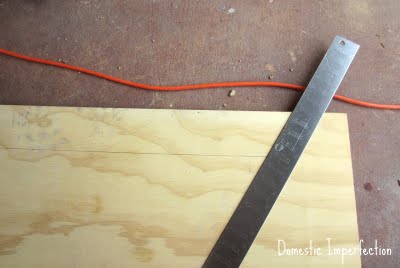
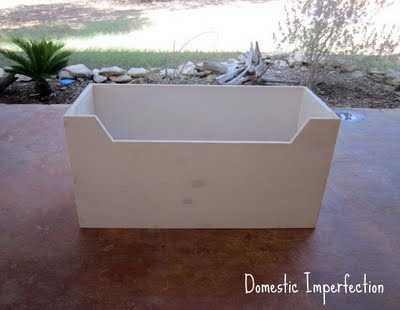
Once all the pieces were cut we quickly realized that there was no way our kid was going to be able to reach his toys.

Of course, if he can’t reach his toys than he can’t make a mess….but no, no that would be cruel. We decided to cut a hunk out of the front to make things more accessible.
.

.
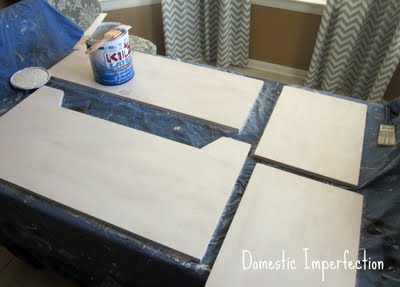
Next I primed…with Kilz…cause its awesome.
.
then assembled…
.
Then I painted the inside white and the outside with a reject kitchen color (mixed with white).
.
Forgot to take a picture of that step. Oops.
.
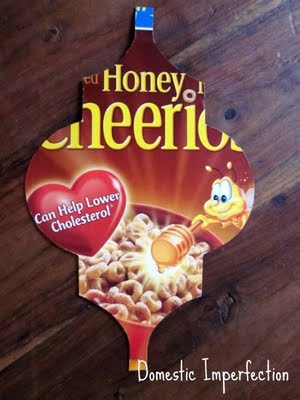
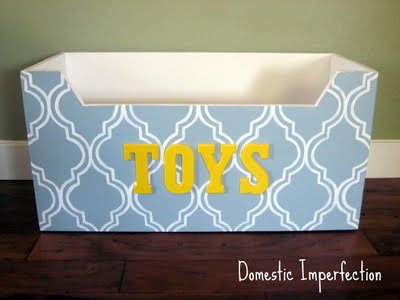
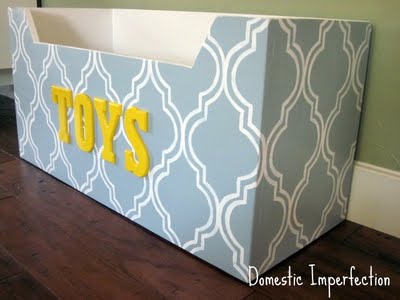
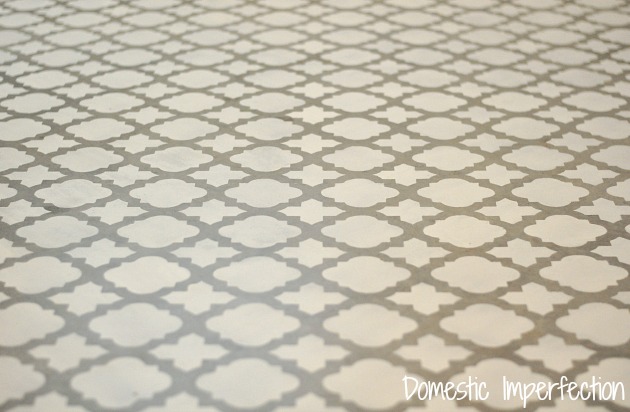
I really wanted to stencil the outside and used the template found here. I’ve heard for awhile now that a Honey Nut Cheerios box makes a great stencil, and it’s true…I just don’t think Chex or Fruity Pebbles would have been the same.
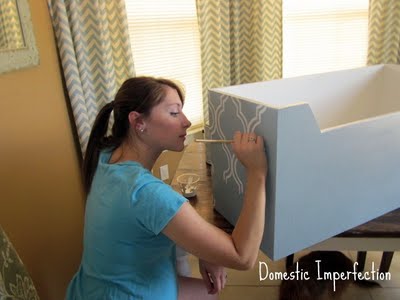
Here it is all stenciled onto the toy box (I know its a little hard to see).

And here I am painting it. I couldn’t imagine doing a whole room like I’ve seen some people do – it would take FOREVER. As I was painting I was thinking how horrible it looked, like a five year old painted it. Turns out that’s okay, and when you back up, it looks awesome. Thank goodness.
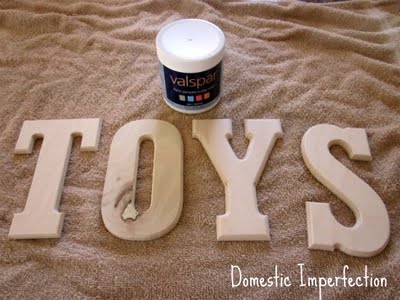
The last step was to paint and attach the letters. I had a free sample of bright yellow laying around, so I decided to use that.
And here, my friends, is my masterpiece. I love it….it’s sooo much easier to keep the living room picked up when the toys don’t fall out of the toy box on their own. Plus, its beautiful : )
.
.

And that is an adorable toy box! Great job.
I love it, and the stencil looks FANTASTIC. I have been searching high and low for the right storage solution for the toys and seems you nailed it :)
looks very nice!
Adorable- great job!
That is the most fabulous toy box ever! Love love love everything about it!!
Love that toy box and how you painted it! Really nice and fits in with your style!
I'm your newest follower BTW!
Stop by soon!
Rondell
This is so cute Ashely!! Love the stencil!! So much nicer than the old toy box.
That looks fantastic! I'm always amazed at what people can create from the simplest things.
this is beautiful. I have the same living situation with the toys, I was planning to craigs a chest but maybe making like you have would be easier?cheaper?. Great job!
Super cute. I started stenciling a wall and gave up after an hour of tracing only covered an 1/8 of the wall.
It turned out amazing! Great job! Stopping over from The Girl Creative linky party.
It looks wonderful! Great job on the stenciling. I saved that same stencil from Jones design for “one day” when I get some time :) Came over from Running with Glitter.
Adorable! Love your stencil! It looks great!
The stenciling adds so much detail! Great idea!Come check me out-www.alivedinhome.blogspot.com
love it so super cute come see me at http://shopannies.blogspot.com
Gorgeous!! That is ADORABLE!! Would LOVE it if you would link this up to my turquoise lovin' party going on right now!! ;) http://www.sweetlittlegals.com/
So beautiful! Thanks for linking up!
Emily
domesticdeadline.blogspot.com
What a LOT of work! It's GORGEOUS!!
Great looking toy box! I love the stencil!
Yeah, totally adding this to my project list that is way too long. This is just so adorable!!
Stopping by from Bella Before and After
This toy box is STUNNING! Thanks for leaving me totally inspired. I want one for my little kiddo now. :)
That is awesome! I didn't know I could make my own stencil. Thanks for posting. I'm a new follower from Homework's blog hop. Have a good day!
that looks gorgeous- the colors and the pattern! and i love the open top design so toys don't have to fit or be squished!
SOOO AWESOME! you guys did a great job!! thanks for sharing at Tell me Tuesday! :) you rock!!!
xoxo
ash
Your toybox is so cute! I love the stenciling and the colors!
Adorable! What a great idea for a free stencil too! Gives me inspiration for the tow box I am doing right now!
wow! I love this and the pattern you used! It looks great!
I would love it if you would share this and/or any other projects you have been up to at Tuesday Talent Show at Chef In Training! Plus there is a fun giveaway too! Thanks so much and I hope to see you there!
-Nikki
http://chef-n-training.blogspot.com
So, so cute!! The stenciling looks great and I'm sure it required a lot of patience! If you get a chance I would love to have you link it up to my party, The Creative Spark. Have a great night!
Jenn :)
SO cute! You've done an amazing job! Thank you for linking to Wicked Awesome Wednesday.
WOW! That looks great! Love the colors.
Visiting from Women Who Do It All!
Love this idea, you can never have enough storage–and what super cute storage it is!
I would love to have you share this at my link party, Show & Share!
http://southernlovely.blogspot.com/2011/08/show-share-3.html
I love this! Beautiful stencil!!
WOW this is amazing! This looks nothing like a 5 year old paint project! great job and colors.
Wow I am so impressed with this, great idea!
It's gorgeous! You guys did an awesome job on this toy box. I'm stopping over from Serenity Now linky party. Thanks for sharing! :)
Super cute! Love your diy stencil!
OKAY. SO I AM TOTALLY DOING THIS!
i just painted our toybox 2 days ago and have not been digging it.. THIS is exactly what it needs AND i already have this template! thanks for the idea. great job
Wow- how fabulous is that!1
Love, love, love this!!
I'd be honored if you'd visit and link to our Crafts for Under Twenty Somethings party going on now until noon Saturday!!
http://bearrabbitbear.blogspot.com/2011/08/crafts-for-under-twenty-somethings-4.html
Melanie
bearrabbitbear.blogspot.com
What a wonderful toy box. I would love to try this! Thanks so much for sharing at delicate CONSTRUCTION! I'm your newest follower :)
Thats the prettiest toy box I've seen!
So cute! Great way to store toys and have it also look great in your living area! Thanks for sharing! :)
Love it! The stencil is a brilliant idea! I lived using the pregnant look. It came in handy so many times!
Very impressed with the work you both did on this. Came out gorgeous and adds so much functionality and style. LOVE it!
I am a new follower from I Heart Nap Time Sundae Scoop. If you have a chance come by http://messforless.blogspot.com and say hi!
Thanks!
SO cute! And I love the painted pattern. I've been considering using it for my master bedroom, but want a stencil for ease and speed rather than all that hand painting for the WHOLE room! Anyway I'm featuring your toy box today on Topsy turvy Tuesday's! So thank so much for linking up!
I love this. We're going to do this for our playroom. I also like how it's heavy, so it wouldn't be easy to dump over. Right now I have a huge toy basket and my toddler keeps pushing it over.
How thick is the wood that you used? We have some, but I'm afraid it will be too heavy when we're done.
I'm def stealing this idea!!! i need a toy box for little miss ASAP.. We're currently using her babydoll cribs and when she wants the cribs she takes EVERYTHING out =/
I love the toy box! We're having the exact same problem with my 1 year old's endless mountain of goodies. I was wondering, what color are your living room walls??? I love the color. That is the color I was going for but our walls ended up too bright..
I wish I had an answer for you on the wall color…green is such a hard color to get right! What ended up happening was this…I painted the living room (or most of it) THREE TIMES and every green color I did ended up looking like something out of a babies diaper. Eventually I wisened up and started buying those small paint samples and I STILL could not get it right. By that time I had so much green paint that I just bought a five gallon bucket, mixed it all together, and viola…that's the color that's on my walls. Oddly enough, all my horrible rejects mixed together is the best color ever.
Great job! it's such a cute toy box.
So functional and freakin' adorable! I need better toy storage!
Wow!! I didn't know a toy box could be so pretty!! I've been dying to stencil something w/ that pattern. You did a great job!! :)