
Farmhouse Kitchen on a Budget – The Reveal
(Update: I hadn’t really intended for this to be my kitchen reveal post, I really just wanted to show y’all how I “decked out” my new floating shelves. Anyway, it has become fairly popular as a kitchen reveal post so I went ahead and added the prices for everything we have done so far in the kitchen to the end of the post.)
Well, my internet is working again and it’s time to show you my shelves! They are decked out, colorful, and oh-so-functional. This post doesn’t really have a story to go along with it like all my other projects, it’s mostly just a photo bomb of some pretty sweet kitchen pics. Also I bought a lot of stuff for this post (I know, deep breaths) and I am going to link to each one of them so you know where to get everything if you so desire. So colored text = link.
Two weeks ago (wow I’m good at making y’all wait, huh?) I showed you the empty shelves that my awesome husband built.
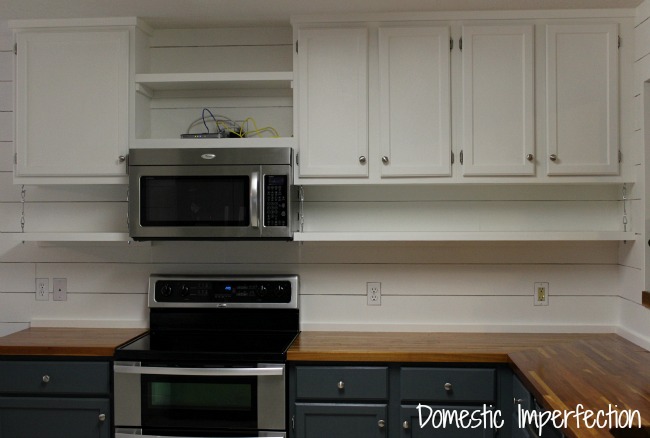
And now, here they are…decked out with kitchen goodies!
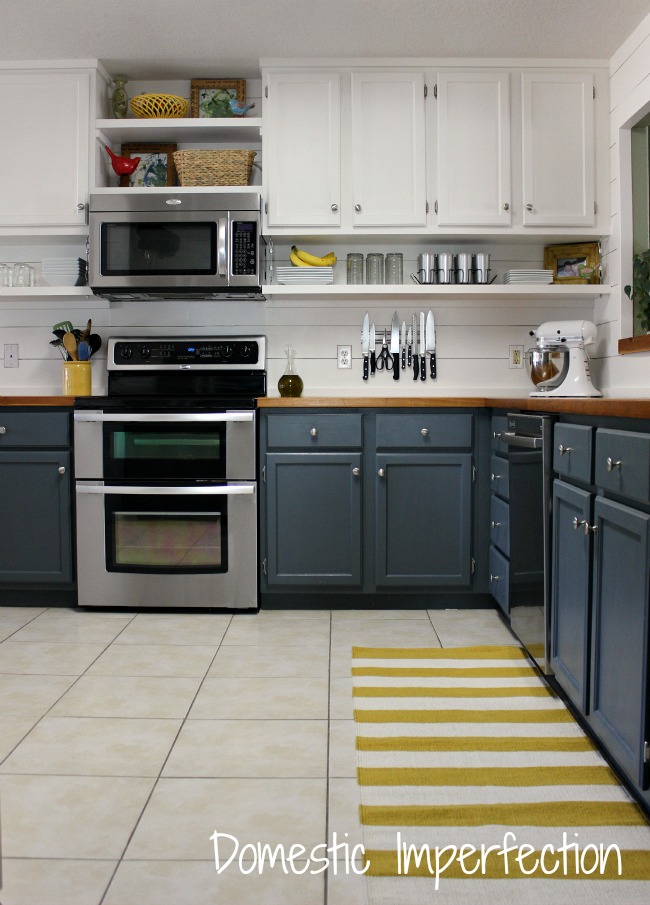

Okay, lets just work our way around the kitchen. First off we have the little shelf next to the command center, this one just holds some mason jars we use as cups and our bowls.
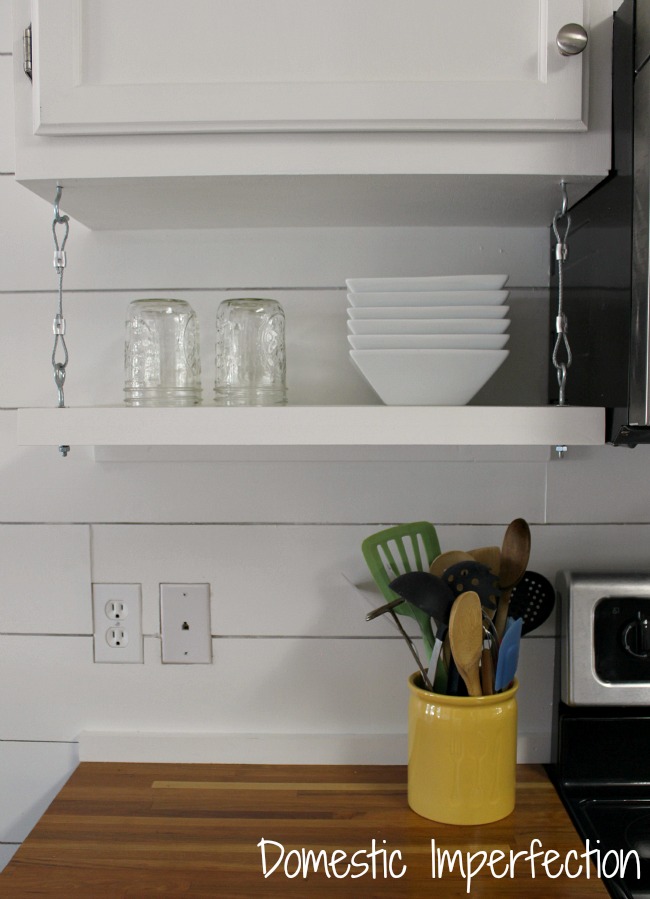
That utensil holder is new… I can’t seem to find it online, but picked that up at Target. I already had a stainless steel one of these, but this one matched my yellow table so well that I couldn’t pass it up!
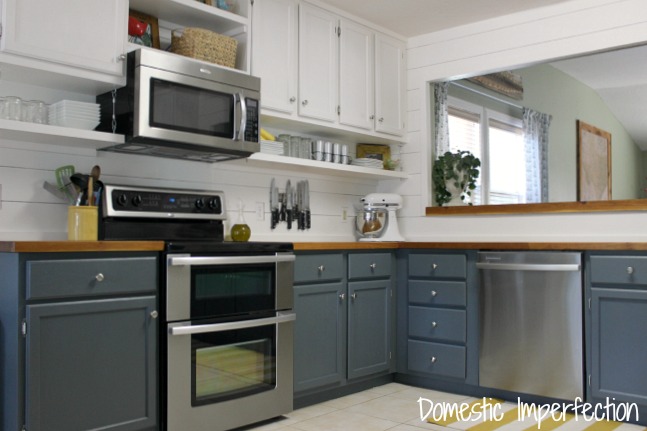
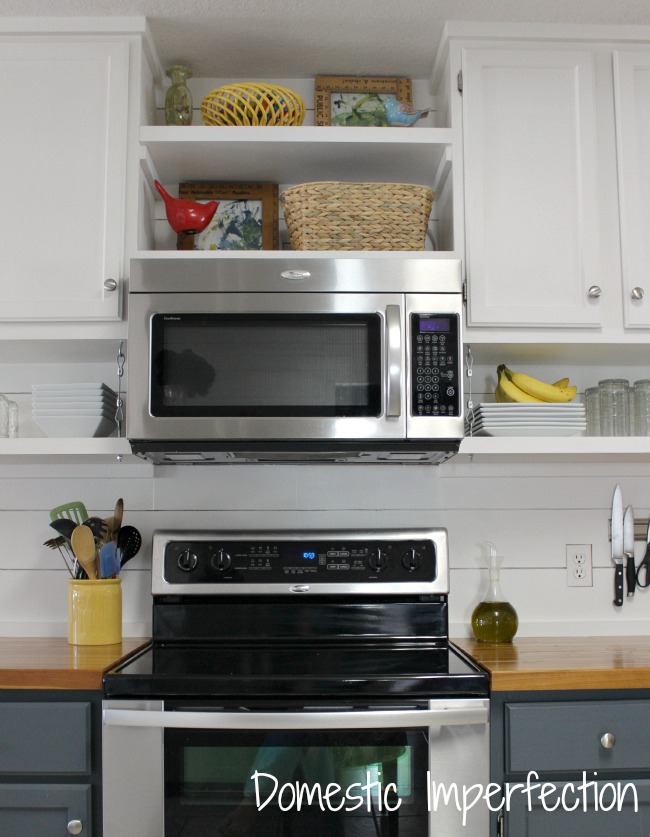
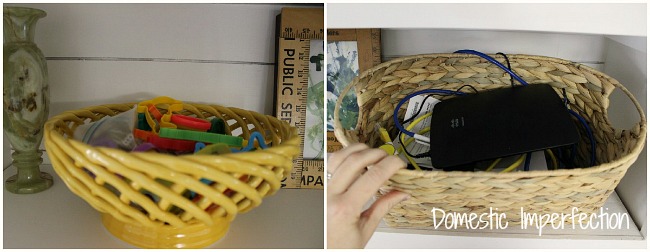
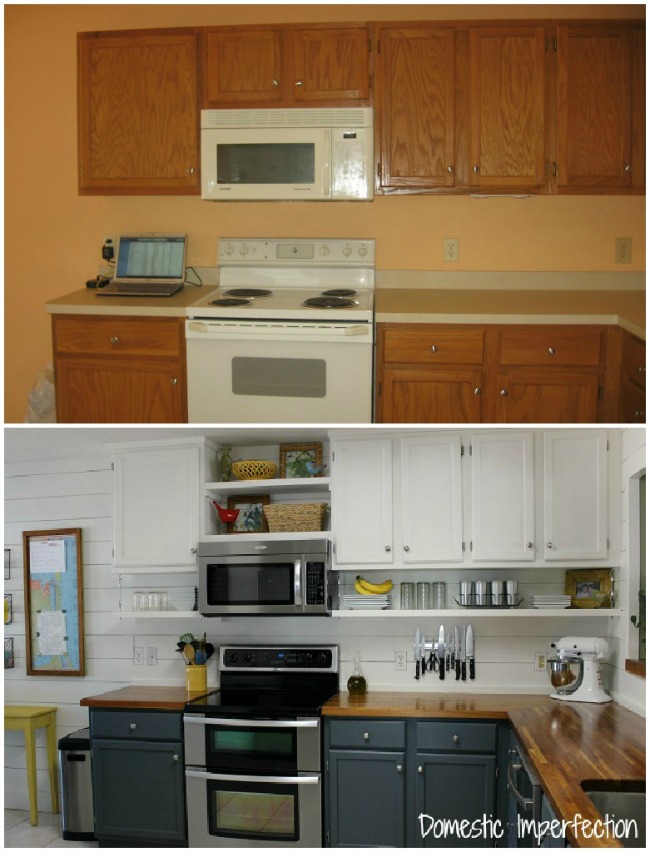
Next up we have the area above the microwave.
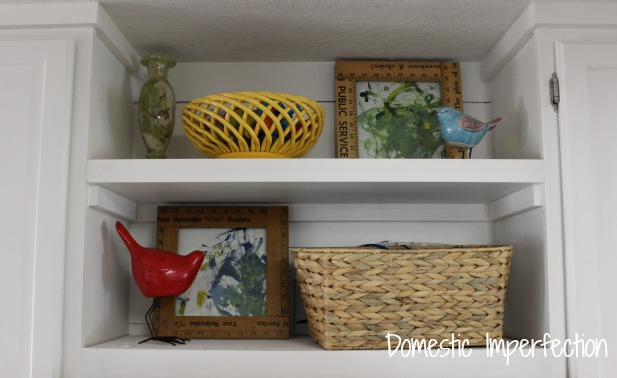
That green vase is actually from when my husband was deployed to Afghanistan, so you probably won’t be able to get your hands on one of those. The yellow bowl is also from Target…I can’t find a link online to it either, maybe it’s because they were on clearance. That bowl has spent a few days on every surface of my kitchen, I could not figure out where to put it. At first I had it in another part of the kitchen with fruit in it, but I quickly remembered why I keep all my fruit in the fridge…room temperature fruit is seriously not good. After a few more rounds it ended up above the microwave and it holds the most random thing ever…play dough (and play dough toys of course). It actually is working out very well! The yardstick framed art I showed y’all last week, and the little birds are from Kirklands (in store only). The little one was only $2.99, and the bigger red one was $6.99. I seriously fought myself over the red one… it seems really random and out of place, but in the end I decided that was good. Plus there is some red in my plate wall, so it ties in there. That basket is from HomeGoods, it hides our router and a ton of cords and outlets.
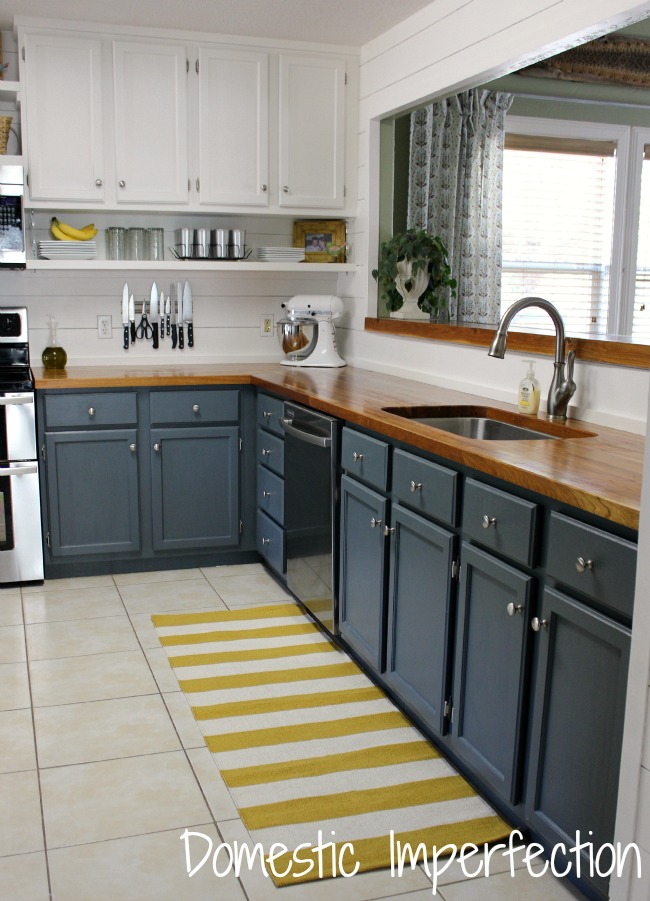
Next up we have the big shelf, which holds plates and more cups. Underneath it is my new favorite thing ever, the magnetic knife holder.
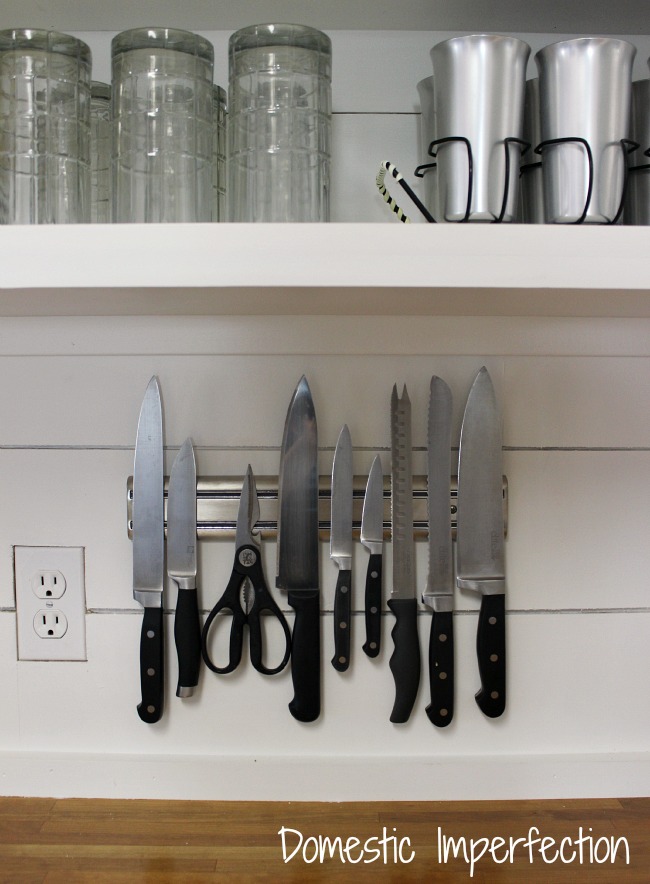
I’m seriously in love with this thing, it’s a million times better than my clunky old knife block. I bought it here on Amazon, it was only 19 bucks.
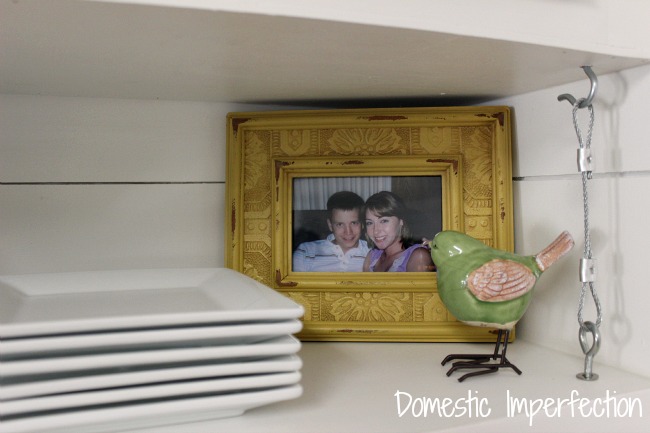
On the far side of that shelf there is a little decor in the corner. I found that frame at our church garage sale for $1…I didn’t even mess with it, it was that perfect when I found it. In it is a picture of a Adam and I back in the day….I know we look crazy young, but had actually already been married for over a year in that picture!
Next we have the little shelf on the far side if the kitchen. At first I was determined to put that yellow fruit bowl here, but that fell through and I made it into a mini Starbucks.
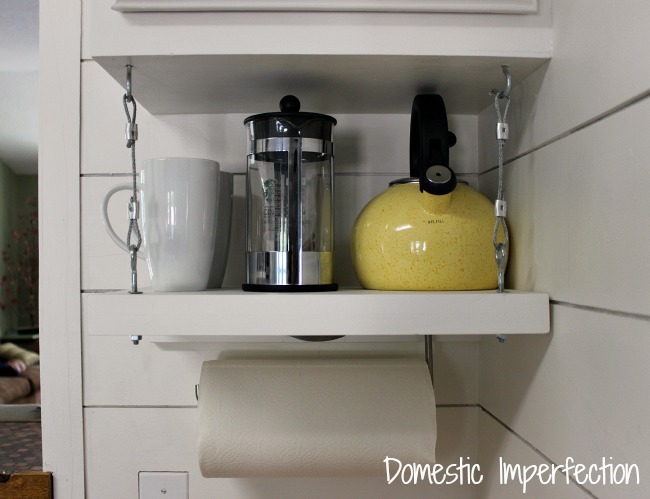
That shelf includes a Bodum french press, a tea kettle by Paula Dean, and a new paper towel holder. We’ve never actually had a paper towel holder before, our paper towels have always just floated around. For our entire marriage we have been searching for our paper towels… at least once a day we ask each other where the paper towels are. For years. Frequent answers include things like “I cleaned the bathroom earlier so they might be in there” “I think I took them out to the garage” “the last time I saw them was in the boy’s room when I was soaking up pee.” Well, no more..$11 measly dollars has saved us from ourselves and our paper towel dilemma.
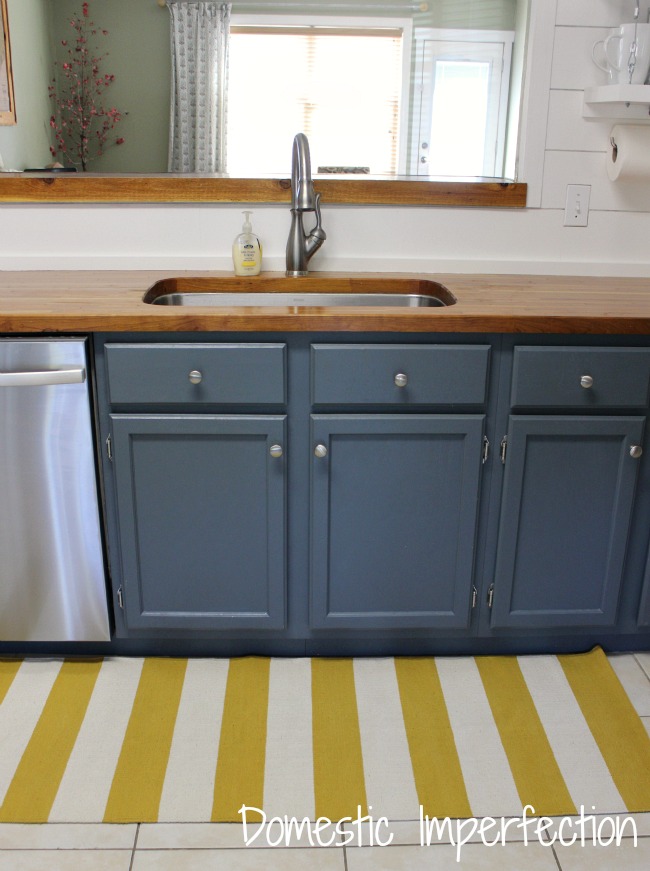
Lastly, the yellow striped runner is the Olin rug from Crate ad Barrel in gold. I tried really hard not to buy this because its more than I usually spend and stripes are really easy to paint, but I was having a hard time finding a plain runner that was any cheaper than the rug. Plus I like that this one is a flat weave and you can just toss it in the wash. It does really need a rug pad though, cause it moves around like crazy.
And that’s pretty much sums up the kitchen tour!
Now the kitchen isn’t done, we still need lighting, floors and dining room chairs. I’m not quite sure when we will get to those things and I’m ready to move onto my boy’s room makeover. If money wasn’t an obstacle here is what I would finish our kitchen out with…
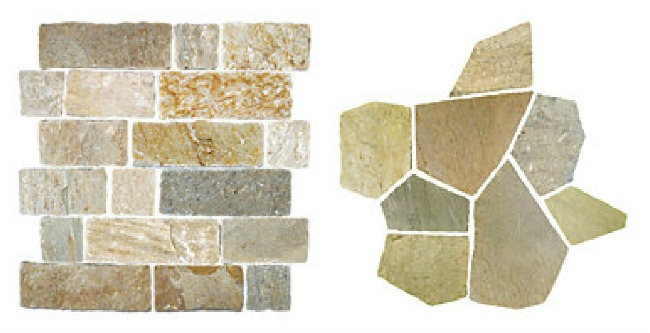
For the floors I would use one of these two beautiful, rustic, stone tiles from The Tile Shop. I know these pictures are grainy and terrible, but if you click-through to the website you can see how beautiful they are. The first one is the Baoding Creme in Brick and the other is Baoding Creme in broken random. Both are -hold onto your britches – $10.99 a square foot. That’s a little rich for our blood, though only by about $9.99 a square foot. Maybe they will read this and give me free tile a la Katie Bower. What do you think my chances are? Yeah, I agree…not good.
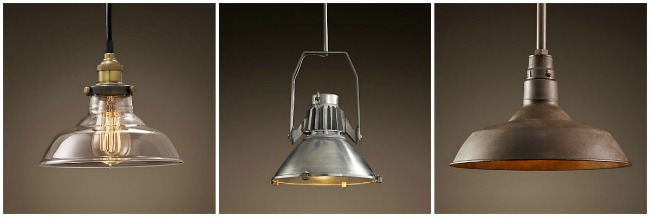
For lighting I want to do canned lights and some pendants over the sink/pass-through/bar area. I want something kinda industrial/rustic and like all of these from Restoration Hardware. Even the cheapest one of the bunch (the first one) is still over my budget at $119, but I feel pretty confident that I can DIY something similar to these for a fraction of the cost.
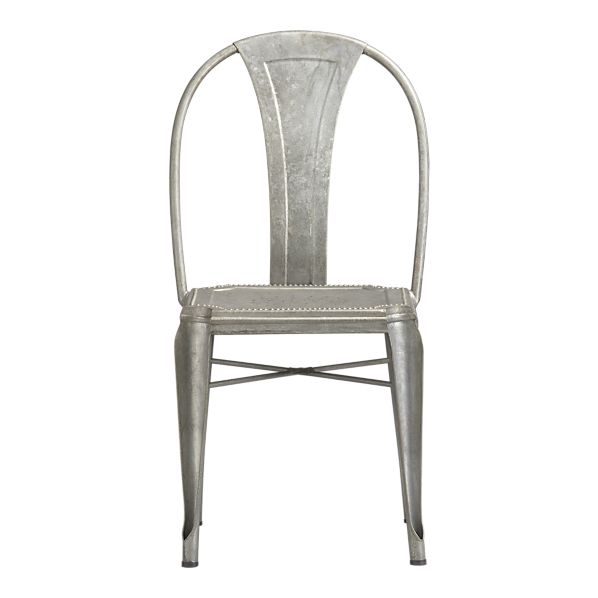
And I know I’ve mentioned these chairs from Crate and Barrel in like three different blog posts, but I am seriously in love with them and might have to find some way to make these happen. After all, unlike everything else on my “crazy expensive” list, these get to come with us when we move.
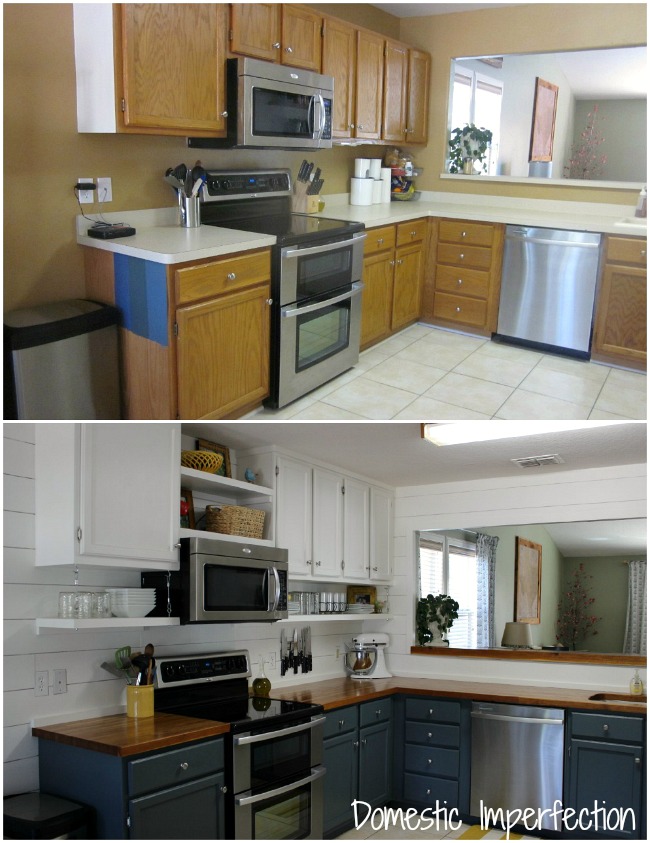
Here are a couple of before and after shots of the kitchen. This is always my favorite part of blog posts when I read other blogs…there is just something about a good before and after!
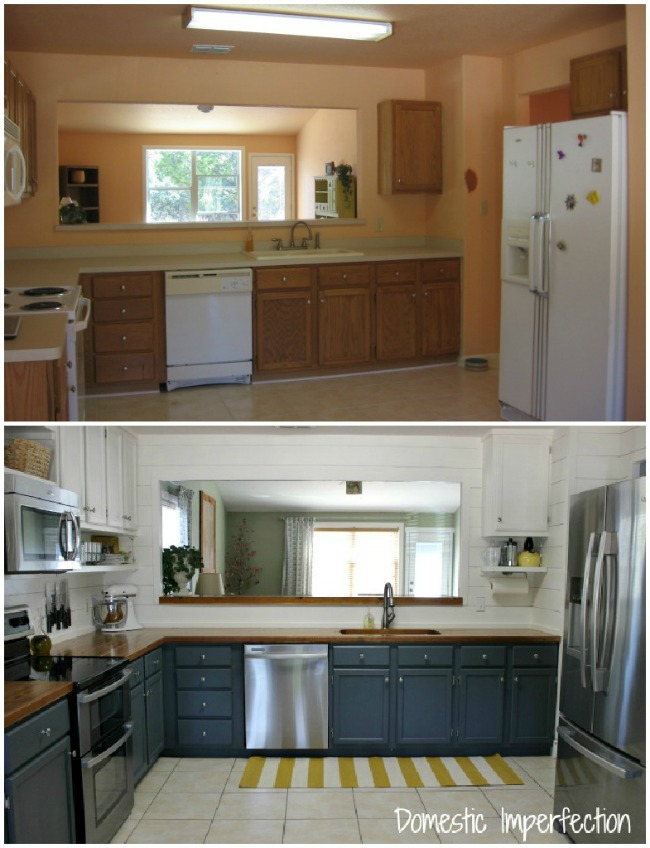
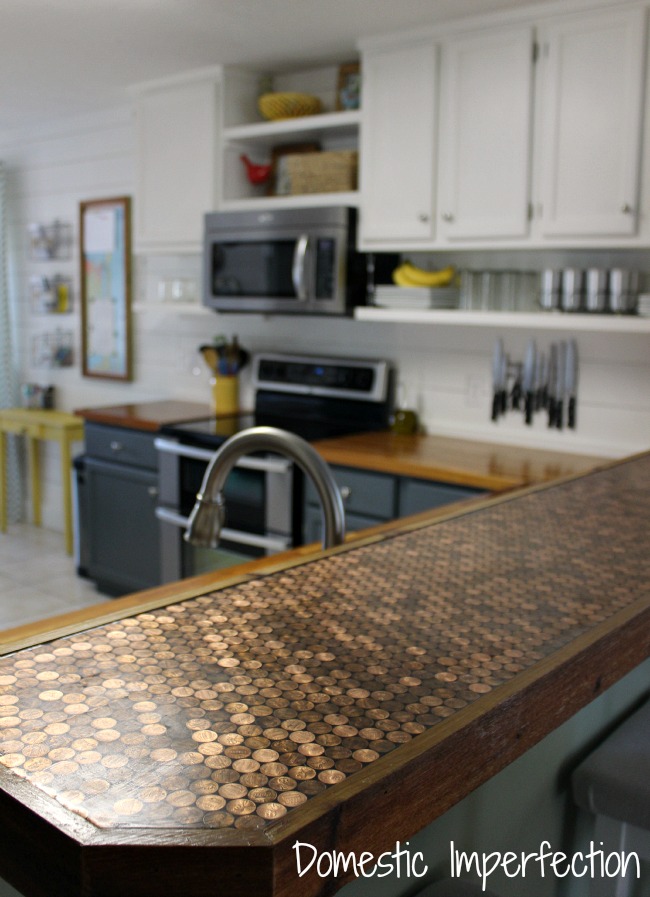
While snapping pictures of my (perfectly clean and sparkly) kitchen I also went ahead and snapped a picture of what lies on the other side of the bar area….
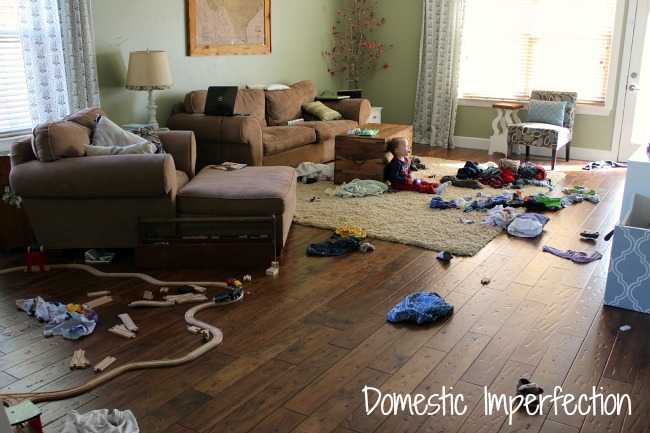
Ah yes, there it is….real life.
Here’s the budget breakdown…
- Paint for cabinets, new hinges, floating shelves,trim (everything cabinet related, really) – $150
- Butcher block countertops (including tax and shipping) – $750
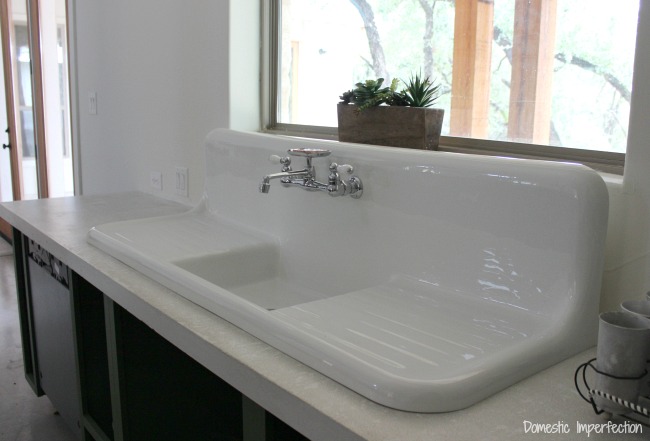
- Sink and faucet – $350
- Plank walls, trim & paint (includes planking the dining room) – $150
- Supplies, decor and everything else – roughly $200
Total (so far): $1600
(Unless you count the new appliances we bought before we started, then that takes it up to about $3700).
Kitchen Remodel Links
Shop the Look

This looks amazing! Yes, I love to see the before and after shots and yours knock it out of the park!! love those shelves under the top cabinets. That is a great idea! You can find vintage industrial lights at salvage places! I see those from Restoration in green that are old all the time. You can usually get one for $25 and then have it re-wired for $15-20. I’m obsessed with creating lights out of cool stuff! I have lots of glass globes that need to be wired. ;)
I plan to DIY them, though I’ve never been lucky enough to find something old cool thing that would work. Perhaps I’m just looking in the wrong places…what EXACTLY do you mean by salvage places?
there is one in galveston and downtown houston if you’re ever around here. i found them by looking up architechtural (sp?) salvage in the yellow pages. be forwarned leave the children at home and hubby possibly, u WILL get lost in there. you find yourselve wondering the history of each piece, LOL!
Thank you Michelle! I will have to look some up…and find a babysitter :)
Ashley… Love .. Love the kitchen! Everything about it. The bar of pennies is really unique, and the color of the bottom cabinets are great. Did you mention the color name, if so, I overlooked it. Would like to know please. Thanks! Abbe (Foothills of N.C.)
Thanks Abbe! The color is called grays harbor and it’s from Sherwin Williams.
I love this color also. I was thinking yellow for our lower cabinets but I think you have changed my mind!
can you tell me where you ordered the butcher block counters like that with the sink cut out, did you give dimensions somewhere including the cut out? I have almost the exact lay out counter top wise I just can’t quite figure out how the butcher block has the sink IN it or is the butcher block in pieces and then is just joined together around the sink somewhere? thanks, Laura
This post has the answers you are looking for – https://wildfireinteriors.com/two-weeks-of-countertops/
Love!!! Can’t get enough of the yellow and blue together.
Thanks Leanne!
Wow love love your kitchen! And that little extra does of reality – classic!)
Haha, I have three other rooms that look just like that. The living room, not the kitchen…the kitchen stands alone, lol.
Stunning, stunning, stunning! I’ll be moving in real soon! Great, great job!
Silpada necklace is going in the mail tomorrow and I’ll send you the tracking #.
=)
Stunning, stunning, stunning! I’ll be moving in real soon! Great, great job!
Silpada necklace is going in the mail tomorrow and I’ll send you the tracking #.
=)
Beautiful job! Sad to read that you would even consider moving! ;o)
Wow, I am in love. Your kitchen is so amazing!
OK, I’ve never actually seen the “before” pics of your kitchen before today. I’m seriously inspired now. Maybe I’ll even get the guts to paint my cupboards sooner rather than later? I’m loving all the pops of yellow too! Thanks for all the inspiration!
Your kitchen looks FABULOUS! WOW! I just love the look of the white upper cabinets and dark lowers. And you’ve styled your shelves perfectly with the hits of yellow and the touch of red. Did you make that penny bar topper? Sooooo cool! You must be beyond thrilled with how it all turned out :-)
I’m sure you can find similar lighting for a lot less than the RH ones. Check out Craigslist and maybe consignment stores. And you can probably find the tiles for a lot less too – it just takes some patience and shopping around :-)
Your kitchen looks amazing! We are updating ours and adding open shelving as well! I love it and this just looks fabulous!! Great job!
Love it to pieces!!! Pinning! XO, Aimee
Thanks Amy and I appreciate the pin!
It looks wonderful, Ashley! What a difference. I love your style. Do you like your double oven? With a family of 11, I would really like to upgrade to one of those free standing double ranges. With your house paid off already, couldn’t you just snatch those chairs up with the part of your monthly budget that used to go towards your mortgage?
I really like my double oven, though I only use the small top one 90% of the time…it preheats super fast because its so small. When I have a big meal to cook the two ovens is amazing! Not being able to afford the chairs isn’t the problem, the problem is that I’ll always be a cheapo at heart and I just can’t bring myself to spend $200 on one chair (and I need at least three!). If they go on sale one day or I come across an awesome coupon code then I just might convince myself to pull the trigger!
have you looked at ikea (i believe it was there)? i saw similar ones that were much less expensive i believe around $99/each i’ll see if i can find the link again. i was looking at them for our table but then found some 80’s big, grand oak ones at a thrift store for $10/each. and my matching el cheapo heart said cha-ching, LOL!
I have found some similar ones at World Market and Overstock.com and whatnot, but they just don’t make my heart sing. I think I’m just going to have to hold out for a sale. Actually there is a Crate and Barrel outlet about an hour from me, it would be amazing if I could find some there!
wow
“Pull the trigger”, LOL! I get it, I’m the same way. Even if there is the money for it, sometimes it’s just not a price you want to pay. It’s really painful when the price is exorbitant and there is no alternative… like my daughter’s braces. There is no “off brand”, either she gets them or she’s a snaggletooth for life. They cost the same as our van!
Ashley, you are my favorite person in the blog world mainly because you posted that last photo. I like most of what you do but I keep coming back to your blog because you are real. Love the kitchen!
I TOTALLY agree! :-)
lol. The living room. Ashley, you crack me up! I love it. Real life!! It’s so true.
Agree!
Ashley- It’s Kirsten from Bible Study at Fort Drum. I am in LOVE with your whole house! Seriously- I am inspired! Boots and I are in the middle of a remodel ourselves and have honestly been thinking of throwing in the towel but you are keeping me going! Just last night he mentioned butcher block from lumber liquidators but I wasn’t sure if it would work because it was so much less expensive than other butcher block (that we really could not afford!) SOOO thrilled to see how gorgeous it looks in your kitchen. I guess I owe you a thousand dollars :) THANK YOU!!!
Kirsten- Tell Boots I take checks!
O yeayyy!! :) the kitchen looks so awe-freakin-some!! :):) the pops of yellow are great! that picture of you and adam is jus so cute! and the art by your kids-precious!
This looks absolutely fabulous! Love the shelf hardware and LOVE the pops of color. Your little one is so cute sitting amidst all the destruction too, lol
Fabulous! All of your picks for the shelves are great, and seem to be very much YOU.
BTW – I’ve tried that Pinterest/Martha Stewart tip about using latex caulk in lines across the back of a rug – it works! And WAY cheaper than a rug pad that attracts lovely stuff like hair and rug-fluff. You just flip that rug over, place a few beads of latex caulk across the back & let it dry well. No more slipping!
Puff Paint from the craft store would also work, too. (BTW, DIY slipper socks that way, too… )
Hey girl, I know it’s been FOREVER! since you posted this, but I just came across it and I LOVE IT! But I randomly saw these comments and thought I would add my little trick… Hot glue. Just did a few lines on the back and KABAM! NO more slippage. Hubby is forever greatful as his before dawn rising has less falls now ;D Hopefully when we get moved into our new fixer upper I can use this, thanks!
Maybe you could DIY your light fixtures. . . like these. . . http://lilluna.com/diy-galvanized-light-fixture/
I so have Kitchen Envy. Love it…GREAT JOB. Also thanks for the splash of real life living in blog land. I bet you sit in your dining room staring at you kitchen because it has the new glow accomplished look, love that feeling. Also, I recognized the train set from Ikea…I have picked that track up more times than I need to admit. lol.
It looks SO great! And I know I’ve asked you before, but now I can’t seem to find your response – what is the color of your base cabinets? I def need it in my home. :)
LOVE the kitchen and the real life shot as well…
Ok that red bird? Perfect! Seriously.
And my solution to the paper towel migration (listen to the voice of experience here, I have 3 children and 11 grandchildren :) is to buy a few inexpensive towel holders (dollar tree) and bulk towels (Costco) and put them in every room you yfrequently need them! You might need to get creative if they are unsightly or a temptation to the kids but youwon’t have to hunt for them because they were not but back I the kitchen after use :)
I love your kitchenand you’ve done a great job!
~K!
I love how they turned out! I would’ve never thought of having open shelving above the microwave but I loved the added space to show off stuff. I want to add shelves like that to my kitchen! It really adds so much space that is never utilized – great job!
Sorry for the fat fingered typos
What? All I saw was a cute baby :)))
You must be over the moon! The kitchen looks so fantabulous!! Like a million bucks girl. Love that pretty frenchy fridge too ;) Could NOT talk my hubby into that style. Man, did I try. Enjoy your fab new space :)))
Wow! It looks great! I have a little kit hen envy :) looks like something out of a magazine!
Okay, I just am not going to have enough words to adequately convey how much I LOVE this. Every single detail. I feel so inspired, I can’t wait to rip out my whole kitchen and start over. (Andy better get home from work soon and put a stop to all this daydreaming!) Just shared this on facebook!
Holy cow it looks amazing. That transformation!! Ah – it’s just gorgeous. And the open shelving – I have to admit, I’m quite smitten with it.
Love!! the colors are amazing! But, gotta say…my favorite part is the real life :). The train track looks fun!
It’s so pretty!!! I love the backsplash and counters.
I have some metal chairs from World Market. They were less expensive than the Crate and Barrel version and I love them!!
HOLY WOW! It’s absolutely amazing!!! I love every detail!
WOW. Just wow. Wanna come to my house? I love those floating shelves and your cabinet color!
Your kitchen looks amazing! I love how you raised the cabinets up. It looks great. I would love to do that in our house, but I think it might be too big of an undertaking even though our kitchen is pretty small. I love the white. It looks so pretty!
This looks sooooo good! We’re in the early stages of a kitchen makeout ourselves and this is great inspiration! I also may be buying a few of the things you’ve purchased for your kitchen! I love the paper towel bar, that’s so much better than having them take up counter space!
WOW!!! LOVE it!!! What an AMAZING transformation!!! You all did a wonderful job, and I LOVE the real life shot at the end! Fabulous! :) Hugs!! Claire
I love your two tone cabinets & the floating shelves are the perfect touch :o) I also love how you accessorized them!
It looks wonderful, amazing, perfect, livable, fun, cheerful! AWESOME reveal! The color you chose for the lower cabinets is so rich and unexpected. Very nice work. I hope you are enjoying every inch of it!!!
I love it. I love the colors, I love the planked walls…but my favorite part is the shelving below the cabinets! Not only do you have a functional storage space, but you eliminated the dust collecting section above your cabinets! When we remodeled our kitchen, the old cupboards went all the way to the ceiling and we replaced them with shorter ones with the plant shelves. UGH! Such a mistake. I am now contemplating moving all of my cabinets up and doing this clever shelving. Awesome inspiration, as usual!
An amazing before & after! You and your husband have worked so hard on this amazing project. Just love all the details! Enjoy for now and focus on that little mess-making sweetie pie!
:) Linda
Oh wow….this looks amazing. I love it! You have truly done a wonderful job, both of you. I like your tile choices too, especially the broken version, but agree with the comment above that I’m sure you could find something similar for less.
I happened to see a chair similar to those metal ones for $109, trouble is, it’s in Aus. I don’t know what the shipping would be, probably not worth it. Here’s the link, anyway – if they have them there, maybe there are more around here somewhere. http://www.milandirect.com.au/vintage-metal-cafe-chair-reproduction/?utm_source=myshopping&utm_medium=cpc&utm_campaign=Furniture&utm_term=Vintage+Metal+Cafe+Chair+Xavier+Pauchard+Reproduction+Galvan
What an incredible difference in your before and after photos! You must be so pleased.
Cheers! Jan
What a great transformation Ashley! Love how it all came together, especially with the splashes of yellow. And I love that RED bird, another color to draw the eye.
What a kitchen transformation! I love raising the cabinets and adding a shelf below. Do you use a step stool for the upper shelves? And with all the oohs and aaaahs I love your last photo. Yep, its life :).
I actually just crawl on top of the counters to reach the top shelf :) I don’t have anything that I need often up there, plus after doing it multiple times a day for year or so I don’t mind so much!
omgosh….seriously i can’t believe y’all did all that work yourselves, it’s AH-MAY-ZING!!! so beautiful and cozy, i feel like i could walk in and pour myself a cup of coffee. and thank you, thank you, THANK YOU!!!!! for the pix of the living room, i seriously wonder sometimes if i’m the only one with the crazy ‘other’ room, LOL! i’m just still in such awe of your kitchen – wanna come and do mine???? i’m only a couple hrs away…..
You are welcome for the living room pic, but in all honesty that isn’t “the” crazy other room…it is one of three crazy other rooms. You should see our master bedroom/bath/closet. Hey, there are doors for a reason, right?
I was just talking to my sister about not having enough counter space to work with….and the next email I open is your post. I’m green with envy. Your kitchen is the dream I have for my future! Love it…what a great job y’all have done…the transformation is amazing.
Great work Ashley! Your kitchen is beautiful and the perfect inspiration for other DIYers {like myself}! I love that you showed “real life” at the end it made me feel like I’m not alone.
It looks fantastic! I’m going to do my friends kitchen in the near future and I’m trying to all her into butcher block countertops. Are you having any trouble with the upkeep?
And I’m sorry, I didn’t want to post any links to my kitchen in my comment. That’s a little tacky. I didn’t know what that little check meant next to my posts…now I know!
No no no, not tacky at all! I added a program to my website that posts links to your recent posts on purpose, I wanted my readers sites to get more exposure, even if it’s just a little. Link away ;)
I really like my butcher block countertops and haven’t had any problems with them, but I do feel like I have to be really careful. I think in the next house we will get something that can take my normal amount of abuse and still be beautiful.
This is a FANTASTIC renovation! I love that you took a pretty plain-jane kitchen (that almost anyone could have) and turned it into something so bright and spacious! Love it!
Hi Ashley, love your blog! I check it every day to see if you have anything new! On the large shelf above the knife magnet it looks like you have some tin cups. Where did you get those?!? My grandma always had those and I have been dying to get my hands on some! I saw some once in an antique store and passed them up and I am kicking myself over it now!
I hate to tell you this, but I found them at an antique store. I know, I’m sorry! I wonder if you could find some on e-bay? Or etsy maybe?
I’m so glad you enjoy my blog….sorry to disappoint you five or so days a week! :)
http://www.1000bulbs.com/category/commercial-light-fixtures-clearance/
Here’s some fixtures I ran across that look suspiciously like what you’re wanting. Better price?
Oops wrong link. Here’s the one I saw.
http://www.1000bulbs.com/product/86717/NUVO-76-662.html
Oh wow, that looks sooooooo good!!!! Y’all did an amazing job on your kitchen!! :) Congrats on finishing!
Holy cow! What an improvement. I love the two toned cabinets and the shelves look beautiful.
You are a wonder! What a transformation you’ve accomplished. I especially love your hanging shelves and the yellow bowl and fat little red bird are simply perfect. Great job!
It looks fabulous!! I have a gray, white, and yellow kitchen. ;) Love it!! Awesome job!!
that is wildly awesome- that looks fantastic!
The “before” cabinets are mine now. I can’t tell you how I hate them. My husband and I regularly have a domestic dispute over painting them. This “after” might be the key to me winnning lol! Great job on the updates. The rug is the perfect pop of color.
Your kitchen is amazing, I love the colors you used but probably the most important thing to me was seeing what an amazing transformation you have created by leaving the original bones of the kitchen intact. As for the mess on the other side, it’s good to see you are normal with little ones.
Your kitchen is absolutely stunning. You and your husband should be so proud!
Amazing!!! Love it all – from the two toned cabinets to those very cool hanging shelves!! Great job – now go buy those amazing chairs -you deserve them.
So much to pin and share!
Have a great night.
Kelly
Oh Kelly, you are such and enabler…that might be just what I need :)
Thanks for the pins and shares!
Amazing transformation!
It’s gorgeous! :)
What a LOVELY remodel! Well done – I especially admire the clever addition of shelving below the cabinets!
Cheers!
~H
I saw these pendants on sale at West Elm. They are a bit more boring than the pics you posted and only come in red or black but for $6.99 spray paint then what you want. http://www.westelm.com/products/industrial-pendant-w585/?pkey=call-sale&cm_src=all-sale||NoFacet-_-NoFacet-_–_-
Thanks for the link! I’m really tempted to buy these, that is a crazy cheap price. I really wanted metal, but for $6.99….
Hi there! Popped over from The Nester and I absolutely adore your kitchen makeover. Can you tell me the color of the paint on your bottom cabinets? I think it’s about the closest thing I’ve seen to what I want to do in my kids’ bathroom.
Thanks so much!
Rachel
Of course! It’s Grays Harbor by Sherwin Williams. I actually wrote a post about it (forever ago), and you can see it next to some of the other colors I tried… https://wildfireinteriors.com/2011/08/kitchen-colors-update/
You know I’m in love with your kitchen, right? Guess I’m not the only one! It’s beautiful and realistic and just so pretty! So happy for you! Can’t wait to see the rest of it, when you get around to it!
This is seriously inspiring Ashley. My son and his wife have a very similar kitchen, which they are sick of, and have been trying to decide how to approach it. They must see this!
WOW! This is simply fantastic!!! Great job! wow!
ps – I love the real life shot too!!! :) that looks like my real life
OMG I love this! So pretty, love the open shelving under the cabinets and the two different colors!!!! Gorgeous!
XO
Kristin
This shelving is absolutely gorgeous, and I love it. I’m sharing on my blog now!
Skip the rug runner & caulk some silicone squiggles on that bad boy of a rug. I almost forgot I was reading your blog & thought I had clicked onto some high end webzine until the “Find the baby in the laundry” photo appeared. That brought me back. Ain’t real life grand? :) ~ Dee
You did a great job! Love the blue cabinets!
Stunning! I love every last detail!
I absolutely love this! You did a great job! Love the two toned cabinets and the butcher block countertops! I would love if you would share this over at our blog hop http://www.ablossominglife.com/2013/02/frugal-crafty-home-blog-hop-11.html
Thanks for linking up! I love it so much I already featured it on my Facebook page! So jealous I want a kitchen like yours :)
Holy cow – It’s perfection! I love the contrasting cabinet colors. Having the white up above makes the room feel a lot more spacious. What a great before and after!! Nice job.
Found you at the Craft-O-Maniac link party. :)
Woooow! Absolutely gorgeous reno. Lovely and clean-looking. Great finished result!
Love this! The colors are amazing – and I love your little yellow tea kettle! =) Happy Monday!
Danielle
SewMuchCrafting.com
Oh’ my FANTASTIC-NESS! I love it alllllll! I love the touches of color too. Great job, shared this on my COM-FB page. hugs, jen
Ashley, this is a fantastic makeover and unbelievably affordable! I’d been telling my husband that I wanted wood counter tops and darker lower cupboards (while keeping the upper cupboards white). He couldn’t visualize it, so I just dragged him to the laptop to look at your remodel. He not only liked it but said, “Would you like some shelves like that, too?” Score! Thank you so much. :D
I love everything about it! Your counters are my favorite. :)
It’s wonderful…all of the details bring it together so perfectly! I wish you would come and do mine now. Please? lol. You are so talented! And I love you even more for the messy family room. :)
it looks so good! i especially love that rug!
What a fabulous redo/reveal! I found you through The Inspiration Board at Carolyn’s Homework and would like to invite you to link up to my party, Project Inspire{d} ~ I hope to see you there!
http://cupcakesandcrinoline.com/2013/02/project-inspired-week-2/
Mary Beth
Love the colors of your cabinets!
I love everything about this kitchen! We are about to redo our kitchen and I have found this very inspiring as we have a very similar layout. I especially love the open shelving below the cupboards and the rug!
I m sooooo impressed with your makeover, it looks fantastic. Thanks for the real life picture by the way, lets me know im not the only one with messes…
I enjoyed seeing your kitchen redo. Love the plank walls.
Traci
Well done! I am going to be doing a kitchen remodel in the next year or so, and you have given me plenty of inspiration. I have been eyeing the penny project for some time now, but am trying to sell it on my husband. Hope you can stop by the enchanted oven to say hi.
xo,
Lisa
Trying to “sell” you husband on the penny project, haha. I get it. I perused your blog for awhile…you are quite the cookie artist! I’m so impressed! I never did take to baking, mostly because it breaks my heart to watch something I worked so hard on get eaten. Is that weird? Also, I love – like really really love – the name of your blog.
WOW! Your kitchen looks FANTASTIC! I love the two-toned look with the cabinets, the floating shelves, the pops of yell0w – all of it! And can I also say that I never tire of kitchen makeovers? Visiting from Savvy Southern Style. :-)
Thanks Jenny! I love kitchen makeovers too…cheap ones, expensive ones, colorful ones, neutral ones. I love them all equally!
Thanks for linking to Take-A-Look Tuesday over at http://www.SugarBeeCrafts.com – you were featured today! – – Mandy, Sugar Bee Crafts
WOWZA! I love this!! As soon as I saw a glimpse of your “command centre” I knew what kitchen it was. I love your blog and I often click it via the parties ;) You’ve done some amazing work there. You’ve inspired me to paint my bottom cupboards now. Have a great week!
Jamie ~ Better With Age
WOW!!!! That is amazing! You did an incredible job!!! What did you use for your counters? Is it a butcher block? It’s so lovely and organic feeling!!Love love love everything!
Selene from restorationbeauty.com
Thanks Selene! Yes, the counter are butcher block, I wrote a post about them if you are interested https://wildfireinteriors.com/2011/09/two-weeks-of-countertops/
Hi, I’m visiting from the link party at the Shabby Creek Cottage. Your kitchen transformation is amazing. I love the way you did the walls with the planking horizontally, I love that you chose that lovely blue for your bottom cabinets rather than going with all white, and those floating shelves — I’ve never seen anything like them before and LOVE them. They are so clever, the perfect touch! For that hanging light you want, I would look at Lowe’s and Home Depot and Amazon.com for an “industrial” styled light or a barn light that has the look of the expensive one but not the cost. Good luck with your continuing redoing/revamping. You’re off to an excellent start!
Thank you Jan! I have to admit I’m pretty smitten with it myself, and I am loving the open shelving. I’ve seen some lights I like at Home Depot, but they’re still about $80 a pop. I’m hoping to find some hidden treasure at a thrift store or garage sale and make my own lights! We will see :)
The transformation is absolutely amazing! I was in love with your kitchen back when you posted about the floating shelves. :)
Depending on where you live you might come across an ol’ fashioned MILK STRAINER–these fit in the tops of the old milk cans that were used to haul the milk to the train or wagon–they are a pretty good size both width and depth AND have holes already prepunched in the base–which would of course probably be YOUR new TOP!!!! These should be fairly cheap and you might find one on ebay or Craigs. Should cost seriously less than a “real” industrial light fixture AND have a cool backstory–and if it is too rusty or someone has already painted it–there is always the “Spray Paint Emergency Shelf”.
You DO have one of those don’t you????
Add a hanging lighting kit and et voila done. Might even save you enough $$$ for those chairs! Maybe not enough for the floor tho!!!!!! Have you seen the “Paper Bag Floor” tutes??? Go seek and you might be seriously awed by what you find and how easy n CHEAP it is.
I wanna know—who was barricading the DOORS to keep all those intruders you live with OUT of the kitchen!!! And can I HIRE them????
I’ll have to look into the milk strainer, that sounds kinda perfect! And it’s funny that you mention paper bag floors, I am actually just finishing up paper bagging the floor in my boys room. It took forever but it looks awesome! I posted picture on my facebook page if you want to see http://www.facebook.com/DomesticImperfection
As far as who was barricading the doors…his name is Curious George, lol. He lets me get some quiet time during the day…I love him :)
I am shocked. Such an amazing transformation with such a small cost. Amazing!
This is gorgeous! Beautiful inspiration!
Can you do mine now? Just kidding of course. But seriously, this is amazing! This is proof that you don’t have to go broke updating your home. Now I have new-found hope. Love the open hanging shelves.
Thanks for the inspiration!
What a beautiful transformation! I love the pops of yellow with the stainless steel. I love the “if money were no object” floor choices. I like the random pattern better. We did our kitchen a few years ago and I had the same ” if money were no object”, i had to pick different flooring!
Love your new kitchen!! Why did I not know your hubs was in the Army too? So is mine and I have a couple of those same green stone vases from Afghanistan (hubs deployed there twice) – we have so much in common! Love how you decorated and designed everything! Pinned!
I love that you posted that messy picture of the next room at the end. Perfection!
Fabulous makeover! I know you love it! Thanks for showing the messes, too, because after all, this is real life!
Marty@Marty’s Musings
Wow! What a fabulous transformation — love your color choices!
I’m in LOVE with your entire kitchen!!!! The penny counter is AMAZING!!! They stopped making Pennies here in Canada beginning of February… now I know what I can use them for!!!!
Thanks so much for sharing this at The DIY Dreamer… From Dream To Reality! Can’t wait to see what you link up tomorrow!
Very impressive! I love what you’ve done.
CONGRATS!!!! You have been featured at The DIY Dreamer!!
Come on over and grab your featured button, you deserve it :)
http://thediydreamer.com/from-dream-to-reality/10-features-55/
Don’t forget to come back to From Dream To Reality this evening to link up again :)
Gorgeous! I love every single detail and those shelves are fabulous! Pinned and featuring tomorrow!
Thank you Trish!
I had to scroll down forever to leave you a comment, but I could not leave your site without leaving one :)
Your kitchen is the bomb! Those shelves are brilliant, I wish I had space to do the same thing. One of the coolest updates I’ve seen in a very long time!
All of your accessories are adorable too.
Thanks for scrolling :) I love the shelves as well and they ARE totally brilliant…I wish I could say they were an original idea!
Curious about how you solved the problem of the vent above your old microwave? Your kitchen is almost exactly like my daughters and would greatly appreciate how you worked this out.
Both the microwaves have built in vents. We were free to do whatever we wanted above them, as long as the front four inches (where the steam blows out) were left open. Makes it easy!
Hi Ashley,Thank you for super idea,These are(colors, designs)great.
That is absolutely incredible! I am going to pin this for later. Thank you for sharing!
wow.. Ashley that is such a dreamy Kitchen. I love the shelves below the cabinet. Thanks for linking up at the party. Pinning it! :)
Thanks Hani, I appreciate it!
I’m in love with your new kitchen! Our kitchen is similar to your ‘before’ picture…honey oak cabinets and white-ish laminate. I’ve been considering using butcher block because of the cost and you have won me over! Thanks!
Thank you so much for sharing your kitchen at Redoux. I am completely in love. I am loving those floating shelves! Featuring today at my party. -K
Awesome job! I love the open shelf below the upper cabinets, and how to make room you hung the uppers extra high… so clever! I’m pinning this one. Little Bit from http://www.DecorateWithaLittleBit.com
GORGEOUS!!! I want you and your husband to come redo my kitchen!!! :-) We’d love for you to link this up at our party! http://www.housewivesofriverton.com/2013/02/riverton-housewives-round-up-54.html
Congratulations on being featured at Strut Your Stuff Saturdays at Six Sisters’ Stuff! I am a new follower.
WOW! What a superb transfiguration! And for so little cost. Y’all are magicians! I am seriously loving that penny bar.
I love how fresh and bright your kitchen looks! I love all of the yellow accents :)
Hi Ashley,
I just found your blog and am absolutely in LOVE with it. My husband and I just bought our first house and our kitchen looks EXACTLY like yours before the remodel. You may have anwered these questions before, but would you mind letting me know some more details about what paint color you used for the cabinets and where you got the new counter tops and counter for the breakfast bar (such a great detail!)? I’ll be honest, I want to redo our kitchen the same way you did yours. It’s so tasteful and modern, I love it. Any links to the actual stores/items you used for the remodeling would be greatly appreciated (unless you keep them secret – I know this must have been a LOT of work!!!!).
thanks, Laura
Haha, they aren’t a secret! If you go back to my kitchen post and scroll to the very end you will find links to all my other kitchen projects and those posts are chock full of details. You are of course welcome to copy any project or the whole kitchen if you’d like. If you have questions after reading the posts then feel free to e-mail me and I will share anything I missed.
And congrats on your new house!
Amazing!! I love those plank walls and the color on the bottom cabinets!
You did an incredible job your transformation is stunning! (found your blog via hometalk)
wow! as if there isn’t enough to gosh over in this post/kitchen. gotta say too love the paneling detail. great job! ~jb
What exact color is the lower cabinets?? I love it!!!!
Thanks! It’s Grays Harbor by Sherwin Williams in their “duration” paint. Its expensive…wait for a sale!
Did you move your cabinets up? Is this how you got the space below? I think it looks amazing
Yup, we moved them up. It was really simple and we basically just transferred the space from a useless on above the cabinets to a useful one below. I wrote a post about it if you want some more information/pictures https://wildfireinteriors.com/2011/08/let-renovations-begin/
This kitchen is so beautiful. I’m so thankful you posted this on the web cause I’m totally stealing the design! Bravo…you have a gift.
Love your kitchen remodel!
We just raised our cabinets too and I am in desparate need of shelving below. Do you have the specs for the suspended shelf your husband built?
The shelf is your standard 18 inches off the counter and from bottom the the shelf to the bottom of the cabinets is 10.5 inches. We also have the standard eight foot ceilings and the top of the cabinets is about an inch from the ceiling (the gap is covered by molding). Hope that helps!
hi, just a quick question, did you just move the cabinets all the way to the ceiling and placed the shelfs where they originally were?
Yup, that’s exactly what we did!
Would love to know your opinion. It appears that you raised the existing kitchen cabinets to the ceiling and then added the shelves underneath, so I am curious at to your opinion. Since your cabinets now go all the way to the ceiling, do you think it makes your walls and ceiling look taller?
Hmmm….Yes, I think. We moved them up about two years ago, so I’m having trouble remembering the feeling of them being lower. But I think the combination of raising them up and painting the top half of the kitchen a lighter color has really helped with maker it feel more open.
Wow, I’m so impressed with your talent. As soon as we get out of debt (hopefully in 2 years)..this is the first thing I’m saving up for. I’m so not liking my oak kitchen cabinets. This looks like it belongs on the cover of a magazine! Thanks for the inspiration!
Margaret @ Live Like No One Else
The cover of a magazine, you’re sweet :) That would be awesome. I think getting out of debt is a fantastic goal (we paid off our house last year and its been wonderful), but you don’t need to wait till your out of debt to change your cabinets…you can completely change them for the cost of a gallon of paint!
Hi, can you tell me where you ordered your countertops from? Sorry if you already answered in the above questions but I didn’t want to read through them all. Thanks!
Not a problem, they are from Lumber Liquidators.
I fell in love with your rug from Crate and Barrel and had to order one for our kitchen. We’ve only had it for a few months now, but it’s so dirty! It looks like the only cleaning method recommended is vacuuming…..I was curious if you’ve tried to wash yours any other way…..like in the washing machine, for example? ;)
I’ve washed mine in the machine multiple times and it comes out just fine. Maybe slightly smaller and less straight (so slightly), but it’s better than being dirty!
Just stumbled across your blog. Loved the kitchen remodel. Question for you, what are your floors in the living room? (room pictured above with green walls and cute train track) I love them! Would love to know as much info about them as possible.
Thanks!!
Wow I love how your raised your cabinets and added the shelf. What a great idea! You could even use that shelf area to clear off your counter tops OR make a cool spice display. Very cool. Your kitchen looks great!!
I’m in love with your Kitchen! It looks a great deal like my kitchen.. same cabinets and white appliances! (the before picture LOL) I think I will show it to my husband and see it we can do the same! Wow that looks amazing!
I LOVE LOVE LOVE your kitchen!!! Amazing job! I just showed my husband the pix and said, “I am doing this to our kitchen, just so you know!” :) I also love that you guys have paid off your house! I’m super jealous about that but have hope to get our debt paid off too! Just knowing it’s possible to do it in a few short years rocked my world!
Yay! I love that your husband is the one initiating the kitchen reno…usually its the other way around. Having husbands that are on board is the best :) And good luck with your house, paying it off is a ton of work but is so so worth it.
Love the kitchen redo…..very nice. I love the two colors of cabinets. Great job.
God LOVE you that you took and posted that last pic! I love it! And I love your kitchen!
Love your kitchen! I’ve been considering the same color scheme for mine but wasn’t sure how it would look. Now I see, and it’s fantastic!
I also wanted to tell you that you can get dining chairs similar to the ones you have pictured here on Amazon. Just search their site for the “Tabouret Dining Chairs.” $200 for a set of 4. They come in a few diff colors including silver and I think yellow!
Your kitchen looks amazing !!!! Such a great update !!!
I showed my husband the photos of your kitchen, he actually loved the look of the 2 tone cabinets! It was a real shocker for me, he is usually very traditional (he has always held a strong belief that wood should NOT be painted, only stained)… I have always loved painted furniture, cabinets, anything really… this gives me hope that maybe he won’t insist on stained wood cabinets when we get ready to redo the kitchen!
My family is big into wood too. That’s terrible wording, but you know what I mean, haha. All the cabinets in our house are horrible though, so not a single person felt guilty about painting them. Congrats on your husband branching out, it’s always fun when your husband starts to trust your instincts!
Just stumbled across your blog. Loved the kitchen remodel. Question for you, what are your floors in the living room? (room pictured above with green walls and cute train track) I love them! Would love to know as much info about them as possible.
I love them too, I wrote a post about them forever ago. The pictures and writing are terrible, but there is some info in there. https://wildfireinteriors.com/2012/01/pre-blog-living-room-floor-shelves/
The updated kitchen looks lovely! I want to know if the butchers block counter top lasts long or do we need to sand it and seal it every few months. Even if we use polyurethane sealant. Thanks.
You’re in luck, I JUST wrote a post answering this question. https://wildfireinteriors.com/2013/08/my-butcher-block-countertops-two-years-later/ Let me know if you have any questions that the post doesn’t cover.
Just saw your post from IHeart Organizing! You’re kitchen is amazing!!!!!!!!!!!!!!!!!!!
Oh my word! I cannot believe what you did on SUCH A BUDGET! You guys are awesome. I LOVE the butcher block counters and planked walls, and moving the cabinets up to add floating shelves below is just pure genius. I am so glad you were featured on iHeart Organizing so I could find your blog – can’t wait to catch up with some of your other projects – you definitely have talent!
Hey Kayla!
We went on vacation so I wasn’t able to reply to you ASAP, but I just wanted to say thank you! You are pretty much the most awesome commenter ever, looking forward to having you around!
Well I realize this was a while ago, but WOW, great floating shelves. I think I’m going to copy you! ;-)
I see that you said you connected the shelves to the rear supports with glue and nails, but how did you get the nail gun (or hammer) close enough to the end of the shelf? The few times I’ve done this, the nail gun (and/or hammer) would keep hitting the wall while I was trying to use it. Do you know what I mean? Hopefully I’m explaining that correctly.
That’s a beautiful countertop. Is that wood or is it a laminate?
And I love the pennies built into the bar top.
It looks like I have that same tea kettle, but in red. I can’t be sure because of the photo’s angle, but I think it is.
Beautiful photos!
This is absolutely amazing! I love it! Thank you for sharing!
Awesome job first of all! I think it’s brilliant that you raised your cabinets and added shelving underneath! So cool. I actually have almost the exact same layout only the opposite and I am trying to convince my husband to let me do it. I was noticing that the corner space in you base cabinets is similar to mine. The inside is complete deadspace since the two cabinets just come together. There is no opening or lazy Susan therefore complete dead space. Is this what yours is like? Did you do anything about it during your remodel? I’m also working on a dresser kitchen island with butcher block. Thanks for the great post! Oh and how many people did it take to raise your cabinets? Did you go up a foot? Thanks!!!
Just stumbled on your blog via Pinterest. Gorgeous kitchen!!! Love your design choices and aesthetic. Off to check out more of your site!
I love everything about this kitchen! We are about to redo our kitchen and I have found this very inspiring as we have a very similar layout. I especially love the open shelving below the cupboards and the rug!
I just found this post via Apartment Therapy, and I love it!!!
Did you ever find the pendant lights you wanted? If not, have you considered Ikea? They have several pendants that are somewhat industrial-looking, and quite a few wall-lamps and work-lamps that look really close to your middle option (once you hack them into pendants.)
Also, the folks on Ikea Hackers have a few interesting examples of pendants/chandeliers made out of Ikea items from other departments:
http://www.ikeahackers.net/2012/07/blanken-industrial-pendant-light.html
http://www.ikeahackers.net/2012/04/tradig-metal-chandelier.html
http://www.ikeahackers.net/2011/05/lantst-lle-vase-pendant.html
Good luck!
Thank you! We never did end up updating the lighting…it’s still on the to-do list. I’m not sure if we’re going to do recessed lighting, pendants, or both. That last link (with the vases) is almost exactly what I had in mind for some lighting in my guest room though, but I wasn’t quite sure how to easily go about it. This is perfect, thank you! If only I have an Ikea near me…
great ideas
Hey – I think I’ve commented on your kitchen before because we worked from the same color-scheme inspiration photo and I love, love, love your results. But I think I am noticing your chair issue for the first time, so although I am 18 months late and you’ve probably addressed this by now, I wanted to make you aware that those C&B chairs are a knockoff of the iconic “Tolix” design, and C&B is not the only store carrying a knockoff. Overstock carries several colors of the chairs and the stools; their stock varies (they’re popular items), but right now, for example, you can get a pair of the chairs in dark blue for $200. http://www.overstock.com/search?keywords=tolix&SearchType=Header
AND, World Market also does a knock-off version. They have the galvanized finish, $120 for a chair – but just now 25% off, so a mere (!) $90/chair. At least it’s better than $200 :). http://www.worldmarket.com/product/jackson-metal-tub-chair.do?&refType=&from=Search
Happy hunting!
I love the kitchen makeover! There are some great ideas in there, and I love the red bird (I once read that every room should have a touch of red for dramatic interest). And thank you too for the pic of the ‘other side’, you know, the every day living with kids and a husband, there’s too much laundry, normal side. That made my day even more! lol
Love the idea of raising the cabinets!!! What did you do with the ones above your fridge.
Can’t see that in pictures, I’m planning to this in mine and will appreciate your help.
Thanks
Hi Ashley,
I stumbled across your blog and have been voraciously reading it while stuck at home recovering from a shoulder injury (from trying to organize my laundry room!).
So I absolutely love the planked walls and would love to do it vertically (for a wide beadboard look- the sheets of beaded plywood is like $40 each!). My question is how it’s held up behind the sink and stove, as those are my two areas of concern. I cook a lot and I’m not the most elegant or organized cook, so it’s mostly semi-controlled chaos that usually turns out edible, but that means a fair amount of grease is splattered on the painted wall that’s currently my backsplash. And I’m not too proud to admit that I’ve had more than one kitchen faucet malfunction that’s sprayed the wall behind the sink.
Thanks for sharing all your great ideas and experiences!
Angela
“Semi-controlled chaos that usually turns out edible”…..this is me! The area behind my stove is very clean because the splatters don’t usually make it over the back of the stove, but the area behind my sink somehow gets crazy dirty. It actually cleans up really nicely and the grease and water hasn’t permanently disfigured anything. I will re-paint the area before we sell so it looks fresh and new, but I would plank and paint the walls again without a doubt.
Thanks for answering, Ashely! It figured it would take a while with wrangling two little ones and one tiny one, so I’m very impressed! If I can convince the hubs, who unfortunately is not as handy as yours, to help me with this project, I’ll send you pictures! Thanks again.
tanks veryy nice content
Wow, this kitchen looks beautiful. I especially like the color scheme you’ve chosen, and those floating shelves are awesome too :)
I’d like to get more info on the wood planks you used.
What are those? 1x6x8?
Are the tongued and grooved?
How are they holding up?
Would you use them again for a back splash?
What paint and finish did you use for protecting stains kitchen a d cooking messes?
Good idea to change theme. It added life to your kitchen.
I just stumbled across your blog in Pintrest.. I love the bathroom paint do over…then I saw your kitchen shelving was amazing.. What really had me laughing out loud was the shot of the family room. For I remember those days where one room would be cleaned and the room playroom looked as if I had a party that never stopped. And it was of course the first room you would see when you walked in our home. It was suppose to be the formal living room but I don’t believe in formal spaces they just become spaces to collect dust. My husband would tell people if They dropped in unexpectedly that we were robbed…lol.. I even had a housekeeper but the minute they left it seemed one room had to be trashed…and that was ok…Thank you for sharing you have a lovely home and family
Good idea to change theme.
we will try to make it.
I hope my kitchen look so great!!
LOL. I love the picture of what lies on the other side of the kitchen. LOL
Wow! What a transformation! I bet you’re very impressed with what you’ve achieved in your kitchen. It looks very modern and colourful, yet clean. My favourites were your sink and the yellow striped runner – they look brilliant! Thanks for sharing Ashley.
where did you order the counter tops? Love them and the whole kitchen….
The after looks great! The bar of pennies is so unique. I really like all the pops of yellow, too!
Looks great! I love the penny bar countertop! Thanks for sharing!
I love your “remodel”! Lifting the upper cabinets and adding the shelves is terrific. You have a wonderful eye to see the possibilities in a kitchen that had great bones, just out of date. Enjoy your new space! Oh the photo with the baby in the living room….isn’t it amazing how 1 little person can make such a mess! I used to vacuum every day when my daughter was that age! Cracks me up!!!
I love how your kitchen turned out! I’ve never been a huge fan of open shelving, but it totally works in your kitchen. I would love to do a butcher block similar to that for my countertop and a similar blue and white. What color of blue is that? I feel like it helps brighten the kitchen, but it’s not an overwhelming blue color. Thanks for sharing!
The blue is Grays Habor by Sherwin Williams
Love what it is transformed into! Great job!
You kitchen looks very beautiful!