
Kids Room Toy Shelf (an organized masterpiece)
Before I dive into all the DIY goodness I just wanted to say thank you for all the love and support on my last post about Adam’s accident. He is doing well, a little better every day. He is up and around the house now, and even getting out a bit. We don’t do much…mostly just walk around slowly, taking turns moaning about how much moving hurts and telling the kids we can’t pick them up. We’re quite the pair these days!
And now for our regularly scheduled post…

I’ve mentioned this before, but Adam and I have an agreement that we don’t buy gifts for each other. Not on birthdays, Christmas, anniversaries….it just makes life so much easier. I think he sometimes feels guilty about it (because he is basically always off the hook), and when I turned 30 a couple of months ago he kept asking me “are you sure you don’t want anything for your birthday?”
That’s when I made my move. I bet I could have asked for anything, even those dang Frye boots that taunt me with their beautiful leather and giant price tag. “Actually, I do want something” I said “I want us to finally finish that toy chest for the boy’s room.”
Y’all, I married a good man, because he jumped right on it and we had it finished THAT DAY. It was amazing.
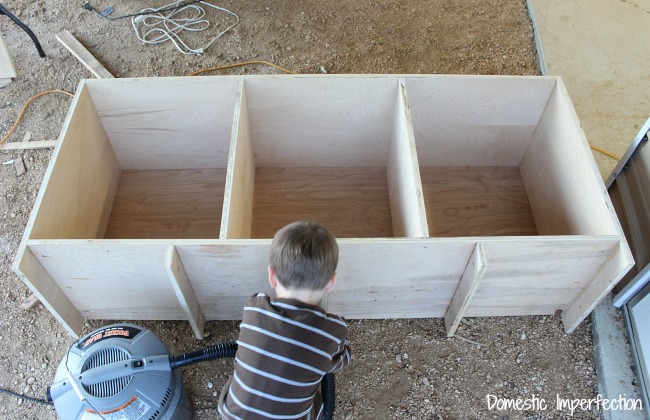
I’m going to do my best to share the process in a way that would make it easy to replicate, but the truth is I have no pictures before it was at this point…
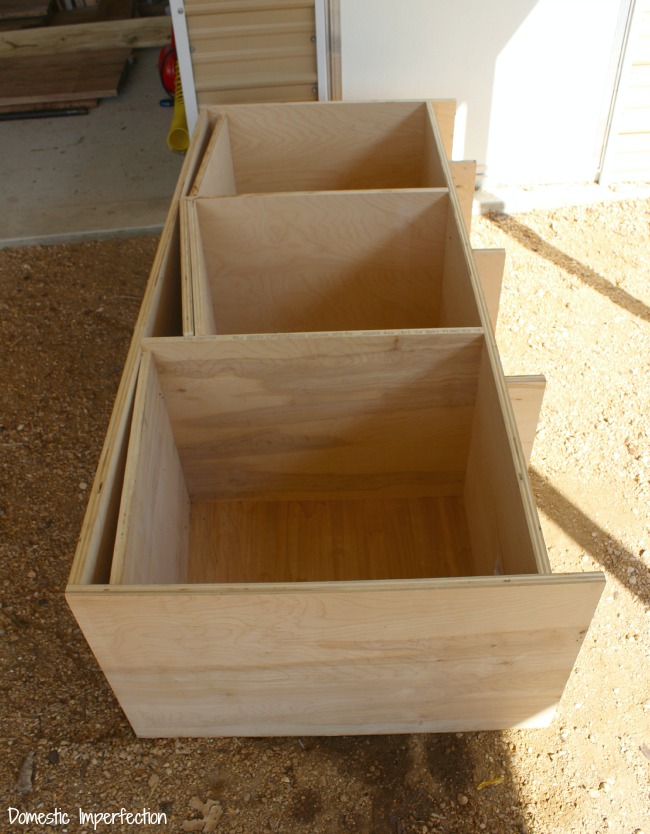
…and I took very few pictures of the process after that. Way to fail, I know.
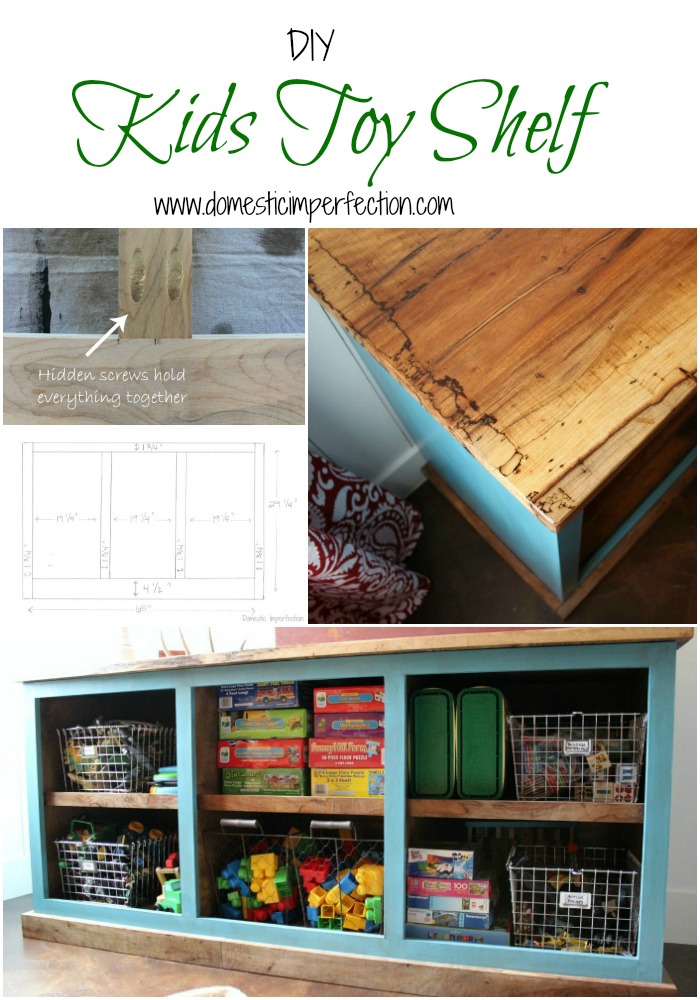
I can tell you this though, the whole thing is built out of Purebond plywood. If you’re not familiar, it’s a high-end hardwood plywood. Not only is it better quality than the regular stuff, but since its real wood (ours is birch) it stains beautifully and looks great. Also, you can get it at Home Depot. It runs right around $50 a sheet and we used two for the entire box…frame, shelves, all of it.
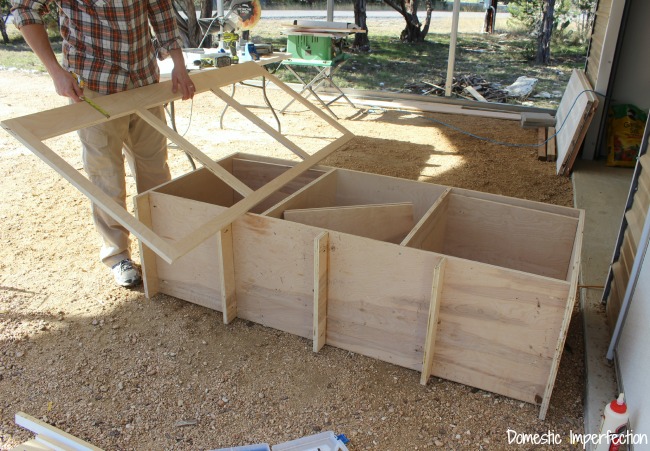
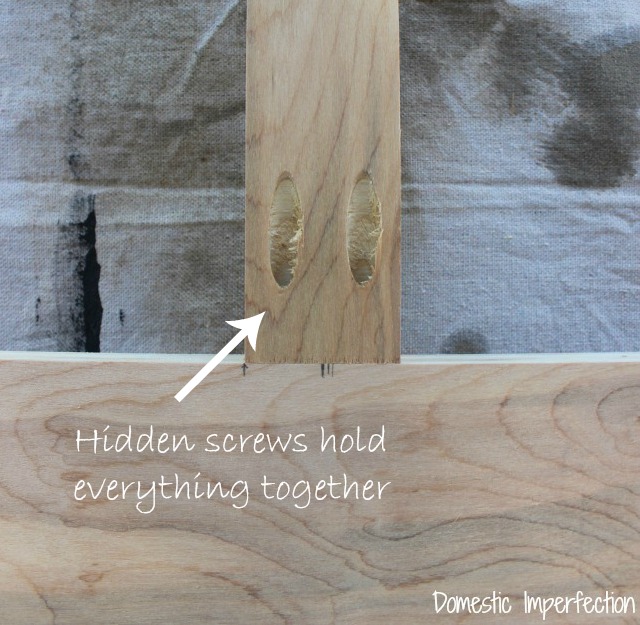
To hold it together Adam used Kreg Jig pocket screws and wood glue, that’s it. If you ever plan to build furniture (or even simple things like picture frames) you MUST own one of these. (Here is a link to the one we have.)
The only other tools you need are a brad nailer, orbital sander, and table saw. Actually, even better than a table saw (when you are cutting big pieces of plywood and such) is the Kreg Jig Rip Cut.
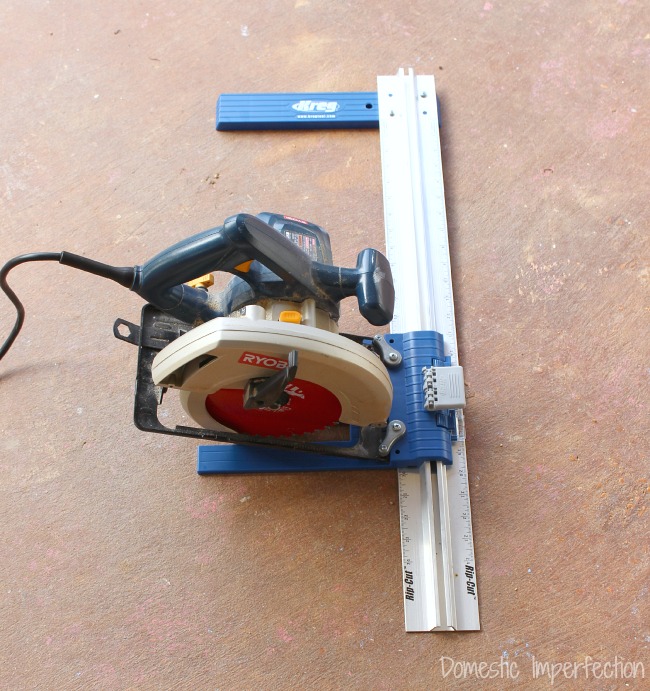
It’s basically the poor mans table saw, but better in a lot of ways because you can cut big sheets of plywood by yourself, where with a table saw you need two people to run it through. You will need a circular saw to use it though, but those are cheap and kinda a DIY necessity.
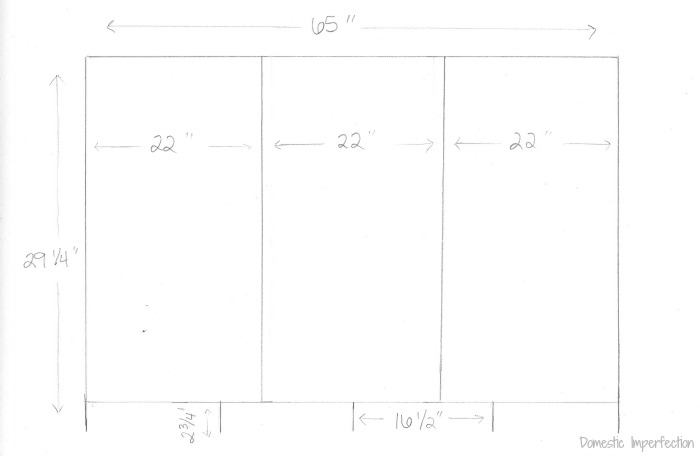
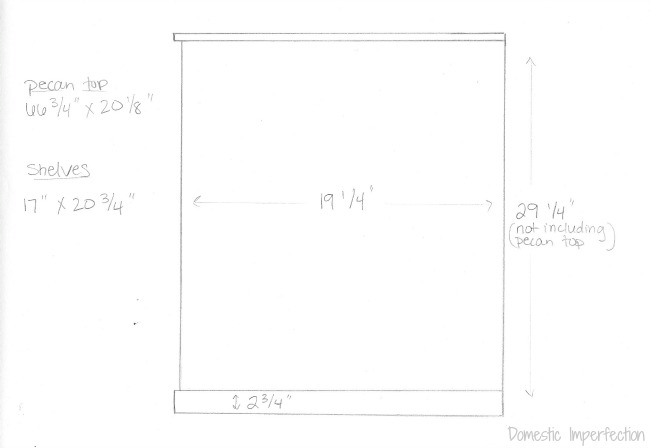
Anyway, to make up for my lack of pictures here are some diagrams I drew up …
Toy Box Dimensions
Face Frame
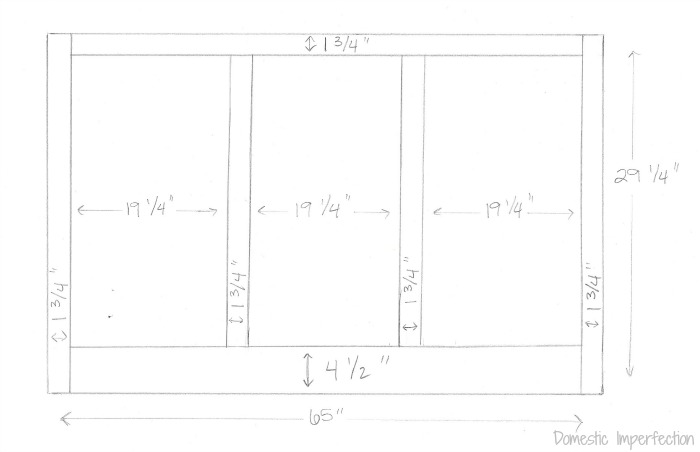
Sides, Top, and Shelves
I painted it to match the giant chalkboard I made for the boy’s room, (Explorer Blue by Behr), painting all the pieces individually before it was fully assembled.

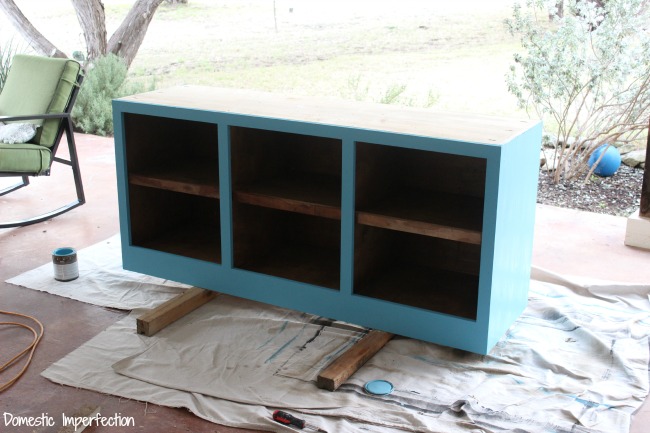
You can’t tell from the above picture because the inside looks like a dark abyss, but I stained the inside as well (Provincial by Minwax). Then it all went together…some rustic pecan pieces were glued and brad nailed to the front of the shelves, the front frame was then attached the same way, and pecan planks were added as base molding. Once it was all together I gave the whole thing the Dirty Cowboy Treatment (distressing with stain, tutorial here), and sealed it with polycrylic.
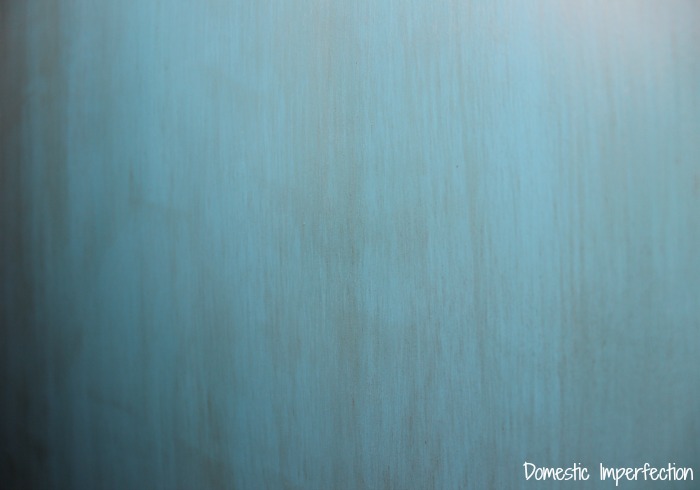
The last step was adding the top. Remember when Adam and a friend milled a bunch of pecan wood and built our dining room table? Well we have a bunch of that pecan left over, this is one solid plank…
Adam cleaned it up and sanded the stink out if it, then I gave it a few coats of tung oil and a coat of matte poly.
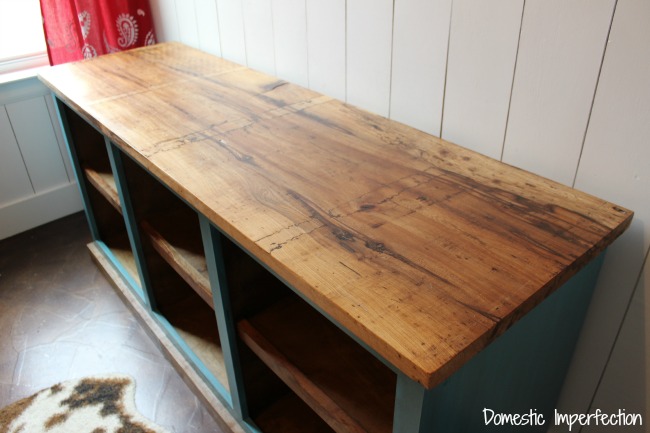
SO PRETTY. Go ahead and tell me that’s not the most gorgeous piece of wood you’ve ever seen.
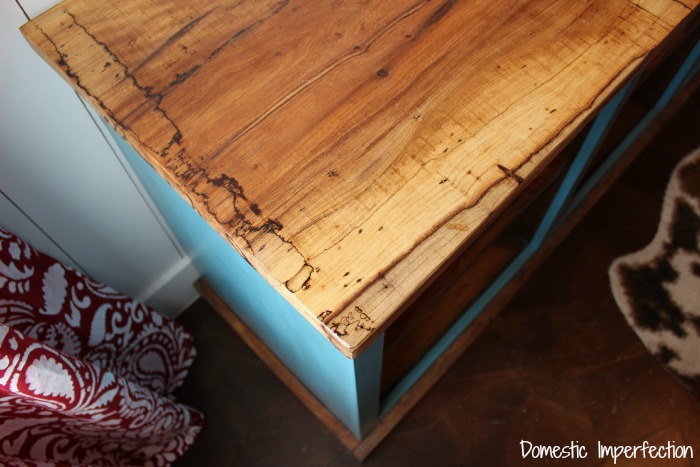
You can’t do it can you? It’s because you’re an honest person with great taste. Don’t ever change.
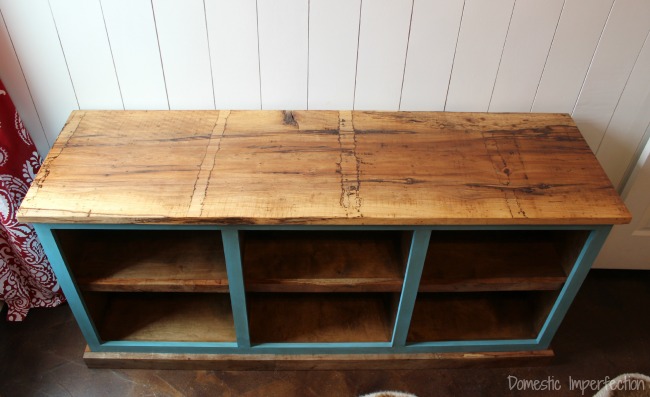
Next came the fun part, which was organizing it.
All of our toys were previously stored in a big toy box in the living room (you can see it here) and it’s was a mess. Everything is all mixed up in there, and all the small toys (the ones they like) always fall to the bottom…which means they are constantly throwing toys out to find what they want. My living room was a disaster.
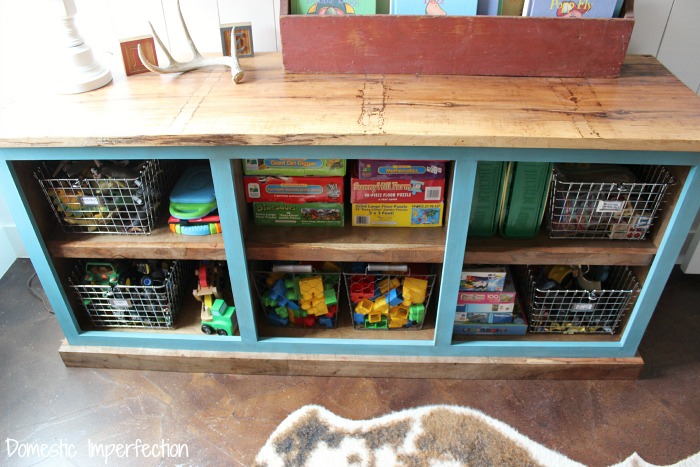
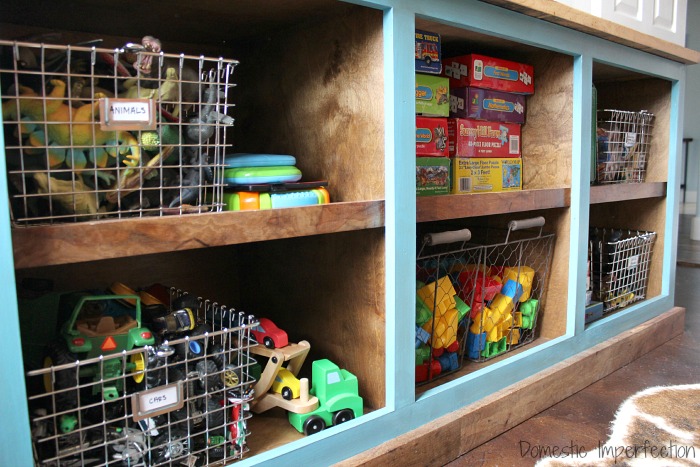
With this new toy shelf not only am I getting the mess out of my living room, but the toys are organized by type into baskets (which I bought HERE). I’m hoping this will eliminate the constant digging and mess making…and even if it doesn’t at least it won’t be in my face all day.
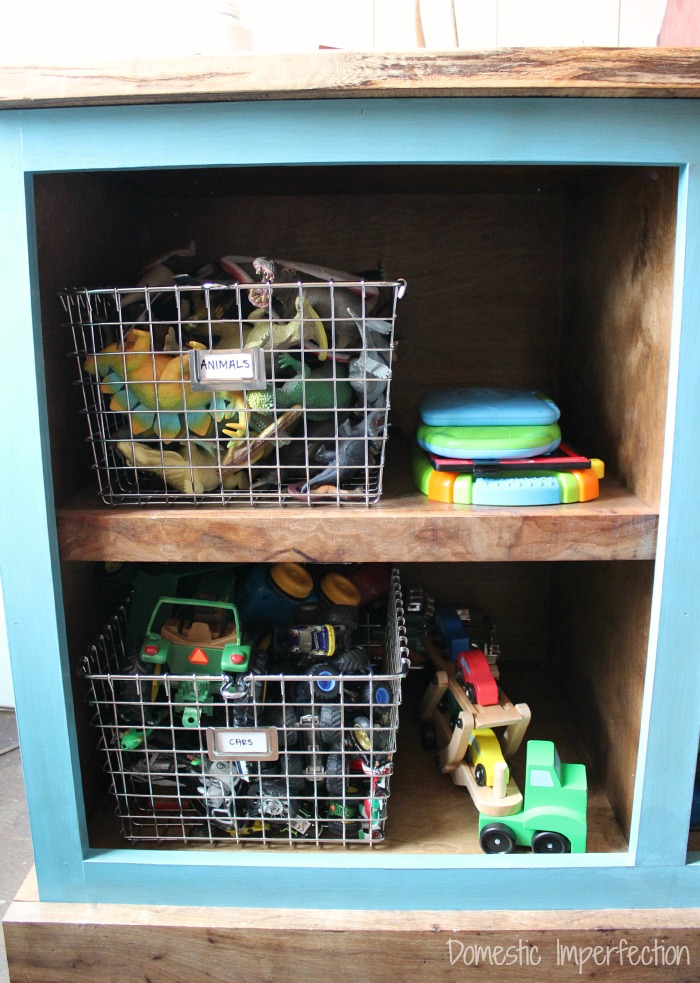
So on the left side here we have a basket of plastic animals (mostly dinosaurs, of course) and one full of things with wheels.
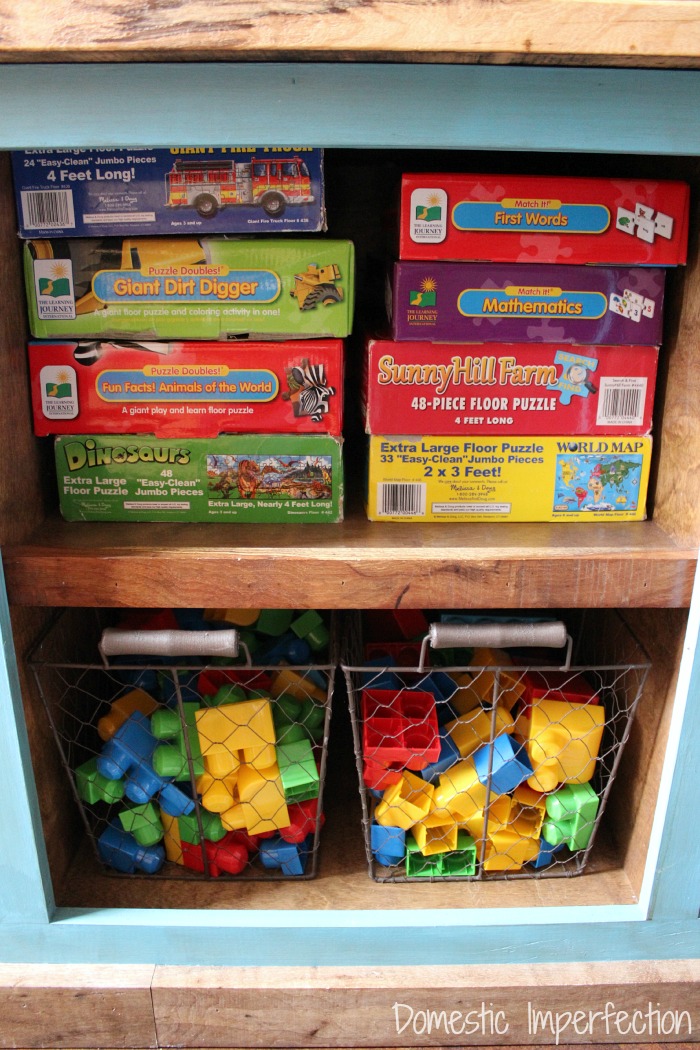
The middle is full of puzzles and big legos (I’m going to fight graduating to tiny legos for as long as possible!)
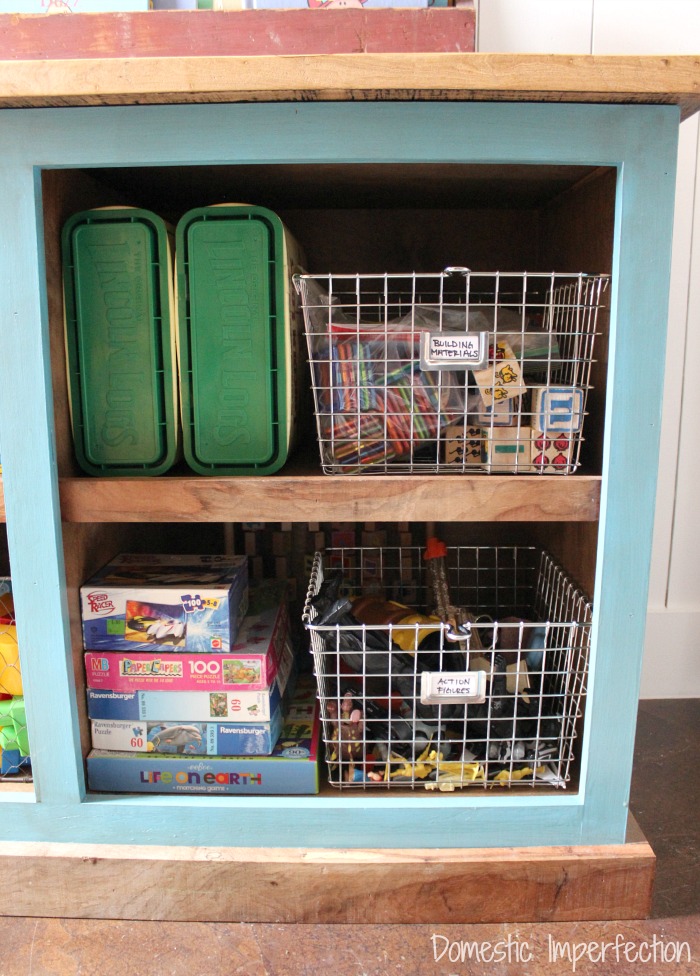
The right side has building materials (lincoln logs, blocks, magformers![]() ) more puzzles, and action figures. Side note about the magformers – I bought these for the boys for Christmas after hearing a few friends rave about them, and my kids love them. LOVE THEM. Just throwing that out there for all you moms that need to keep little hands occupied (or big hands, I think they are pretty fun myself.)
) more puzzles, and action figures. Side note about the magformers – I bought these for the boys for Christmas after hearing a few friends rave about them, and my kids love them. LOVE THEM. Just throwing that out there for all you moms that need to keep little hands occupied (or big hands, I think they are pretty fun myself.)
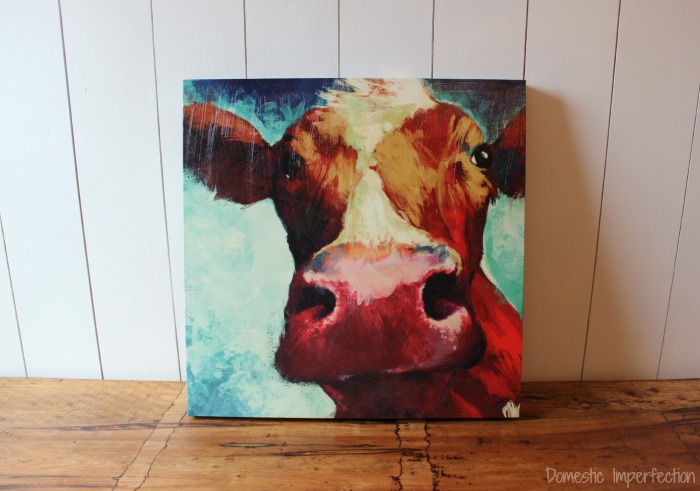
I’m still trying to figure out exactly how I want to decorate the wall behind the toy shelf, but I did find this painting at Hobby Lobby the other day for $20. Could it BE more perfect for this room? (Said in my best Chandler Bing voice.)
Cowboy Bedroom Sources + Links
Items used
- Faux cowhide rug
- Cow painting
- Red reversible comforter set
- Wire baskets
- Bunk beds (similar)
- Cowboy silhouette (similar)
Shop the Look

The new toy cabinet is beautiful! How awesome. That wood on top is truly gorgeous. After reading this post I’ve decided I really want a set of magformers! Sounds like the kind of toy a grandma should have, dontcha think? (It wouldn’t be for me, not at all!)
So glad to hear Adam is recovering. What a relief! Soon time for the next adventure… :D
Oh my! I LOVE that shelf! One of these days I’ll actually start building things. :]
I just voted – you are way ahead!
p.s. LOVE the boots too (and the toy box
That wood IS beautiful! Great toy box. Happy to hear Adam is mending :) Voted for you – good numbers!
Ashley, it came out gorgeous! My kids are adults now (yeah probably about your age :-) but I remember the toy mess, and this is a great solution! You and Adam do great work – good luck with his recovery and your new baby!
That turned out beautifully! I love that purebond plywood; we’ve done a couple of furniture builds with it lately–so pretty!
Great job Adam. Sooo nice to have storage. I just voted and you are wayyy ahead. Hope your up and rinnung soon Adam.
I’m glad that Adam is improving. Your description of being quite a pair made me laugh! Your toy storage is gorgeous. That pecan, oh my!
Where did you get the wire baskets? I like them. And I’m trying to be patient, really I am, but I’m so excited to hear about the land that you hinted about. Please tell us more!!!
I totally forgot to link to the baskets! I spent forever looking for ones that weren’t crazy expensive, I bought mine HERE. I bought chrome because that’s all they had at the time, but now they have a few more finishes (though they do cost more).
I can’t wait to tell y’all about the land! I went out and took pics a few days ago and will try and get a post up about about it early next week.
Happy Adam is on the mend and feeling better :) I love the toy box…ya’ll did a great job!
I voted and you are way ahead YAY!
Oh girl you got this! You are way way ahead of the other penny people:) I love the toy chest – it turned out great and I’m so glad to hear that Adam is doing better.
I am so glad that Adam is doing better. It’s best to keep it slow and steady.
That is one organized toy cabinet! It looks great (and so does that cow!)
And when I voted on your “penny project”, you were way ahead. I will be sure to vote again tomorrow! Good luck with it; and everything else that is going on right now. Too bad I don’t live close enough to help out. I am sure that there are plenty of your readers who would be happy to help!
I love the pecan top! I wish I could find the time to do stuff like that! (And the Chandler quote was perfect too). My mother in law has the same artist hanging in her house. Cows are adorable :) good luck to you in your last weeks of pregnancy and good luck to Adam in his recovery.
Cute toy box and cow picture! I voted!
Just vote for your penny top countertop. You are way in the lead you sure are going to win. So happy for you that your husband is doing great.
Voted on Ipad, laptop and phone and will do every day this month :) Fingers crossed for you x
So far, seems like you guys are way ahead the competition.
The pecan top is gorgeous.
I love that picture! I tried to convince my husband that I needed it, but no dice.
Wow! That looks great! I’m working on something like that myself, it’s my biggest project so far! : O I’m trying to figure out the best way to attach the face frame to the furniture. How did you attach it? Just glue? Hidden holes?
Just glue and brad nails (since we painted it). If you wanted to stain the front you can glue and clamp it or just use the Kreg Jig on the inside of the cabinet.
Wonderful work! The closet is lovely! The colors you chose are also great! I really enjoyed the post! Greetings, Mill Hill Carpet Cleaners Ltd.
What a great project! I’d love for you to share it on my Found & Foraged Linky Party held every Saturday night at 8PM CST at http://houseofhipsters.com/
I love your toy shelf. The top is to die for!! I have used Tung Oil on a project and love how it beings out the wood, looks amazing. I really wish this would work in my house. Thanks for sharing!
Wow that is beautiful!! I would almost feel bad having that tucked away in the kids room where no one sees it! Absolutely stunning!!
Love it! that turned out so good! We live in a small house (1100sq feet) so I am always looking for new storage ideas :) BTW, I have a pair of those Frye Boots, my husband bought them for me because, like you, the price tag made choke a little bit. I have to say though, they are well worth it, I love them so much ( 2 years later) and I swear they get more and more comfortable every time I wear them :)
It turned out so great! I am really impressed! Thanks for sharing! I have a plan to spring clean my home and declutter so there will be more place for a shelf like this for my beloved books! Thank you for sharing! :)