
How to Refinish Outdated Tile (yes, I painted my shower)
Who here has outdated tile in their bathroom but doesn’t want to rip it out and replace it? Did you know that you can paint it? Painting shower tile is an involved process but not a hard one, and for about $100 you can give your shower a complete makeover.
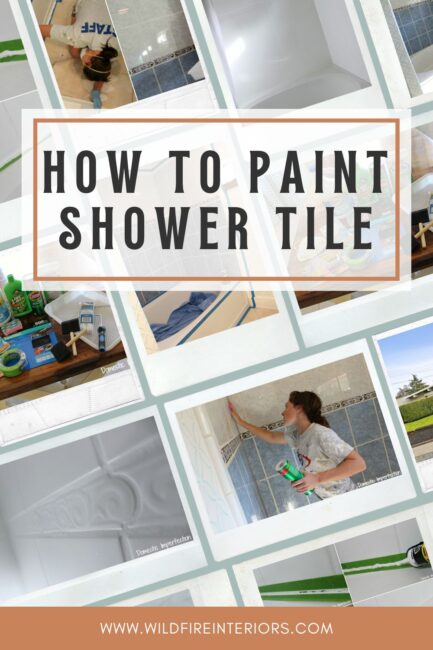
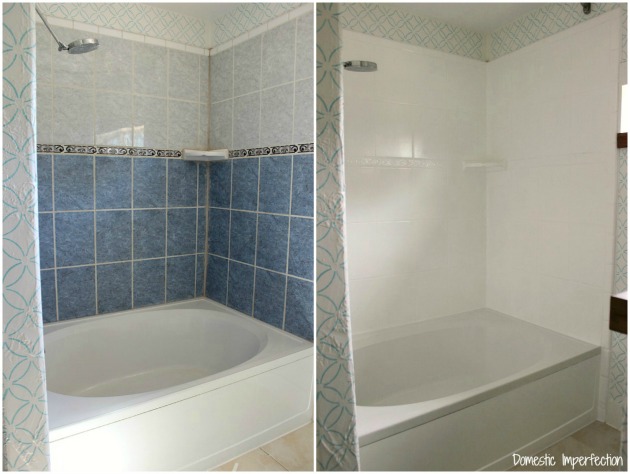
I wavered about doing something with the tile in our master bathroom for a long time. It’s not terrible and I don’t hate it…but by the same token I don’t love it either. I didn’t want to rip it out and re-tile…in our forever house, yes, in this house, not gonna happen. I finally decided to give painting it a whirl, mostly because I like to experiment and I thought some of y’all might be curious about the process. Plus I figured solid white would be an improvement over the blue, gray and swirlies.
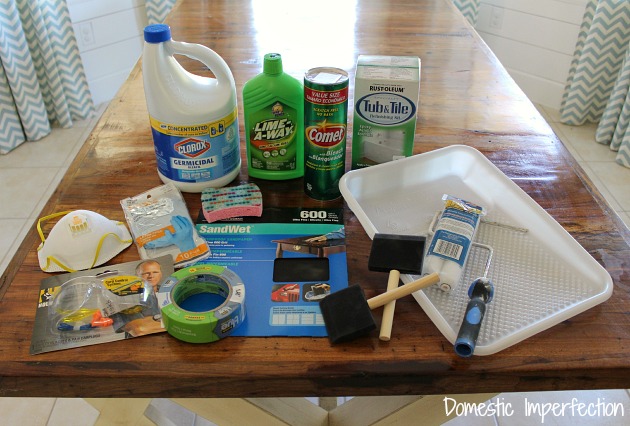
So let’s get started. First off, you need supplies. Quite a few of them.
How to Paint Shower Tile
Supplies –
- RustOleum tub and tile paint (I used almost two boxes and did three coats)
- Cleaning Supplies – bleach, Comet, and Lime-A-Way
- abrasive pad/sponge
- 400/600 grit wet/dry sandpaper
- 3M™ Safety Products – a respirator, safety glasses, and gloves
- ScotchBlue™ Painter’s Tape
- brushes (I used foam)
- rollers (I used foam)
- paint tray and liners


You may or may not need –
- tools to remove caulk
- grout
- caulk
- dropcloth
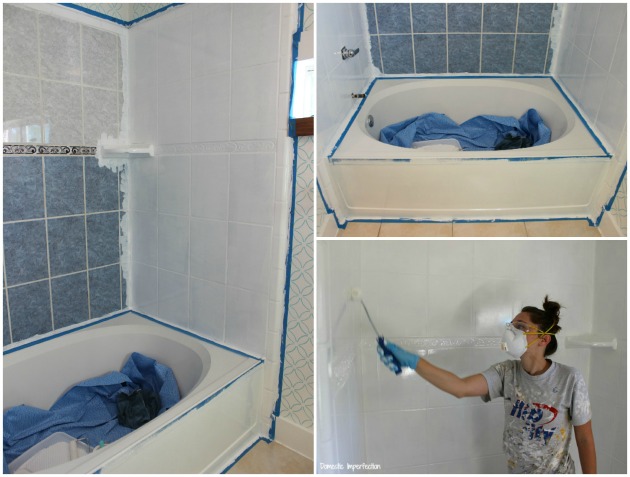
Step one – Prep work
Preparing the tile is critical, and if you don’t do it thoroughly the paint won’t adhere properly and you will have a mess on your hands. Don’t be lazy with your prep.
Remove caulk/replace grout
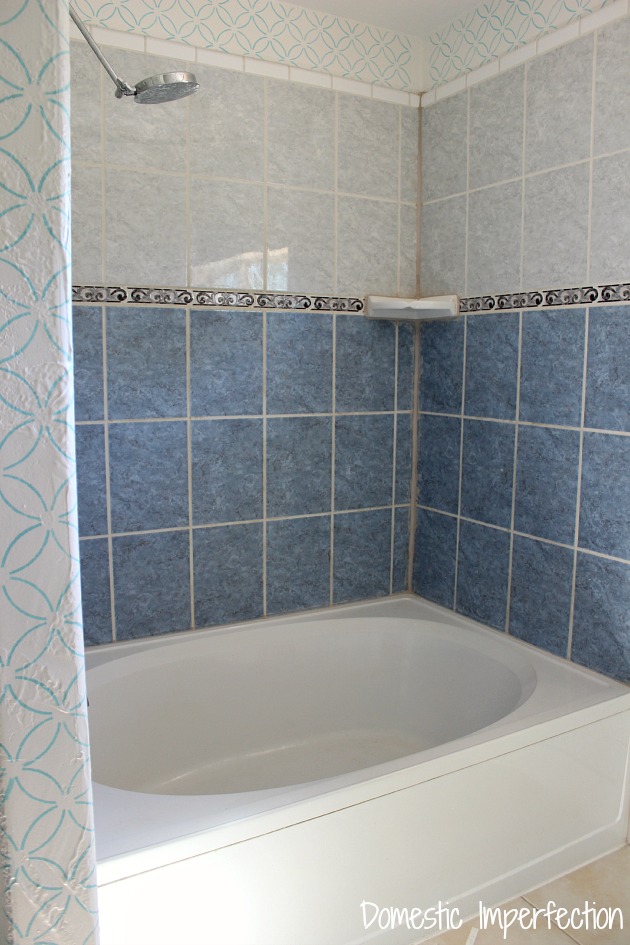
The very first thing you need to do is remove all the caulk from the areas you will be painting, since you can’t paint over it. This should be in all the corners of your shower. (You can go back and add it after your shower is painted and dry). We didn’t have caulk in those areas, but rather cracked, chipped, and missing grout.
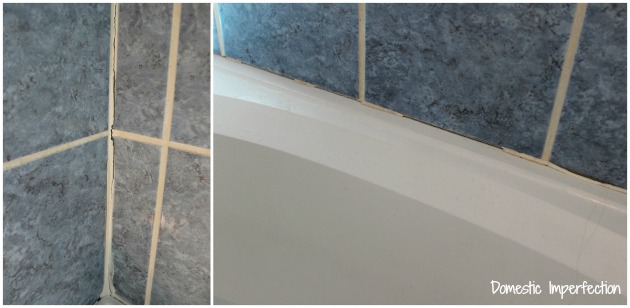
My husband decided to go ahead and remove and replace the grout in those areas. He said it was for the betterment of the tub… I think he just likes destroying things.

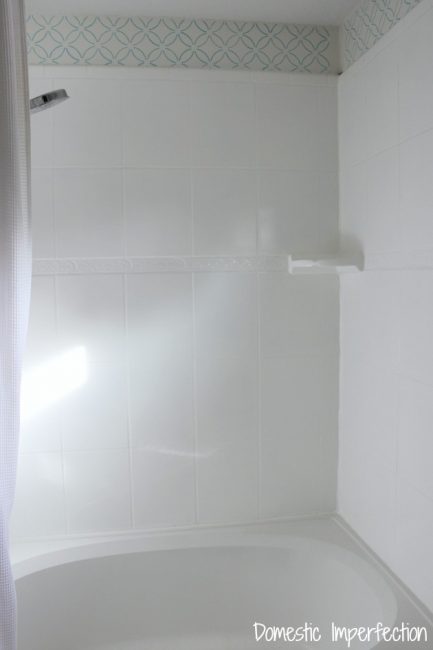
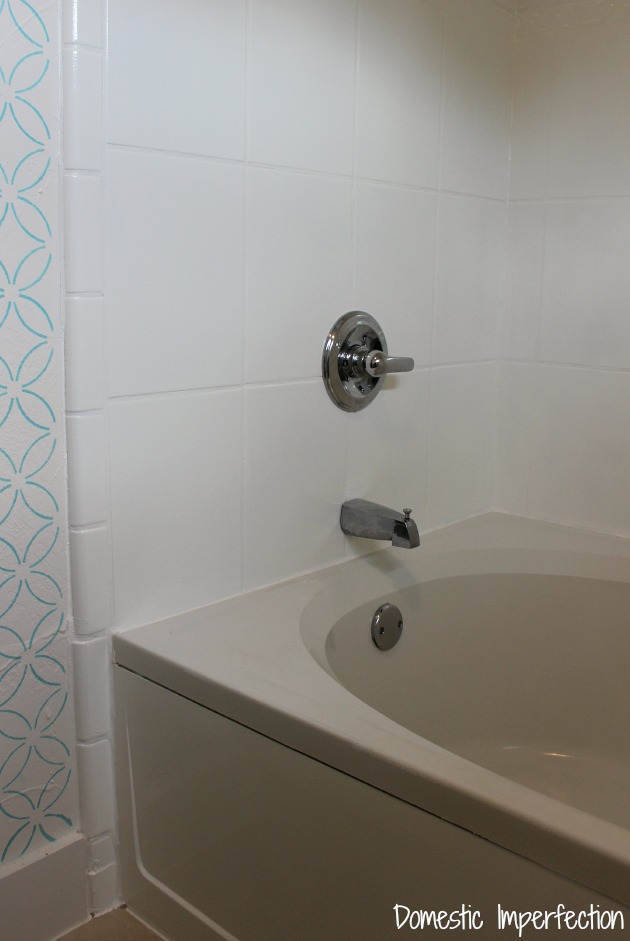
Here is the official before picture, after a few hours of prep work.
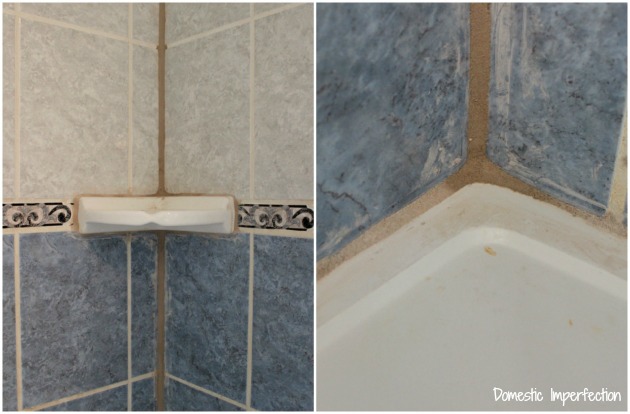
Cleaning
The first non-optional step to painting shower tile is cleaning it. (Actually, the first four steps are cleaning.) This was new territory for me, I am terrible at cleaning our showers. Terrible meaning I just never do it. If I don’t make something a top priority around here it doesn’t get done, and scrubbing showers is never a top priority. In my opinion, you shouldn’t even have to clean showers. Their whole existence is centered around soap and water…they should be self-cleaning. Can I get an amen?
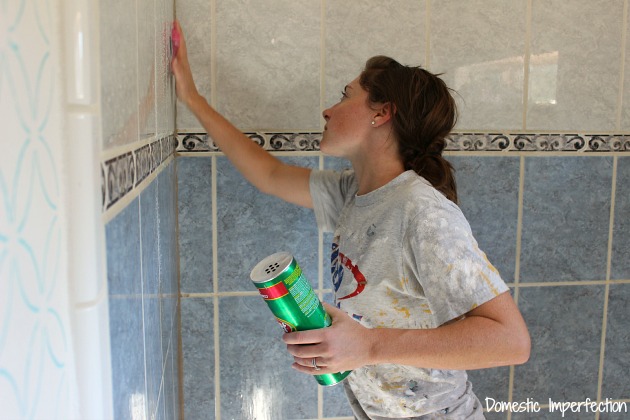
Here are the cleaning steps, I simply did exactly what the box told me to do.
- Clean with bleach water to remove mildew. Rinse.
- Scrub with Comet and an abrasive pad. Rinse.
- Clean with Lime-A-Way. Rinse.
- Sand with 400/600 wet/dry sandpaper. Rinse.
- Let dry for at least an hour.
The result? Insanely clean tiles. Literally so squeaky clean that I could have used the refection to do my make-up. So beautifully clean that I may just go completely crazy and scrub my shower once in a while.
Tape Off the Area
Next I taped off the shower with ScotchBlue™ Painter’s Tape.
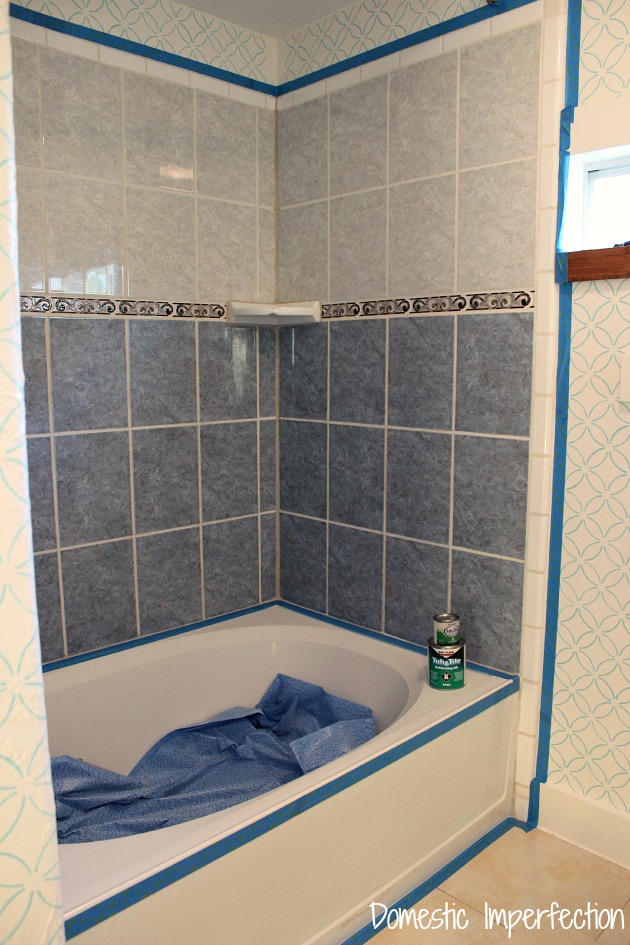
Here is what I was thinking when I did this…
I wanted to paint the tiles, but I didn’t want to paint the actual tub (except for the front, because it had some discoloration). The tub was already white and not in bad shape. No need to fix what isn’t broken, right? Also, the tub and tile paint has great reviews online (you can read them here on Amazon) but whenever I read a negative review it said something like “it’s been a couple of years and it’s holding up great except for some chipping and peeling around the drain.” If the floor was everyone’s problem area, then I wanted to avoid painting the floor.
Step two – Paint
Mix the Paint
Shower paint is a two-part epoxy paint that you mix together by pouring part A (the activator) into part B (the base). You can use it on porcelain, ceramic, and fiberglass.
Start Painting
First, use your brush to cut in the edges and corners, just like you would if you were painting a wall.
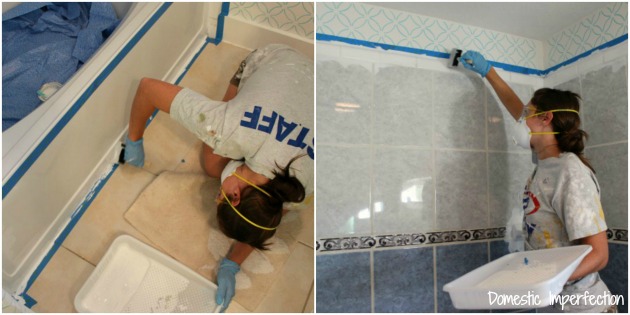
When that is done go after it with a roller…
Painting a tub may sound a little scary and intimidating, but really, it’s no different from painting anything else and it doesn’t really take any longer. (You only need to wait about an hour or two between coats).
Okay, I lied a little…there is one major difference between painting shower tile and painting a wall.
THE SMELL. The tile paint is so freaking ridiculously strong; it’s insane. Do not even think about doing this without a respirator. I used this mask and could smell it a bit, but it wasn’t bad. I would think that a mask like this would do a much better job. The fumes were so strong that my eyes teared up a bit and I seriously considered putting on my snorkeling mask. I thought the Waterlox we used to seal our butcher block countertops and farmhouse table was bad, but it has nothing on this tile paint. You can tell I’m a mom because the only comparison I can make is comparing Waterlox to newborn diapers and tile paint to toddler diapers. Neither are pleasant, but as soon as you graduate to solid food toddler diapers you realize those newborn diapers basically smelled terrific.
Step Three – Finish
As soon as you are completely finished painting, remove the tape. Then you just need to wait for it to dry for a few days before you start using your fresh new shower!
Here are two things you should NOT do when painting a shower.
Do NOT use a roller that isn’t foam.
I did some research before starting this project and it was recommended that you use a low nap roller over a foam roller. That’s all fine and dandy and obviously worked for some people, but my roller left tiny raised hairs all in my paint. Literally everywhere.
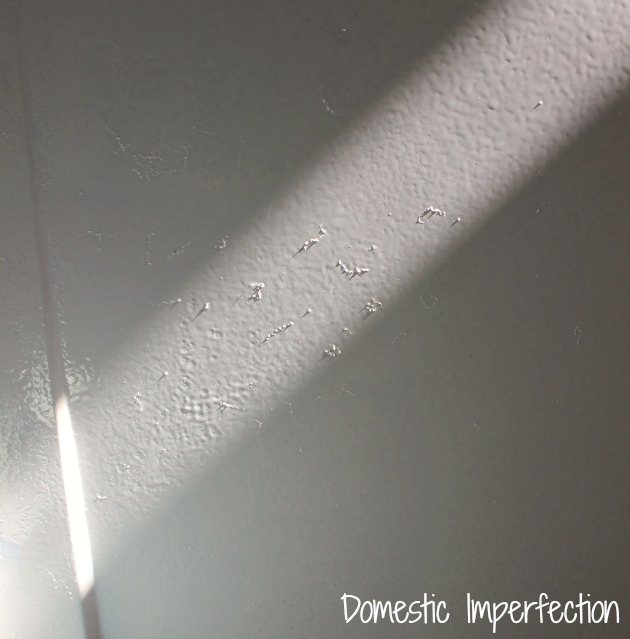
I ended up sanding again after the first coat with the 600 grit sandpaper to smooth them out and using a foam roller for the rest.
Do NOT use the same paint tray for consecutive coats.
Use a liner and throw it away after each coat, even if the paint in it looks dry and safe to pour over. The new paint will re-energize the old stuff, just enough to leave tiny, bumpy, gelatinous spots all over your nice smooth paint job and make you want to hurt somebody. (I couldn’t get a good picture of this.)
Final Thoughts
With that being said, here is the final product…it looks so bright and clean! Perhaps a little too bright and clean…I think I have to paint the tub now. I used to think it was white, but against the ultra-white paint it looks gray and dingy (it looks better in pictures than in person).
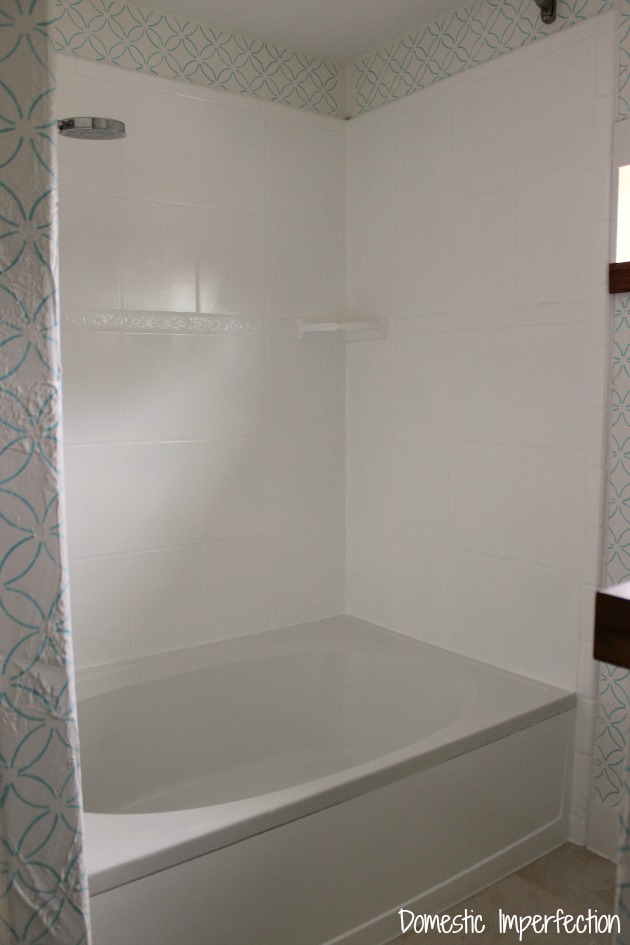
The finish on the paint is surprisingly great. It’s smooth and shiny and really doesn’t feel like it’s going anywhere. Adam was very skeptical before we started, he told me “just because you can fix things with paint doesn’t mean you should.” Now that is complete he suggested we do the guest bathroom as well.

If y’all have any questions just leave them in the comments and I will do my best to answer you!
UPDATE – Is shower paint durable? CLICK HERE TO SEE HOW IT IS HOLDING UP AFTER A YEAR!
Update #2 – I just saw that Rustoleum now makes a touch-up kit for this product! Now if I do get some chipping I can easily fix it without buying and mixing up a quart of paint.
Have something besides a shower you want to paint? Rustoleum also makes kits for –
- Tile flooring
- Appliances
- Countertops
- Garage floors (tutorial HERE)
- Cabinets
You may also like –
How to Make Dirty Grout Look New
Paper Bag Flooring – A Tutorial
My Painted Kitchen Cabinets – Five Years Later
How to make your kitchen look custom for under $50 (hint: It’s not paint!)
How to turn a dresser into a bathroom vanity


THAT. That is AMAZING. It looks like brand new tile – and now the grout will be easier to clean too! Win!
Just want to know if this process will hold true for the floor tiles of my bathroom.
Can’t I skip all that cleaning and just get to the good stuff? I despise shower cleaning. Hmmm.
Love, Mom
At least I come by it honestly!
That looks AMAZING, Ashley! I can’t believe how beautiful it is now. And thank you for the tips – I will definitely keep all of this in mind should I ever decide to paint tile. We resurfaced our tub – not us, we paid someone – five years ago, and the smell! The smell was horrid! I can imagine what this paint was like.
This is fantastic!!!! We are in the process of redoing our home and what a wonderful solution for the bathroom tile! I have seen all the products, but was always a little skeptical. Glad to know it works and looks so good!
I totally understand your skepticism. I’m a skeptic too, which is why I avoided painting the tub. It really does look great though…I’ll have to do an update post in a year or so to let everyone know how it’s holding up.
I have already made up my mind, I am doing it… I will link you on my page when I do, because you made my mind up within two minutes of reading. But, if it doesn’t hold up in a year, I will just have to get new tile, which isn’t a bad solution either! :)
Decisiveness, I like it!
What type of cleaner do you use on the finished tub walls? I recently painted a shower house with epoxy paint and would appreciated any input. I didn’t know if there were any cleaners that were damaging. Thanks! Your project turned out great.
I have’t found a cleaner that is damaging yet, I would just stay away from anything abrasive.
Ashley,
We have an 85 year old home with cracked tiles and I am looking for a reasonable solution like this one. It looks great and I am interested to know how it is holding up. The tile I need to paint is used by three teens/pre-teens daily. It will take a beating so I am curious if it is worth it.
Thanks.
It’s holding up really well, and it is used daily by my family (including my two preschool age sons). I can’t imagine it will stay perfect forever, but so far I’m really impressed and would definitely recommend it.
Love this!! We recently bought our first home and I would like to do some updates. I hadn’t thought about painting the tile, but I think that it would give our bathroom a major facelift without breaking the bank. Thanks for the inspiration!
What a great transformation. We had this done professionally about 10 years ago and my OCD husband wouldn’t give a thumbs up until a final power buff was done (he did it). Your job looks even better than a professional. One thing I see in your pics is grout between the tub and tile. These transitions should always be filled with a good caulk. The tub flexes and causes the grout to weaken leading to leaks/mold.
You know, I didn’t even think about that. That area was grouted instead of caulked when we bought the house, so we just followed suit. I guess that would explain why it was in such terrible shape!
Actually, you did it correctly. It is a common misconception that one should caulk between the tub and tile. Because tile jobs, mostly the grout are not water proof, water will get behind the tile and caulk simply holds it in causing water damage and mold. If you think about it, I’m sure you have seen many tubs with the infamous black caulk around the edge. It has to be replaced constantly. This is why.
Tubs should NOT flex, the non metallic variety is set in a motor bed to stabilize it and screwed to the wall studs at the top, there is very little if any flex/ movement when properly installed.
I don’t wanna paint and I don’t wanna tear old some old tile. So I have decided my girls bathroom can stay like it is and I won’t ever go in there.
WOW. I didn’t know that painting bathroom tile was even a possibility! This is fantastic to know! We’re just renters right now, so I won’t be doing this anytime soon…. but this will definitely help us plan when we finally do become homeowners! I’m so happy to have run across your blog a few months ago…. I’ve really been enjoying reading about your past projects and your newest ventures. I’m such a home/DIY person…. but I’ve never tackled the big projects like you have! So fun to watch!
Amazing! Astounding! AWESOME! And you say it works on fiberglass as well? Hmmmm. We may be renting, but we have the awesomest landlords ever, and they split any DIY that stays with the house with us, usually 75/25 (since they get the long-term benefit).
We moved in and the fiberglass showers were pristine white. After a week, during which a window-cleaner came, there were horrible BLACK drips and brown shoe prints in the tub and on the walls. They. Don’t. Scrub. Off. Seriously, they don’t. I’ve tried everything from Bleach to Vinegar, both regular strength and the stuff you can only get with a contractor’s license (it’s good to know people!). There just might be a light at the end of this tunnel!
Much mo betta! Looks great!
just doucle checking– You can use that rustoleum paint to paint the actual, used everyday covered in water, inside part of your tub?because that would be freaking awesome. we are installing a new vanity this weekend, and then I was planning on painting the tile as well (with a slightly differrent process), but I didn’t think I’d be able to cover up my grossly stained tub too.
Yes, you can! I’m going to ahead and do mine too. Kristi over at Addicted 2 Decorating did hers and has a post about it. I’d give you the link but I’m on my phone.
Love your site , its so real and how tos are great including what not to do .. Funny !
We are thinking of using restoleum deck painf to resurface our wooden deck we just made into a fpglassed in sunroom , diy using recycled glass doors , 14 . After removing all deck rails and putting screws instead of nails , Room looks fantastic but need to do floor. Anyone used rustoleum on deck and can tell us how it looks or works . ????
We want to fill in gouges from removing nails and replacing with deck screws . almost done except for paint and wood trim and floor. Our deck runs entire lengthnof house in back and now we have full lenth glass panels to enjoy deck in rain in oregon
If your deck is covered, it might work fine. If your deck is exposed to weather, the Stuff (deck paint) is garbage. Home Depot has a much better product that fills in cracks and weathered wood. However if you have used Rustoleum first, they do not guarantee adhesion of this product over it. I use black Rustoleum on countertops, but have to repaint between tenants–easy fix.
I didn’t know there was such a product on the market! I’d be happy to have walls that look like your before, let alone your after. It looks great.
Little hint for not having hairy walls when using a roller; Get a roll of wide sticky tape and lay it all over the nap and pull them all off. Then wash your roller, let it dry then do the sticking tape trick all over again. Believe me it works! I love what you did with your shower/tub recess. Bit of a pain I am sure, but much easier than ripping out old tiles and re-doing them!
Thats a great tip! I would have done something like that, but no one else seemed to have that problem (or if they did then they just didn’t mention it). Next time I’m going to prepare for the worst though!
Hi,
I painted my tiles yesterday following your instructions. The only change that I had to make was using the foam roller and foam brushes. When I came back to put the 2nd coat on after a couple of hours, I put on a brand new foam roller and got brand new foam brushes and they just fell apart right away. Pieces of the foam started sticking to the tile, it was awful! I ran into the garage and got a small paint brush and a small nap roller to continue the job before too much time passed and it worked beautifully! So for me, the only change I would make is to not use foam at all, just get a good quality small roller and paint brush and it will come out fine. (I used Purdy brand brush and roller). Thank you for this great idea!
Oh no! That’s so weird because the foam rollers worked perfectly for me. Glad you were able to fix it before it caused too much of a headache. Thanks for leaving a comment about it too, it great to have readers leave their experience so that others doing this project will have all the information before they start.
Hi! Now I’m confused (and afraid!)! I NEED to do this in our outdated bathroom, but am not handy or an experienced DIYer. What brushes and rollers should I ask for at the hardware store in order to complete the tiled walls and the tub? Also, did you tape off the taps and faucet or did you remove them? Thanks!
Thank you again for this great tutorial. It came out beautiful and saved us a lot of money. I am now going to paint the sink countertop with the “SpreadStone® Countertop Finishing Kit” –I heard this is the best one to use for the counters.
Did you paint the grout too?
Yup, I painted the grout and everything. I actually love the painted grout, its a breeze to clean.
You are my new personal hero… we have terrible terra cotta colored tiles in our master bathroom and every time I looked into painting them, the results were iffy in areas that would get wet… but clearly I didn’t look hard enough!! Doing this in a big way. So questions: 1) caulk is a problem, but obviously not grout, right? Just paint right over? 2) Obviously these hold up to water, but any reason to think this wouldn’t work on tile floors that will get a little more wear and tear than the shower walls? Love it!!!!!
Thanks Charlotte! The box says not to paint over caulk, but you can caulk AFTER you paint. As far as doing floors (that aren’t in your tub) I asked rustoleum and they said it won’t work for that. But hey, if it’s something you are planning on ripping up anyway then it can’t hurt to experiment, right? It might be slick though, just FYI.
There is a paintable caulk. What brand of paint did you use? I may have mised that, but do not recall seeing it. I also have awesome landlords! They split our cost as well. I did not, however, realize you could paint the counter tops too. What brand of paint would that be?
I want you know know that I found your blog while perusing the web looking for answers to “can I paint tile?” And this worked SO WELL! I used it in the basement guest bathroom and it’s like an entirely new bathroom. The fumes were definitely worse than I imagined, but everything else worked so well. Thanks for documenting and sharin your experience!
So glad it worked for you! (and yeah, those fumes are BAD).
I can hardly believe how epic this outcome is. I might need to “accidentally” forward this post to my landlord and see if he’d be up for me painting his dingy gray bathroom tile. Crisp bright white just looks so clean and refreshing! Sigh. I could get into that!
Well done, Ashley!
fantastic!
WOW! Now THAT Is a transformation. I have to tell you that I rarely pay for any professionals to do renovation work for me, but in my last house, I broke down and paid a professional to “reglaze” the outdated tile in our guest bathroom. It was $500 and didn’t look one bit better than your results!
Do you know if this can be used on floors? Your tub looks great!
Thanks! I wondered the same thing myself about doing floors (like in my kitchen) so I asked rustoleum and they said no, it wouldn’t work for that. Too bad!
Thanks for finding that out. Too bad, I was already redecorating my whole bathroom in my head!
AMEN to showers being self-cleaning! The other day I came across a big, detailed pin on how to clean your washing machine. o.O What’s up with that??
This turned out great, Ashley. Lovely and clean-looking. I respect how you always go back and redo things that aren’t to your liking, like the hairy walls. I do stuff like that, too. I wonder why the recommendations never mention it, or what to do to avoid it?
Where I work they refinished their tub a few years ago, and the area around the drain now looks absolutely horrible. Just saying. Your tub doesn’t look bad, the colour looks like a different shade of white rather than a dingy or dirty surface. However your method of prepping may be more thorough than what was done for them. I’ll be interested to see what you decide and how it all holds up. Cheers!
I did this to a mid century BRiGHT yellow tub and surround. Fantastic results and 4 years later it still looks great.
That’s awesome news!
Yes, washing machines should be self cleaning too! Although I do actually clean mine from time to time…lots of poop goes in there, and that rags I use to clean it come out gag-worthy. Eww…
I really don’t want to paint the tub, but I when I was prepping the shower for painting I was on autopilot, jamming out to some Pandora…and I sanded some of the tub without thinking. I did all the cleaning steps to the tub (just cause it needed cleaning) and caught myself partly through sanding. It looks kinda scratched up, but its bot terrible. So I’m not sure what to do.
Love this! Did the smell stay around for long after you were done painting?
Yes, it lingered. It wasn’t crazy super intense for too long, but it was uncomfortable enough that Adam and I slept in the guest room for two nights.
Hi Ashley! Great job you did on your tiles! My husband and I ventured out and did the same and we’re very happy with the results too… only problem is the smell! The final coat was done a few days ago and the smell is unbearable. So unbearable that I don’t know what to do. Do you have any tips to get rid ofit? We have a young son and I don’t even want him going in the bathroom because of the strong chemical smell. Any tips?
Love it, Ashley! Looks so great! From one tile-painter to another….great job! Looks so updated and fresh!! :)
Wow! That is very impressive – I’ve been planning my own bathroom tile makeover and you’ve shown exactly how to do it. Yay! On my way to the first 4 steps.. cleaning!
Thanks!
A-mazing! If you only knew how many times I’ve stood in our spare bathroom looking at the grey-blue tile with (wait for it….) dolphins on them, wishing for a solution that didn’t involve demolition. (I would be thrilled to demo, but my wallet, not so much.) You have set the dolphins free! Can’t wait to give it a try!
This is awesome! I’ve been debating on how to take care of jade and mint green in the kids bath, and gray and maroon in mine without breaking the bank. Hubby will likely say no initially to my painting it rather than hiring it out, he’s already mentioned having a pro reglaze. But I’m all for DIY and save a dime if I can.
How long did this have to dry before it was cured enough to take a shower? Our tile is the whole bathroom, not just tub surround, so I need to calculate the out of order time.
Never knew one could paint tile!! This would be perfect for a few of our clients who don’t want a whole gut job!! Great work looks absolutely fantastic!
Stay Fabulous, Ashley!
P.S. we too fail to clean our shower on a regular basis haha.
Wow! That looks amazing. I would never have thought that you could paint tile.
Um not only does your shower look amazing but most important (to me) was your hilarious commentary…. We could be sisters. Good to hear there are others out there like us… Scuba mask comment took the cake. You rock!! I want to decoupage my walls with some wrapping paper…. But I’m scared it’ll be epic fail… Any suggestions? Will I need to get my scuba tank and flippers out? Tia!!!!!
The fear of having a project fail is the best part! It’s my adrenaline rush :) For the walls, I would do the same thing I did to my floors (but you probably only need one coat of sealer)… https://wildfireinteriors.com/2013/03/paper-bag-floors-a-tutorial/
call me crazy but i liked the old look, but thanks for telling me how to really give the tiles a good clean!
How’s the paint holding up after all the showering?
I just saw this comment, sorry it took me so long to respond! It’s only been about three months since I painted the shower, but it looks perfect. No chipping, peeling, or discoloration at all.
I’m just curious what Rustoleum says about longterm. We are about to put our home on the market and would love to update our master shower tile, but I don’t want to make a mess for future owners either. Seems like I read somewhere that painting was not for areas that get wet, but hey if Rustoleum stands by there product and I can transform a god awful black shower to a wonder crisp and clean white shower, I am willing to give it a try!
I can’t comment on the long tern since I just did mine a few months ago, but I totally understand your hesitation (which is why I didn’t paint the tub part as well). It is made specifically to get wet, so I’m hopeful!
I love how your new bathroom looks! I have the same tile design as you do and have been itching to refinish these outdated tiles for the past two months. Just one question: what kind of bathroom cleaning products have you used to clean your painted tiles?
So far I’ve just cleaned it with that spray shower cleaner by Scrubbing Bubbles. It’s cleaned up great and looks just like it did the day I finished it. (BTW, I have no idea if it’s okay to clean it with that, the box doesn’t have any cleaning instructions. It just says “washable”.)
Do you think this would work for refinishing a kitchen counter? I have the ugliest yellow tiled kitchen countertops and this makes me wonder… What do you think?
I have had readers tell me that they very successfully did this in furniture and tabletops, but I’m not sure about counters. I know it would work, but I don’t know how long it would last or how sanitary it would be. I have some areas on the floor where the poly has started flaking (plan to write an update post soon) and if it did that on a kitchen counter things might get ugly quickly. You might try something like this though… http://littlegreennotebook.blogspot.com/2013/07/diy-concrete-countertops.html
It would be a little more difficult to get smooth because yours is tile, but it would be just as budget friendly (and I personally thing it looks great).
Hi there. Want to paint our master bath counters that are tile. Would the rustoleum work?
Your bathroom came out beautiful!
Love the look of the tile/bath! You did a great job, very handy! Thought I’d ask you this question ;) We’re redoing our bathroom, hubby is currently working on the tile/shower while I’m “working” We have wainescoating (?) halfway up in our bathroom. We have a large mirror above the sink that I’d like to replace with a tri view medicine cabinet. Those don’t run as large as our mirror. So if we put one in, there will be nice gaps below and along side of the miror. Any ideas / thoughts on how to go about that? I don’t want to buy little pieces of wainescoating to fill in (especially on the bottom when you would see the seam. Just thought I’d see if anyone had any creative ideas! THank you!!
Hmmm, it’s hard to say without actually seeing the space. Would adding a frame around it work? Like with tile, wood, or maybe some painted metallic moulding? That would give it some interest, define it a bit, and be an easy DIY.
Great post!! Very helpful! I did have a respirator and the smell is terrible!! Before: https://www.facebook.com/photo.php?fbid=10202503410179624&set=a.10200920733613699.1073741825.1626265682&type=3&theater After: https://www.facebook.com/photo.php?fbid=10202523788049058&set=a.10200920733613699.1073741825.1626265682&type=3&theater
Thanks again! I needed 3 coats to cover 100%.
Thanks for the step-by-step demonstration you posted.
It looks like a lot of work, but the end result turned out real nice. So I think it was worth it.
Thanks for your tutorial. I have dark grout in my shower. Will I have to regrout it white or will the paint cover the grout and make it white as well?
Hi there!
I want to do this! I’m a little unclear on the whole grout/caulk stuff. Your hubby replaced the grout before you painted, right? And you just painted right over the grout? And then recaulked?
Thanks!
Yup, he replaced the grout before I painted, then I painted right over it. BUT, we also made a mistake…we grouted between the tiles and tub instead of caulking. Tubs move slightly (water is heavy) and the grout line where the tub meets the tile has cracked. What we should have done is replaced all the grout except along the tub, painted, and then caulked along the tub (don’t paint over it). Other than that it is holding up perfectly though!
Ashely, I loved your DIY bathroom tile painting guide…. Pictures and true explanations really help! And your humor kept me reading haha. Thank you for the tips and please post how things are holding up…l as we will be starting a bathroom makeover on a budget very soon-
Someone painted over our pink shower, before we bought our home. The walls are 3 huge pieces of fake pink marble, plus the one on the floor. It looked really good at first, but, now, it chipping and peeling. The wall soap dish is almost pink again and the floor is peeling in different spots. It looks so bad. What can I do to repair it at this point. Would your epoxy paint cover it, if I sand it down and clean it up. Help!
Yours looks great.
I would love to know this too! Someone painted our pink tile before we moved in too & ils chipped & lifting in spots around the grout & in the soap dish… Not sure how long ago this was done & would love to know if it would work to sand off the bad parts & go over it!
How long did you wait to sand the “hairs”?
I don’t quite remember, but it wasn’t long. Maybe a few hours.
Wow… I know many people before me have already said this, but this is so incredible it needs to be said again… AMAZING! The transformation is incredible, I had no idea this was possible. Congrats on such a success!
Thank you so much for sharing this, and for sharing the Rust-Oleum product link.
Funny thing:
That same product is available at the US Home Depot, but not at the Canadian Home Depot which is along my ride home from work. If it wasn’t for your post I may not have ever known it existed. I’ll be ordering it off of Amazon tonight.
Rock on guys!
Looks fantastic! I really want to do our master bathroom but I’m so nervous, thank you for all the tips – including the “what not to do’s” – so helpful!
Did you paint right over the grout a well? How has the paint held up for you?
oops as well:)
Yup, I painted right over the grout. So far that paint has held really well (looks the same as the day I finished), plus painting over the grout makes it super easy to clean.
When I read the reviews on the Rustoelum website people were saying there would be no grout lines when finished, yet your pictures show grout lines. Did you do something different? I prefer it WITH grout lines rather than smooth flat surface.
Maybe they just meant that the grout gets painted everything is a uniform color? The grout lines will show no matter what…its just paint, so any texture is going to show through.
Hello – to paint over the grout, did you use a brush first and then roller, or just roll over the tile and grout all at once?
I believe I just used the roller (it’s been a few years now).
Can I paint over already painted tiles?
I’d lolled to know this too… Someone painted our pink tile white & it’s cracked & peeling in parts. Can you sand out the bad areas and re-coat?
Thank you for these step-by-step photos and instructions! I have searched the internet before looking for advice on painting tile and came up empty. Then, last night, I saw you and this project mentioned in the June 2013 “Redbook” magazine, so yeah!!
Redbook! I had no idea I was in June’s issue! I mean, I did the interview, but I’ve done a few and they never actually show up in print. I went grocery shopping today and tried to buy it but all they had was the July issue. Now I’m on a mission :) Anyway, so glad you found my tutorial helpful, the paint is still holding up great 7 months later!
Ashley –
Did you find a June “Redbook?” I will be glad to tear out the section that you are featured in and mail it to you tomorrow, or at some point when I am next at the post office, I can mail the whole magazine to you. Let me know if you need either of these things done. You definitely need to see your name in print!
Amy G.
That’s so nice of you to offer! I didn’t find it anywhere in person but ordered a copy off of ebay last night. Thanks again for letting me know, I would have completely missed it otherwise.
OK, good, I’m glad you will soon have it. I’m surprised the magazine didn’t even tell you that they were using your interview, much less send you a copy!! Amy
What was your reasoning for replacing the grout? Could it just be painted over? This is our only bathroom with a shower so we are trying to complete it as quickly as possible. By the way, this is very helpful. Thank you!
We only replaced the grout because the old grout was in terrible shape…cracked, chipped, and completely missing in many places. It not a necessary step if your grout is in good shape and you can (and should) paint right over it. As a bonus I’ve found that the painted grout is SO EASY to clean…just as easy as the tile. It’s kinda great :)
When it was all dry and you removed the tape, did any of the tape pull off the paint? I had that issue with semi gloss paint, it stuck and peeled away as I pulled up the tape.
No, it didn’t…but I’ve had that problem plenty of times before. The trick is to remove the tape before the paint is dry, even if it means taping again before the next coat. You could also try leaving the tape on after the paint dries and scoring it with a razor blade before pulling the tape off.
Ashley, you are absolutely brilliant! Your blog has answered so many questions, since I want a butcher block countertop that is unique, but I was worried about stain and seal. Thank you so much! Also, I have the tub/shower problem; but, did you ever paint the tub? I know that I will definitely need to do something with mine.
I didn’t paint the tub, but I do plan on painting it eventually. The paint is holding up perfectly!
Ashley, this looks great! I’ve been looking on a lot of blogs recently to learn more about this process and yours was definitely the most helpful. I have 2 questions that I didn’t see the answers to here.
1) is the finish shiny or matte? It looks slightly matte in the photos, so I wanted to check. I read about applying a layer of clear gloss to the top of the paint. Have you ever heard this?
2) my floors need to be painted. They are the same color as the green shower walls. Any suggestions on what kind of paint to use?
Thank you!
It’s shiny, but not crazy shiny. I’ve never heard of anyone one applying a clear gloss, but I’m sure you could. It’s shiny enough that I don’t think you’ll feel the need to add another layer to it though. For the floors I would use the same paint I used for the walls, it is holding up really really well. I didn’t paint the floor of my tub though, so I can’t guarantee how it will hold up… but it’s probably your best bet (as far as DIY tub painting goes).
Ashley- LOVE your results! Question: My new apartment has some weird random pink tiles mixed in with the white. Its supposed to be a “design”. Not working for me…so can I paint just those tiles? Seems like it would be much less work. There are only about 20 or so in a geometric pattern. It screams 1972!
Hi Ashley!
I’ve read a lot of blog posts about this stuff… but yours was the first that really made me a believer (it must have something to do with never scrubbing my shower either!) I have a question for you: did you have any chips or cracks in your tile? I have a few and I was wondering if there was a way to repair them first (like spackle for tile or something?). If not I’m just going to paint over the chips and hope the gleaming white camouflages them!
We did have a crack in the tile, Adam cracked one when he was removing some of the old grout. I’m trying to remember if we did anything, but I don’t think so. I painted right over it and we haven’t had any problems. It’s not like I’ve been scrubbing it with cleaner though, haha ;)
Exactly how much sanding is involved? I desperately want to do this for my yellow tiled shower, but I’m worried about lead dust. I wouldn’t know if there was lead until I started sanding.
Hi Ashley. Great instructions here! I have been thinking of painting my outdated shower tile for quite sometime, and with all the research I’ve done, I feel the most confident following your page to follow through. the only question I have is about the grout. I plan to scrape out the existing grout and refill with new grout. should I do this before and simply paint over? or do you think painting and then grouting it the best idea? grateful for your recommendation as you seem to have done an amazing job!
Cheers,
natalie
I would regrout the shower and then paint, the other way would be pretty difficult and would probably require a lot of touchups. Plus the grout is SO easy to clean after you paint over it!
Is it possible to fill in the grout lines and have a smooth surface?
Anything is possible, but I think that would be really difficult to do and have it turn out perfectly smooth.
How many coats did you put on?
I can’t remember…three I think?
How is this holding up? I’m interested in trying it, but very skeptical.
It’s holding up incredibly well, actually. I’ve had one problem, where the shower wall meets the tub. I re-grouted that part when I should have caulked it instead, since tubs move and flex a little when they are full vs empty. The grout cracked (just like a reader said it would) and the paint chipped off over the crack. I caulked over the area and have’t had any more problems. Besides that area it looks as good as the day I painted it. I’m still skeptical and can’t see this being a forever solution, but so far so good.
I’ve been wanting to do this for a long long time but didn’t have the guts! Thanks for making it look do-able. I only have one question…how long did you have to wait before you could use the shower???
Any issues with the paint coming off the tile from constant water hitting it?
I painted this almost a year ago and haven’t had a single issue.
Awesome! Doing it! Have a 2 family and have to rent my apt and its vintage 80’s!
I have been inspired by your post as well and have everything ready to paint next week! I do have one question though, I bought one box and would like to mix only part at once. Did you do this, or did you mix the whole box/kit at a time? I’m a little concerned about the ratio being accurate. Thanks!
I had a questions some websites are saying not to paint over the grout..you painted over it right?
Yup, I painted right over it and it worked great, no issues. The grout is really easy to clean after you paint too.
I was just curious how this was holding up for you? I’m planning to tackle this type of project this weekend and just wanted to see how things were going after some use.
Thanks for the heads up on the foam roller and the mask. I might refinish my tiles next week and I was searching for some last minute what-to-dos so I won’t end up with all the disaster.
Kalia Floors
I just want to thank you for taking the time to post this. Thank God I followed your lead and used a foam roller. the kit that I purchased told me not to use one. They gave me a brush to use instead. Boy was that a disaster. I went with your lead and it came out spectacular. Thanks for the advice
Hi! I was wondering how you were able to tape the fixtures off so well in order to avoid getting paint on them?
Thanks! :)
This has inspired me to do this to my 1950’s bathroom, you know the black and white checkered tile.
2 questions:
1) did you remove all of the grout from between the tiles? That seems like and awfully time consuming task, and near impossible. Or can you just clean and paint over the grout?
2) Do you think that you could do this to a floor as well.
Any advice would be appreciated!
No, you definitely don’t have to remove the grout. We just removed and replaced the grout in the corners because it was crumbling and couldn’t be painted over. Cleaning it will be perfectly fine if it’s in good shape.
Also, I don’t think I would recommend this for floors. I had the same thought and e-mailed the company and they said don’t do it. Bummer, I know.
This looks amazing! I just had a few questions about it…
How long did you wait until you used the shower after you had finished?
Did you use one entire box for your shower? unfortunately the god awful tile in my shower wraps all the way around the walls of my bathroom! I’m trying to figure out how much I will need
And what do you use to clean it now that it’s painted?
Thank you! :)
I had a 2 oz bottle of acrylic paint and used in on line sin shower today because of grout and dull looking 1 inch tile squares> I actually applied it with tissue. looks much better. the tiles have a small bit of golf squiggly line going through it tiles for accent. I now want to do it for the remainder of tiles on wall, floor and shower curb. all the same look, 1 inch and gold squiggly line through them. i then wiped with napkin so i could still see a bit of the gold squiggly accent. do you think i can use the paint you used, roll it on in a light fashion and still see the gold squiggly line? I would it an endless project day if i had to do the wiping with tissue for all the wall space which is about 75 sq feet. will one box do that amount of sq footage?
Ashley, im excited to try the rustoleum tube and tile :) I used their kitchen countertop tile oaint and it dried so quickly it turned gloppy…I was wondering if you had the same issue?
Thanks, shari
I was wondering….I have very hard water and my tile shower is just gross with iron colored water and my grout is ruined and in a few spots is jsut black with mold…should I take perhaps a dremmil tool and sand out the grout, replace and just paint over it then later put caulk around the tub? and will it stand up to this well water? I love the tile but my water has ruined it…..thanks…your looks amazing….I painted a claw foot tub last week and it looks great…now I am ready to do the other bathroom……thanks
I LOVE this! It looks GREAT! I was all gung-ho to do this in my bathroom until I read the comment about not painting a tile floor :( my shower stall & floor are this NASTY peach color & I was SO looking forward to painting them! Anyways, glad this worked for you! Now I’m off to check out the rest of your website. :)
Great tutorial! Thanks for sharing not just what worked, but what didn’t work for you. That foam roller tip sure saves a big headache later. I can’t wait to try!
You don’t know how much you helped me! Last week I hired an apartment with really old bathroom and this guide will help me to reconstruct a lot of things in it. Thanks a lot for sharing!
I have problems with my tiles too. They are not shiny and more and I am so disappointed every time when I go into the bathroom. Thank you so much for the advices!
I’ve just painted the tiles in my bathroom. It looks grat but I can’t get rid of that horrible smell! Someone help me please!
Okay, thank you for posting this. If we ever meet, I’m hugging you. Or not, your choice. Incredibly helpful!!!!!!
Sarah in Toronto, ON
What I’ve seen on you site and the look of it since a year has passed has completely convinced me to use this too! I have of course a question! How much square footage did you cover with the two boxes you used? I’m planning on doing my bathroom in my soon to be new home. ;-) The tub surround and the walls are tiled. I’m trying to figure out how much I’m going to need.
Thanks for any help!!!
On the post about painting your tile,my husband and I own 2 rental properties,and well most renters just do not clean their showers,or bath tubs,so here is my tried and tested and mastered little secret to cleaning years worth of soap scum,and grim,is, floor stripper,yes that’s right ,floor stripper,you see soap is waxy and well floor stripper is for removing wax,so we add the stripper, and warm water,mix it 50/50 into a plastic pump sprayer,spray it all over the shower walls and bathtub, go work on something else come back in about 30 minutes,and rinse with hot water,and ta da,it will look brand new,now in a really bad case the ratio of 50/50 (floor stripper and water) did not take it all off at once, then just skip the adding water to the floor stripper,and use straight floor stripper,and I will guarantee this 110 % all day every day,and it isnt good to breathe this in so wear a mask,open a window if possible,and the best part any dollar store floor stripper works,and you save money by only needing one chemical.I hope this may help,Sincerely A Rental Property owner cleaning Master.
Wow! I had no idea that I can refinish the bathroom alone! I thought that I should spend a lot of money on professionals. Thanks a lot for this post! Shepherds Bush Carpet Cleaners Ltd.
Hello and thank you for posting.
My concerns are color and cleaning. Must everything be white? I was interested in painting the tiles black and
what have you been using to clean he finished project? It seems something like Comet might scratch or damage the paint so may I ask what you use to protect your work?
Thanks again!
Thanks!
It is hard to believe that there is a way for amateurs to refinish one bathroom on their own. This article proves that everything is possible with a little will. Very useful article! Regards! Belingham Carpet Cleaners Ltd.
Hi Ashley,
Awesome job of course!
I started today on the prep for some wall tiles which are super high gloss. I found that 400 sandpaper did nothing, and even 240 grit seemed to just polish the tiles.
Rustoleum’s instructions just say ‘sand’…like a little. I called their tech support line and they say I must remove ‘ALL’ the glaze or shine, leaving the tiles with a mat finish before painting.. It will be days of sanding and with a far heaver grit than 400. On the phone they said you can go down to very heavy 80 grit if needed to raise some ‘dust’ as you sand the glaze. Everyone else seems to spend like under a half hour on this depending on room size! Maybe 10 minutes!
Did you find that you could get by with a little sanding, and that you paint over a very glossy tile surface…as slick as glass? As a guy who has been renovating homes for 40 years this is the most counter intuitive part. Like painting an ice cube! thanks
The tiles I painted over were glossy, and I probably spent half and hour sanding them with 600 grit. It made some dust, but the tiles were still pretty dang glossy looking when I painted over them. I didn’t sand more than that because the instructions said that was all that was necessary. It’s been over a year since I paint then and I haven’t had any problems at all. I’m sure sanding them extremely well (down to matte) would be better, but I didn’t find it necessary.
Great job! Looks wonderful. Can you tell me if this can be used on kitchen counter tile? Is it save for food to come in contact with?
Any information would be appreciated. I am looking at buying a cabin that has the ugliest gold speckled small tile that totally distracts from the beauty of the natural wood elsewhere. It is also in the bathroom on the vanity. It has to go, but without the cost of replacing it.
How long did u wait to start using shower again?
I don’t remember exactly…it was at least a few days.
I think your job was amazing. Would this work on porous tile on our floor, just wondering. Looks great
Have been thinking about this for a while. Tub was bad so I used a rotary buffer and bar keep abrasive to polish it. It turned out pretty good. I would like to change the color of the tiles in the surround. Would you happen to know if the paint comes in a matte finish as well as a glossy one?
Thank you for sharing more information on refinish your tile in the bathroom. I appreciate your before and after pictures your posted, the result looks great! My wife and I are in the middle of renovating our downstairs bathroom because we want it to be more presentable for our guests. The tiles on the floor and on the wall by the bathtub are outdated and look very old. Looks like I need to start getting some of the supplies because there are a lot! If I am not able to do it myself I might have to call a professional to help me out! Thanks again.
Last year me and my husband, we bought a house with kind of out of date bathroom style. I thought that I should replace all of the tiles. I had no idea that I can just paint them. This will be much cheaper for us. Thanks a lot for the helpful article!
I used the same products you did in 2011 but with our tub. I experienced some of the same issues you did with the brush and using the same pan. The tub prep took three of us ALL day to get the cast iron tub down to the bones…it started chipping and we wanted a fresh coat of paint on it.
When it was all done, it looked better but not perfect. However, we were happy as it was nice and bright and white with no chips. This ONLY LASTED 6 MONTHS sadly. We use our restroom like you use yours with a few more in the house. How sad it was when (not surprisingly) I saw the first chipping of the paint…around the drain. SO…I would suggest NOT using this product for the tub. Yes, I got my money back (Rustoleum is really good about that) BUT, they could not pay for our back-breaking labour! I can see the tiles working just fine, but when you have the paint submerged in water…that is different. Like your hubby stated…even tho you CAN paint over something, doesn’t mean you should. AS OF TODAY, I have a horrible looking tub that is scheduled for a professional re-glazing by a guy that has been doing only that for over 20 years. I can’t wait!! HOWEVER, BECAUSE I did it myself, I have to pay $175 more for him to strip that paint off! So, Whatever the product costs today at Menards (Lowes, Home Depot), Take that price and add $175 to it PLUS the cost of reglazing your tub as you will have to do that in the future! In our area reglazing a tub costs about $550 min. That includes the minor repairs, Prep and travel.
ALSO…when I was done painting the tub, I took the left over paint and actually painted the grout in some areas…just to see what would happen (not the tile…just the grout). I have to say, that paint was AWESOME! Easy to clean and very strong! In fact, last week I went to take the tile off (first using a cutting dremel attachment) and the blade had a difficult time cutting through the painted grout! Impressive!
CONSIDERING: After your tutorial I am considering painting the tile myself. I feel safe doing that since it will not be submerged in water AND……I HATE GROUT!
Take care and thanks for all your hard work in posting this blog, it has benefited us greatly!
We are at the poly stage of our brown paper bag floors!!
Michelle, thank you so much for sharing your experience and I am really sorry to hear the the tub isn’t holding up. It sucks to put in so much time on a project and have it turn into a giant expensive regret six months later. I’m really glad I didn’t paint my tub now! I do love it on the tiles though, not to mention the grout…it’s so easy to clean. I painted the grout on my kitchen floors (using a different product) and that is holding up amazing too, even with all the scrubbing. I’ve come to the conclusion that you can really never go wrong painting grout!
I am so glad I found your post when I did (as I was looking to do Brown paper bag flooring).
Between our flooring projects and a bathroom gutting, I have several big projects going on in my head all at once, lol. So, needless to say (?) you have been a big help! At least I have a cheaper option of painting the tile. I have a QUESTION about your bathroom walls…did you stencil or is that wall paper? Very pretty! Thanks!
Oh girl…that’s a stencil. It took FOREVER. I even have a post about it (where I compare it to childbirth) -https://wildfireinteriors.com/2013/07/stenciledbathroom/
Ahhh! Yes, I understand!! The most blessed rewards come from lots of labour!!
Hi! After reading your blog about painting the tiles I decided to do it in my newly purchased house. Can’t do all the renovations immediately but the puke, mauve 1950’s tiles are icky! I’m heading to the house to do it today! Wish me luck! Did the cleaning and taping yesterday. I’ll see if I can post pix later when I’m done. Hope it looks as great as yours!
YES!! PLEASE DO let us know how the tile painting turns out! I have pretty much decided to paint the tile and let the professional do the tub…but it would be reassuring seeing how yours has turned out as well. I have to add tile to the existing tile around the tub and the colors will be just off. IF it looks bad or awkward, I will paint it. Thanks!
Ok so I did the tiles this weekend. I’m pretty happy with the end product but found two issues. First was that there was a LOT of caulk on this tub. I had attacked it with chisels and scraped a bunch off and thought I had gotten it all off but I guess not! It sort of did a wax resist type of effect along the tub edge. I’m going to let it dry for 48 hours and apply another coat there. Hopefully it works. The other issue was that I have 3×3 tiles and a lot of grout lines. So I had to press the roller in to make sure it coated the grout really well. Unfortunately I didn’t realize in some spots it dripped on the first round and if I had just rolled over it again while it was still wet that would have been taken care of but instead it dried that way because I missed it. I guess I could have sanded it down but I didn’t have enough to do 3 coats. So I just left it and honestly it’s barely noticeable except to me of course. ;-) I have to say in the end I’m really happy because it’s a nice clean white now and the whole bathroom looks so much better! I don’t know how to upload my pictures but it’s very similar to the pictures on this blog. All in all I’m happy with the result.
Thanks for posting those results, I will keep that in mind when I do mine. Before I decided to take all our old tile down that was stuck on our wall by liquid nail (previous owner) I wanted to at least re-grout. I found using the dremel with the circular cutter blades (made to cut metal) did a great job. I had someone next to me holding the vacuum hose to catch most of the dust that kicked up, wore my mask and safety goggles and let do all the work! It was awesome and easy! I love my dremel! I am looking forward to painting my tile after reading the posts on it…thanks again for your imput!
You are so much smart than Adam and I! We own a dremel and it didn’t even cross our minds to use it to remove the grout from the shower. Adam just pounded in it with a hammer and screwdriver for way too long and ended up cracking a tile.
Good luck painting the shower, I’m sure it will turn out beautiful!
I have been thinking about remodeling the bathroom. Mostly because I think that doing this would help me deep clean the bathroom as well. If it ends up look as good as yours did then I will consider doing it more seriously. Thanks for sharing.
Is there a way to color teh rustoleum paint? Or can you only do white? I have ugly yellow tiles that I would love to make a pretty aqua/teal blue. Thanks!
I actually have no idea…but I would imagine there is a way. I would e-mail rustoleum and ask, each time I have e-mailed them they have been super helpful.
I have called them a few times over the years (spray paints, magnetic paint, tub epoxy paint) with issues and questions I have had concerning their products. They have been VERY HELPFUL in answering any questions concerning your project, AND returning any money as a result of it not working out, even after following all of the instructions. You can get your money back, but not your time and labour. In fact, with all the projects we have been doing recently, I have called the number on the back of a few items for detail how-to questions and have gotten great representatives each time! Hope it works out for you. I am going to go with basic bright white on my tiles after Tub re-furbisher guy comes this week…unless he drops the price by a couple hundred dollars or does my tile for free…that would be awesome, lol!
how long did it take you from start to finish to paint the shower walls? I bought the epoxy i just need to get around to doing it
It was so long ago now I don’t really remember, but it doesn’t take much longer to paint the tiles than it would to paint a regular wall. The drying takes MUCH longer though…a few days or so.
Hi Ashely! Great job, I know the post is older but I was searching for tips using the kit and came across your project. I had a quick question, I am excited to tackle this. I didn’t see where you sanded at all so I was wondering if you did and just forgot to post about it. Thank you for your help! The cleaning is done, I am now ready to sand.
Shelly~
Did I forget that part? Oops…I did sand with 600 grit sandpaper and then rinsed the tiles and let them dry before painting.
SO glad to have found this! I just said today that I think I’ve held out as long as I could with our pretty nasty shower. Yours looks so wonderful! Question though, we do have some mold in between tiles (ick)…did you have any of that and if so, was the paint able to cover it? Ive tried scrubbing it but no luck, so I am hoping this might do the trick! Great job!
Check out this small guide as well https://play.google.com/store/books/details/Andre_Nailui_Bathtub_Tile_Refinishing_Guide?id=Ls0HCgAAQBAJ
I wanted to know if the epoxy two part paint for your tile could be in another color?
The only colors I know of are white and almond.
Hi
We are considering this for our rental house. I wanted to know if the painting will cover cracks in the tile. The tiles are 79 yrs old and very cracked.
thanks!
Debbie
I am planning on doing this and I thought I was crazy and it was going to turn out AWFUL but your shower looks so good!! It’s giving me the confidence to try this project on my own! I will have to come back and let you know how it turns out!!
Hi Ashley, We recently moved into a house where the bathroom tiles have already been painted navy blue. There are a few spots where the paint is peeling to reveal light blue tiles. I thought that I have two options: 1) Remove all the navy blue paint with epoxy but I assume that the grout will still be navy blue; or 2) paint over the existing navy blue with a color of my choosing, but I am concerned that the navy blue paint underneath will bubble – especially around the areas where it has started to peel. I would love your input and recommendations. By the way, this is a tiny bathroom and the tile all around the bathroom have been painted navy blue including the back of the door!!! Thank You!!
That’s a tough one! I don’t have any first hand experience with painting over painted tiles, so I really can’t give any solid advice. You are right that if you take the paint off the grout will still be blue, so thats not an option. So you can either try you luck at painting over the paint, or rip out the tiles and just replace them. Since the paint is already chipping you really don’t have anything to loose by painting them again. I personally don’t think they will bubble, they may just be more prone to chipping in the future. I think they key will be prepping the surface really well.
I have a pink bathroom. I have put up with it for the last 36 years. Enough is enough I want to paint them but not white. I seen a couple months ago a epoxy that was low in VOC’s and came in multi color for each color.It dried in an hour too! Yes I did have it bookmarked and now I can’t find them and I came across your web site. I just thought I’d ask. Any info will be appreciated and a hardy Thanks too !
I have been searching everywhere trying to get a detailed video on this process, yours was perfect! Thank you so much for the descriptions! My only question I’m concerned about is the sanding process. The tile AND tub has to be sanded? And how much should you sand?
Thank you so much!
Danielle
Glad it helped you! And yes, everything you are painting needs to be sanded. You don’t have to work yourself up too much of a sweat sanding, but you at least have to make some dust. You’re just looking to give the paint something to grip, unsanded tile is just too slick.
I keep seeing “professional’s” say do not paint the tiles. It peels or cracks after a short period of time. So they say. Is that true with this? Do you use this bathroom a lot? I am scared to do it. I have pink…. yep… 1971 pink tiles in our bathroom. Ugh. I have no 8-year-old little girl to blame in this house either. It’s just God-awful. I have researched this issue so many times that its back and forth on what to do. I do not have the time or money to tear it all out. It’s in great shape anyway. Oh! I wanted to tell you that if you ever have those tiny hairs… I was taught to get some tape and use it just like a lint brush on the roller itself. I know a foam roller was not expensive… just another trick :)
I finally posted my version of refinishing tile, I cannot believe how much of a difference it has made!
http://feistyharriet.com/2015/12/07/painting-tile-apartment-bathroom-before-after/
xox
You may have already addressed this as I didn’t read all of the comments, but how does this hold up on the actual grout, and was your grout sanded or unsanded? Thanks for your reply.
I don’t remember what kind of grout we used, but I can tell you that the paint will be on the grout years, or even decades, after the paint finally chips away.
I’m moving into an apartment that I love….except for the bathroom! It’s an ugly mustard yellow which I could deal with…except the tile half way up the wall, the toilet, the sink, the bath-tub, the floor, AND the shower and shower tiles are ALL the ugly vintage mustard yellow. Ive been trying to look at ways to decorate to make it look better but I’m not finding a color scheme. My landlord is great..but if I approach this project, am I biting off more than I can chew??
Does this paint come in different colors or just white? I’m wondering if for example I were to paint it blue, how do I avoid making the grout look blue as well?? Or do I have no choice and just have to paint everything the same color? Thanks in advance. And your bathroom looked awesome afterwards!
I think it just comes in white and almond. You’d have to paint the grout the same color too, I’m not sure how to do it any other way. It does make the grout super easy to clean though!
Did you remove all the plumbing hardware or just tape it off??
I only did the shower portion (not the tub), so I just taped off the pipe that comes out of the wall and painted around it.
Time is the true test. How is it looking 2 or 3 years after the paint? My concern would be chips in the high wear areas and peeling.
It’s been over two years and it’s not peeling or chipping at all. It looks the same as it did the day I painted it, except that the paint is a little duller. I’m pretty sure cleaning and scrubbing it has worn off some of the shine.
That’s pretty fantastic that you’re still able to update your review 3 years on!!
Does this bathroom get used daily, or is it a second (or third!) bathroom in your house?
I’m DEFINITELY planning on doing this to mine–I tried the less aggressive oil-based primer and bathroom paint, but it started peeling off within weeks!
Whoops–an addendum.
How big was the area covered? I saw that you used almost two boxes to do 3 coats. I know it will be cheaper than retiling, but I’m in the UK and with the cost of importing, it’s £40 (about $65) a box!! I’m keen not to buy more than I need!
This is the only shower in the house that we use, so it gets used every single day…usually more than once!
I agree that you should apply finish after you paint. I think it’s important because of how wet showers are. I think the paint will just rub off over time if a finish is not applied to it.
My spare room shower has nearly no grout left between tiles. Do you suggest regrouting first or after I paint it?
Just wanted to thank you for this tutorial; we did the same thing in our bathroom this past year, and your tutorial helped a TON. Couldn’t have done it without you.
So glad it helped and your bathroom turned out well!
Awesome makeover! I can’t believe how great this looks! Thanks so much for sharing at Welcome Home Wednesdays! I hope you will join us again next week!
Awesome! Love the new look of the bathroom.
Hi I want to do our old fiberglass shower. My daughter did hers with the same product. They had trouble with the foam roller. They said it fell apart when using it. What roller did you use. Your shower looks amazing.
Looks great!
One comment I’d like to make that may be of interest is that silicon caulking is generally used rather than grout in corners – like where you’ve shown yours was cracked before Adam replaced it. The reason for this is that you will always get a small amount of movement in corners due to the wall construction and how the tiles meet in the corner, and the silicon caulking is flexible and will not be damaged by this movement, where grout is rigid and will crack like in your pics.
After debating this project for months and reading dozens of blog posts and reviews, I felt ready to tackle it = less than two weeks before our open house. I figured bright white tiles would be so much better than 1990’s blue, right?
Prep started off simple enough – tons of scrubbing. Removing fixtures. And removing caulk. 90% came off just by pulling it. The remaining 10% took two days, a small fortune in useless specialty caulk-remover sprays and tools, and an endless amount of mind-numbing work to remove. And even then we didn’t get it all. Lesson one: Just because caulking looks loose doesn’t mean it will all come off easily.
Sanding the tiles was an exercise in frustration. Three different grades of sandpaper, plus a pricey “wet” sandpaper, did absolutely nothing. So, as per the kit’s instructions, I used RustOleum’s ‘etching cream” (Another pile of money) and, to the stuff’s credit – it did indeed dull and etch the tiles. Finally, we were ready to go.
Except we weren’t . How do you get this etching goop off your tiles when you’ve removed all your shower fixtures so you can properly clean and coat the tiles. And you’ve removed all the caulking, leaving a generous seam to let water stream into your wall. So I end up engineering a device using a Swiffer and my husband’s old socks and washing it off that way. It took hours. Water still got everywhere it shouldn’t. And then it took hours to fully dry.
By now, we’re three days in and down $50 for the kit, $35 for the etching cream, $20 for the sandpaper, $20 for brushes and various applicators, $45 for the respirator mask and approximately 1 million dollars in coffee.
As per the kit instructions, we carefully mixed up part A and then added the part B, and diligently mixed some more. This stuff has the curious viscosity of being thinner than water. Every single paint brush we used just made the stuff roll right down my arm. Three days later I still can’t get it off my skin. It wasn’t until we used foam brushes that we could get anything to stick to the walls. This is the messiest thing you will ever do and you should absolutely use the spray option, not the brush option.
The first coat looked absolutely horrific. It would not adhere. The drips were everywhere. If a rabid whale had been in my bathroom and vomited on the walls things would have been neater. BUT everyone says the first coat never looks great so we forged ahead with the second coat.
Except there’s only enough for part of the second coat. The kit says you will have enough for two coats on a tub and the surrounding tiles and though I’m not doing the tub I don’t even have enough for just the walls. So we have to buy another kit. And more brushes. And the fumes are so overwhelming and as we’ve been without a tub for three days now, we check into a hotel for the night.
After FOUR coats we still cannot achieve a uniform color. The streaks and unevenness with coat one are still on full display. And the texture is absolutely horrible. Every single brush stroke is evident.
So if you stand back and squint, yep, there’s great white tiles. But if you put the lights on or stand close, it looks absolutely awful. Now either we missed some massive step between reading and re-reading the instructions, dozens of blogs, and talking to the hardwood store people or maybe we are utterly inept, despite never having trouble with any other home reno. But we’re $300 plus in, we’re on day 5 without a tub/shower, I wouldn’t wish the insanely messy, toxic, inefficient process on my worst enemy, and now we need to hire an emergency handiman to gut the tiles and replace them with new ones as there is absolutely no way to list a house like this. I cannot emphasize enough how much research we did, how careful we were, and how absolutely horrible this looks (and smells!)
I’m thrilled it worked out so well for you and many others. But it’s buyer beware for me.
Thanks for posting…your experience is one we can all learn from. No matter how easy a project seems, when dealing with paint, chemicals and a major room in the home…it may just be better to hire a professional…as was our experience. We did the whole Rustoleum tub paint and had experience. After it was all done tho, it DID look better than before (if you saw the before you would understand!), however, after just a few months it started pealing. Because we DIY’d it, when we did hire the professional to paint our tub it cost almost $100 more BECAUSE he had to do more work to fix it. **JUST BECAUSE a company makes a product for the DIY community, doesn’t mean the results will be the same. Most times they are not.
PROFESSIONAL PAINT JOB ON TUB TIPS:
I SHOULD have listened to his advice.
*HE SAID, warranty would be voided if there is damage to the tub due to a show door. I did not listen, we got a shower door, Water got under the track and made the paint bubble (over the coarse of a couple months.
My bad.
HOWEVER, we put a heavier metal rod up to hold our curtain and it became loose and fell down, (well over a year later) landing on the edge of the tub)…it gouged/chipped the paint). My Bad? Well, yea, warranty is not going to cover that.
WHAT WOULD I HAVE DONE DIFFERENTLY?
No Shower Door AND, I would have had him come back the next day to buff out any bumps left behind. I noticed the bumps when I took a bath and he said these will wear down over time, however, some of the bumps did not wear down and now there are small chips. HE DID offer to come at the time that I noticed but I did not call, now I feel it is too late.
Keep in mind…EVEN WHEN HIRING A PROFESSIONAL to paint a cast iron tub, it is still only spray paint (even tho it is commercial grade). It is not baked on like what they do when making the tub in the factory. It is a temporary fix and will have to be done probably every 3+ years (maybe more if there are no accidents). Just budget for that. It is still easier for us to spend $700 every 5 years then rip a cast iron tub out and start over.
From where you purchased all material? Is it available online?? Actually I visit our near by shop but all things are not there. I also want to refinish my tiles. Please let me know what to do.
Is it available online?? Actually I visit our near by shop but all things are not there. I also want to refinish my tiles. Please let me know what to do.
HI it loooks great i have just moved into new place and they have the exact same blue tiles in the KITCHEN with white cupboards.
im a bit confused what paint did you use name of it?
Thanks
Pam
We used this paint – http://amzn.to/2oivRx0
Thank you for the information. Good and accurate information is difficult to find on the internet. You have done a great service. It looks incredible! But what has left me really impressed is that it took so long and still you’re motivated to do it again.
I am using 400 grit 3m dry sandpaper with an electric sander and it doesn’t seem to be taking anything off the ceramic. Should it be really rough or still feel like the original ceramic tile? Thank you
It will still feel smooth like the original tile.
Are you kidding me??????? I never knew you could paint tile. First, I actually liked your tile. Mine is a powder blue in a guest bathroom. Very old, but in excellent shape. However it restricts my color choices. Right now, I have gray walls, and blue accents. I can’t wait to try this!!! Yours looks fantastic!!! Thank you so much for sharing this! I now have 2 winter projects.Guest and master bath.
Tried this was a total fail-
Smell was horrible
I tore the walls out asap- an I am rebuilding
Crazy to try-
Ugh! ????
Wow! That’s amazing! Looks great! I am really going to check into doing this. I hate the tile in my bathroom and have been looking for a cheaper way to remodel it without costing a fortune. Can you also do this to counter tops? Thanks so much for sharing your idea.
How are the painted tiles holding up?
Hi…i would like to know how to remove stain from tile floors in d bathroom….they also look pale..the stains are white in colour…pls help…thank you
Regards
Sheila
This blog has been very helpful! I did have a question though. When sanding, did it seem like it was doing anything to the tiles? I’ve been trying to sand old blue 60’s tile and it still looks shiny and unsanded. Should it take the shine off and create some dust? I’m using all the products the box suggests, I just wasn’t confident with moving to the next step until I was confident the sanding was done correctly.
… I just read the previous comments and they answered my question… :)
When I was sanding it really didn’t seem like it was doing much. It was making some dust though so I figured the sandpaper was doing its job, but the tiles were still very smooth to the touch.
Hi how long did your bath take to dry snd how bad is the smell. I was told not to do it because of the smell. Thank you
I want to say it took a couple of days to dry (it was so long ago now I can’t quite remember). I do remember the smell though, it was bad and we slept in the guest bedroom that night to be further away from it. The smell went away when it dried though and I wouldn’t it stop me from doing the project. Just buy a good mask!
Hi. Great job. Has it held up well? Daily use? I am contemplating doing this but nervous about long-term. Thanks.
We sold this house in 2016 (three years after painting it), and when we did the paint looked almost as good as day one (it was just slightly less shiny). I’m sure the paint won’t hold up forever, but it is a great solution that should last a decent amount of time.
I simply had to appreciate you once again. I’m not certain the
things that I might have created without these techniques documented by you relating to my subject matter.
It had become a real challenging concern in my position,
but finding out the skilled avenue you managed the issue took me to cry over delight.
I’m thankful for the advice and as well , expect you find out what
a great job that you’re accomplishing teaching the others with
the aid of your site. Most likely you’ve never come across
any of us.
I got what you mean, thanks for posting. Woh I am glad to find
this website through google.
Great ? I should certainly pronounce, impressed with
your web site. I had no trouble navigating through all the tabs
as well as related information ended up being truly simple to do to access.
I recently found what I hoped for before you know it in the least.
Reasonably unusual. Is likely to appreciate it for those who add
forums or anything, web site theme . a tones way for your client to communicate.
Excellent task.
Merely wanna remark that you have a very nice site, I like the style
and design it really stands out.
We are using the 400 grit sandpaper and it is not even touching it. Does the tile and tub need to be scratched up? Ours is shiny as hell? Ty..nervous wreck over here!!
did you find out the answer?
This is amazing. I’ve inherited the house I grew up in and am now moving in with my fiance only to find there are what seems like massive amounts of work to be done. This makes me feel a little less intimidated about accomplishing all the projects at once and more about taking each project little by little. Thank you for this resource! Super helpful.
I’m dying to paint the ugly salmon colored tiles surround my garden tub. I’m not a tile expert so bare with me. They’re not the shiny ceramic tiles they’re more dull and a bit textured almost like the large bathroom floor tiles but smaller (Lord I hope that made since). Do you think this product would work for them?
Thanks!! Great job btw
I’m not 100% sure what kind of tiles you mean, but I know this product works on a variety of surfaces, from ceramic tile to plastic tub surrounds. I think it would do great on your salmon wall. I say go for it :)
Just want to ask, (read this entire blog and too lazy to reread to see if I missed this step :o) but did you regrout before or after you painted? Thanks!!
HOW long doesn’t the paint smell linger??
How long does it need to cure before you can use the shower??
Just to clarify you removed all old grout and replaced with new grout? How difficult was that? What material/tools did you use to complete that process? Did you have to purchase tool or rent? What was the cost for that part of process?
How long has it been since you completed the project? How’s it holding up now and would you do it again?
We only replaced the grout in certain places areas, because it was crumbling off anyway. You DO NOT need to replace the grout if it is decent shape. We sold this house a few years ago so I can’t tell you how it is holding up today, but we used it for a few years and it held up wonderfully.
Looked better before ?!?
We just moved into a home where the dated bathroom was painted. It’s been weeks and the off gas is still overwhelming. I’m wondering if they did something wrong. Did you experience this or hear of it in your time since?
Well……you have inspired me, so wish me luck ???? your bathroom looks AMAZING!!
So with this stuff you dont need a primer?
No, the prep work (which is a lot) is sufficient.
Hi Ashley,
Thanks so much for posting about this!! I’m getting ready to do it, but I have 2 questions…
1) MOLD! Our tile has lots of mold. We’re going to clean it as well as possible, but would it be ok to use a mold killing primer under the Rustoleum kit? Or will that mess it up?
2) Our bathroom has no windows, so I’m worried about the smell. I’ll use fans/masks/etc. but how long would you expect the stink to last?
Thanks so much for your help!
I’m dying to do this in my shower. You’re before and after a are crazy inspiring! ???? By in mine is a flat smooth stone travertine. That I HATE! How do you think it would hold the paint?
Hey! It’s been a while since you posted this. How did the paint hold up in your shower? I would like to do the same thing but I am very skeptical about painting a space that continuously gets wet. Thanks! By the way the end result looks great!
We sold that house a few years ago, but when we did the shower looked great. Same as the day I did it, except perhaps a bit less shiny. I would recommend it for sure, but even though it has held up wonderfully I still can’t imagine it would last forever. Also, we only painted the walls and not the tub or floor, so I can’t comment on how well it would hold up in those places.
Is this product appropriate for a full bathroom that is wall to wall tile ? And do you work with chalk paint and if so can that be used in the shower area as well ?
I want to do this and was wondering about the chemicals because I have 2 cockatiels. I could move them downstairs but I am worried about them being in the house at all. Any comments would be appreciated
I plan to use this to refinish my acrylic tub and ceramic (?) tile. The grout has dark mildew and I think I need to re-grout. Question: should I re-grout first, then paint? Or paint first, then re-grout?
I would regrout and then paint, personally. It may not be necessary though, you could probably just bleach the mildew off and paint over it.
Hmmm, just read your post on painting tile. I’m in the middle of a tile project right now, and a little concerned.
I’m only painting the bathroom floor, but followed different processes. Super cleaned the floor, and painted with bullseye sealer. I’m now ready for the next step of base paint, and was going to use Porch and Patio paint. I’m concerned bc I’m thinking I should have used lime, and also should be using the epoxy tile paint. Since I’ve started this project, is there a way to intervene before proceeding?
Thx
Our bathtub needs to be painted as well could we use the same method for that?
What kind of paint?
how is this holding up a few years out? amazing transformation!
Hi, I loved your video, I need to paint our tiles, but I don’t think I could do a beautiful job like you. Does the tile seem to be ok with the steam in the shower?
Please help. Should I attack this project?
Thank you for your video.
I live in Rhode Island
Jean Sears
I have a grey and white stone tile shower floor that has been sealed -is there a stain that can be used preferably in dark grey to go over all the tiles and will hold up in a shower?
What brand paint did you use. My shower is that weird almond/yallowish color and want to just paint it white. Can’t stand looking at the awfulness anymore
I loved it like it was before! I wish I had that blue in my own bathroom!
We just did my shower tub, which looks just like yours, and after the first shower my tile started peeling. I’m so upset. We followed all the directions. Any thoughts on what to do?
What product do you use to clean the tile once you start using the shower?
Did you paint over the grout as well?
How did you paint the soap dish? Was it difficult?
I treated it the same as the tile, wasn’t difficult.
Is that a stencil in teal on the wall?
It is! https://wildfireinteriors.com/stenciledbathroom/
This is such a thorough and transparent post and your tips and sharing your pitfalls gave me the confidence to take this on. I ran out of product yesterday and because of your post about fibers in first coat due to roller, I feel confident to sand tomorrow before the next kits arrive so the finish will be porcelain smooth (a few dog hairs made it in lol) Thanks again!! ????????♀️????????????♀️????????
Looks amazing…. I have a bathroom that no one ever used so the tiles and grout look like they were just installed. The tiles are a hideous colour since it was done in 1980. I’m planning on putting in new floors and painting the walls. I couldn’t justify the cost of new tiles but they won’t match anything else. So I think I will try painting them. Thanks for all your tips.
Best description I’ve read yet.
I’m not clear about the grout though. What tool did you use to remove it and how did you regrout the tile without damaging the paint? What grout did you use to regrout?
Thank you for an extremely helpful article. Your tile looks great. ????
We only replaced the grout that was cracked and falling out, so it basically came out on its own. We regrouted those areas and let it dry before painting over it.
Hello,
When do you re-caulk the tiles?
Looks great! Any tips or tricks for around the faucet?
What happens when you have to clean the shower walls? Does the paint come off? I usually use a hand brush to scrub by bathroom walls or a plastic scrubber. So I’m curious as to how the paint holds up. We purchased a house for my daughter and her new family. Rather than having to remod the bathroom there, given everything else we’re already replacing, a budget option for the tub tile walls might be better for now. Welcome your feedback.
Thank you for telling the truth about the nitty-gritty stuff! Enjoyed your commentary and no, I decided not to paint despite your encouraging words and success!
Did you roll/paint over the grout? If so, does the product seal it, or should we address the nasty grout first?
Did you remove and regroup the entire thing?
We have a tub with lots of tile above. Don’t like the taupe color. Want more gray. Thinking of just dry brushing a little gray paint heater and there ! What would I use for a sealer over all of tiles ? No shower so doesn’t really get wet ! Any ideas or suggestions welcome !
Thanks a lot for the information. I want to paint my bathroom and floor tiles what is the procedure
Great job… thanks for sharing!
Do you have an update? I clicked the link but it doesn’t work. Please and thank you!
So I have dark tan tile and dark brown grout. Unlike your white thin grout and smooth tiles. I have rough porous tiles and what appears to be porous grout. Total 70s. I’m curious if that system would cover that type tile work ❓
I did this in our old house and it was fantastic! I was thinking about doing it in our new house now. Recently, I saw that they sell colored grout. Do you think it would make sense to remove the old grout, then do all the painting, let it cure then regrout with a cool color to get a whole new look instead of painted grout? I feel like it could work and look great, but I wanted to run it passed someone else that’s done it. :)
I feel like that could work and turn out well. I do think it would be a ton of work though…removing grout ain’t easy and there is always the possibility of damaging a tile in the process. I was really glad we only had to remove a tiny bit. But if you’re up for the challenge, I say go for it!