
$5 File Cabinet Makeover
One of my “loose goals” for 2013 was to buy a real file cabinet and finally take control of paperwork in our house. Why is it that it is sooo easy for paperwork to get out of hand? My command center has helped a bit, though only in my kitchen and only with recent paperwork. The rest of it is still a mess. My current “file cabinet” is too small and stuff comes busting out of it and then never makes it back in. Exhibit A:

There is also an exhibit B, C, D & E, but I’ll spare you.
So the kids and I were perusing the local thrift store when we stumbled across a literal PILE of file cabinets for $5 each. We of course had to touch them all to find the best one, turns out they all had jammed drawers besides this little black one…
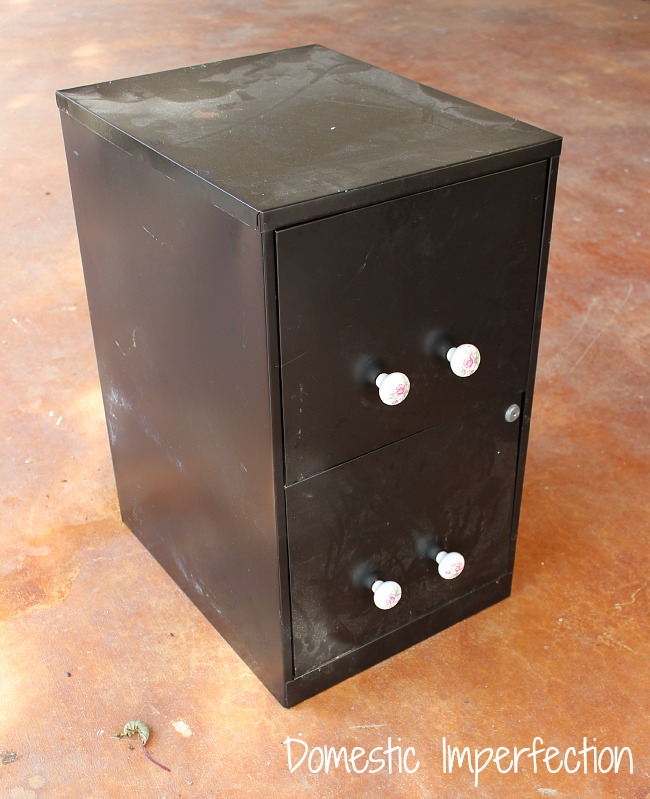
When I was checking out the cashier gushed about how pretty the floral handle’s were, to which I replied with something like “oh yeah, they’re definitely…unique.” I didn’t have the heart to tell her I was going to chuck them and give the whole thing a makeover. Perhaps this means I should be suspicious whenever I get a comment telling me my most recent project is “unique”. Hmmmm…
Moving on.
So the first step was- surprise surprise- to prime and paint.

My plan to jazz up the drawer fronts was simple…I was just going to Mod Podge a piece of scrapbook paper to the front and call it a day. But then, it didn’t quite fit….which was weird because I had eyeballed it in the store.

I wasn’t really bursting with ideas on what to do instead, so I took a few days off from my file cabinet makeover. Then one day my friend Kelly over at View Along the Way posted this herringbone artwork she made…
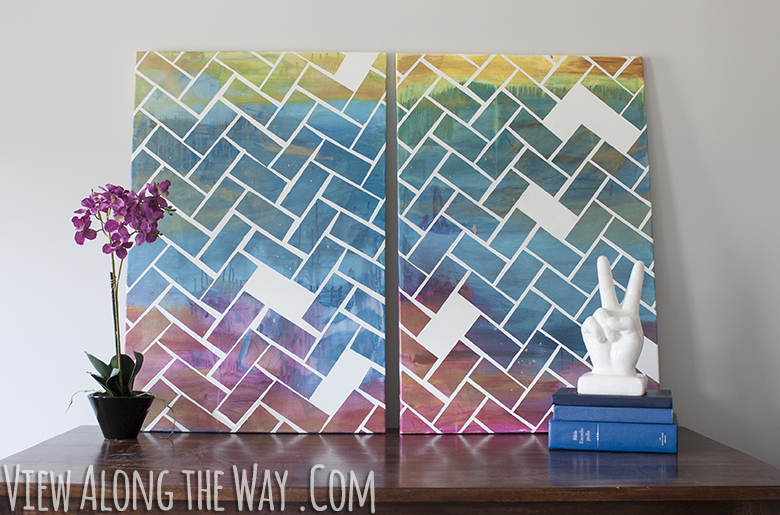
….and I knew just what to do to my drawer fronts.
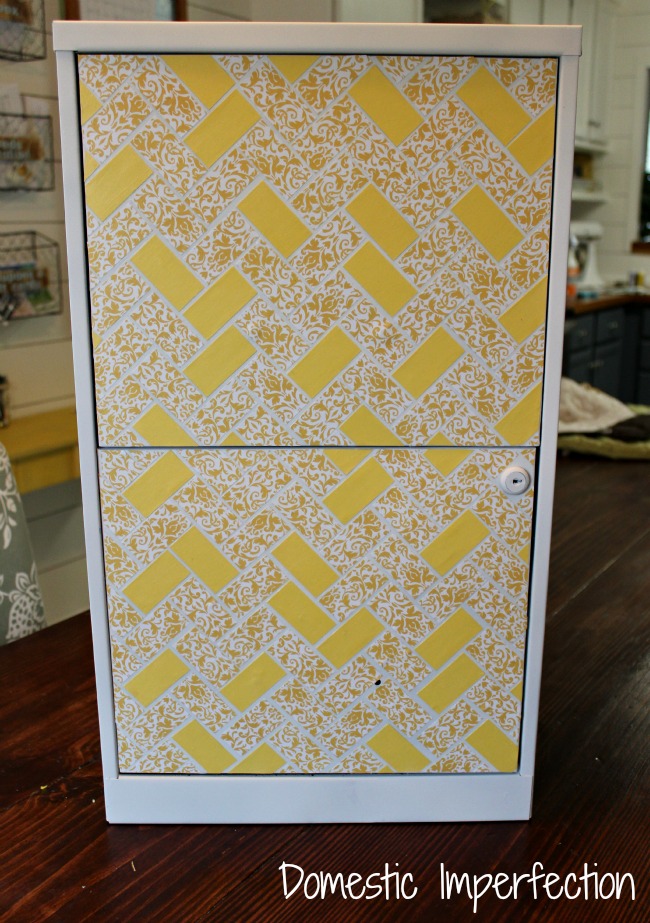
So I added a dark yellow piece of scrapbook paper to the designed ones I already had and cut them all into rectangles.

To start, I skipped all the math and it’s associated horrors and just slapped a piece on there.

And then I mod podged. And modge podged. And then I mod podged some more, until I had this…
I had found some pretty glass handles at Hobby Lobby for 50% off, so I went to attach them…except that they didn’t fit. Perhaps I’m just naive, but I assumed that all cabinet/furniture handles would be the same size. I was obviously wrong, but in my head that would just makes sense.

Not a problem though, I just drilled a hole in the correct location and mod podged new rectangles right over the old holey ones. And here you have it…not bad for $15 total!

Adam offered to put a wood top on it for me and I think that would make it look way better, but honestly I’m just going to stuff it my craft closet and it’s likely that the top will never see the light of day again. (You know, cause it will get covered with stuff…cause I’m messy. You get it.)

That’s not the end though, no no…I still had to actually file everything. Try as I may I couldn’t procrastinate any longer.

I went through all my piles and in the process I discovered a little something about myself. I discovered that sometimes I’m really organized. I had every single electric bill, water bill, phone bill, and internet bill that we have received since we moved into our house. All of them, neatly filed away and organized. I was impressed with myself. That being said, I have no idea why I would need those (it’s all online), so I chucked ’em. I also discovered that sometimes I am really NOT organized. So I found all my bills…woohoo. But Levis birth certificate? THAT is absolutely nowhere to be found. It’s gone. I think I may have mailed it off to an insurance company or something instead of a copy…that or it got left in the copier. I know, bad bad bad. So now I have to get a certified copy and make sure his identity hasn’t been stolen or something terrible.
I’ve depressed you….now you can’t stop thinking about poor little Levi having his identity stolen. It’ll be alright, I promise. How about I cheer you up with a little before and after shot?

Wow, hard to believe that is the same file cabinet! You did an awesome job and I just love how it turned out!
What?! This is AMAZING. I love how you reference my DIY project as inspiration, then proceed to blow it away with something a hundred times cooler. PS: Are you SURE about those floral handles? ;)
(Thanks for the link my friend!)
HOLY CRUD that is cute girl!! I don’t know how you had the patience to put all those little pieces on there!? I could never do that. But it’s stinking cute now :)
Seriously, where do you get that much of time with those two adorable sons?? :) and the patience to glue each piece! wow :) The file cabinet looks so wonderful.
Isn’t that a big step up for the filing cabinet. It looks great; I love the yellow!
awesome job, i love how it turned out. and those knobs look so great on it!! your transformation makes it not even look like a file cabinet.
That is super cute!!! I love it!!
That is the cutest thing I have seen in a long time girl! Love.
love it and a sunny happy Yellow….and the Birth C. may still show up…
Am I the only one who didn’t notice any of the clutter in that first photo? I was too busy checking out the design on your trash can & cute little floral dohickeys on your desk drawers. Hey – maybe the birth cert is in one of those drawers? ~ Dee
Haha, I’m sure your the only one who didn’t see the clutter. If you only notice pretty things and don’t see messes than you should come over…you might actually be impressed! I have scoured the house, drawers, cars, purse pockets, photo boxes…I’m pretty sure that birth certificate is lomg gone. Blah.
Herringbone is the pattern of the moment for me too. I actually posted about a herringbone console table top I built during the President’s Day weekend just yesterday. :) There’s something about the geometric staggering and complex consistency that makes it such a great pattern. I love how you found a way to make your vision work for both the use of paper and the handles. =D
That looks great! That herringbone must have taken quite some time.
Yes it did…way longer than I anticipated. Next time I will be using bigger pieces of paper!
I love the yellow! I think we all need a way to make the dreaded task of filing a little more cheerful. :)
Filing is actually on my to do list today. yuk
It looks so amazing now. Filing would actually be a pleasure if filing cabinet looked as good.
Beautiful! I can see these in offices all across America!
That looks amazing!! I love a measurement free project :)
Adorable!!!! Yet functional too =)
Seriously AMAZING!!!! Great job!
Turned out great Ashley!
So, guess what post I was working on today?? My file cabinet makeover that I picked up as roadkill last week. LOL. I’ll wait til next week to post it. (well, real talk….I won’t be done writing it til next week anyways. You saw all the posts I promised in my kitchen post. Sigh.) :) Anyways, Great minds, sista! Also, it looks amazing. Ours are complete opposites, so I think we’re good. <3 ~V
Haha, I thought I was the only blogger who promised posts before I had them written… or the project even finished. I promise a post and then finally come out with it like three weeks later, lol. I can’t wait to see your (totally opposite) file cabinet!
Are you sure you want to keep that hidden in your closet? It turned out so cute, it’s a shame it will only store the paper pieces of your life.
I know, it is a shame. Though the closet doesn’t have any doors and I plan to turn it into and “cloffice”, so you actually will be able to see it.
I really like that Ashley. That idea would look great on dresser drawer fronts too and is an easy project, but knowing me I would over-think it (again) and take me forever to get done! Thanks!
I was thinking the same thing while I was doing this…you could use this technique on anything, with any color and pattern. So many possibilities! Though next time I’m going to use bigger pieces of paper!
You just made my day, out paperwork looks about the same! Of course, since you fixed your pile of paperwork now I feel like I need to fix mine! Thanks for the inspiration ( :
Your welcome :) I’m not totally organized yet though…I have a giant, horrible, terrifying pile of blog paperwork that I need to turn into an organized tax form. BLECK!
Hi Ashley! I found your blog after looking for some penny floor info (AFTER) my mom pennied her floor. I love your DIY/thrifty home projects. Super awesome!
…..as for the knobs…. that sort of thing happens to me from time-to-time and I’ll just say, “Awesome! Do you want these knobs? I’ll be switching them anyway…..” Often this results in the giftee feeling inspired to do their own project as well
I know, after I got home I felt like a jerk for not offering them to her…I don’t know why I didn’t think of it when I was checking out. I’m going to blame it on my kids, they must have been distracting me and throwing me off my game, haha.
Your mom pennied her floor?! How did it turn out? Did you run into a ton of problems or was it a breeze?
I left that last comment. Totally hit enter before I edited and proofed. Oh well, you get my drift. (:
WOW!!!! This turned out wonderul!! I am on vacation and have deleted most blogs from my inbox – but this one was calling my name – so glad it did. YOU are so talented!
Thanks Donna! Enjoy your vacation… I’m not jealous at all ;)
I seriously laughed out loud about the scrapbook paper not fitting. Eyeballing? Yeah, it drives my husband crazy! haha. I am trying to remember a tape measure in my purse every time I go to the home store or craft store to make him proud. Looks good, and as always, thanks for sharing REAL life.
Haha, I drive Adam crazy with that kinda stuff too…he’s always saying “would you quit being so ghetto and just measure already?”.
I love this! I’ve featured it on BlogHer’s facebook page. :)
Oh wow, thank you!
This is adorable! I still can’t get over how expensive new (and UGLY) filing cabinets are. We got one for five bucks at Goodwill a year or two again…maybe I’ll be inspired now to jazz it up a bit with mod podge. :)
Seriously, they are crazy expensive! Even used on criagslist they were usually about $50.
You did a great job on this. I have one that’s fake wood – now more than ever I’m thinking it’s in need of a little TLC! Alas, it will have to get in line…
Cheers! J.E.
YOU ARE SO TALENTED!!! Yes Im shouting it out :)
I won’t leave another file cabinet behind! I’m inspired to get one now!
Debbie
This is so cute. My ugly file cabinet is looking at me right now and needs a new look. I love the yellow.
What a craft chick you are! It looks so much better. Great idea to make it a mosaic.
Amazing transformation! I’m pinning this inspiring re-do too. Little Bit
OH My. This is great. I just bought a filing cabinet and paint a couple weeks ago…and was going to paint it all one color…but now you have me thinking with the scrapbook paper! It’s soooo cute. I would love it if you would share this at Tell Me Tuesdays Today. http://mothersniche.com/free-printablelinkparty/
What a great job on the file cabinet! It looks great. Maybe you will find the birth certificate in another set of papers….you never know.
KC
Love what you did to the file cabinet. thank you for sharing. Yellow is so pretty and cheery.
Leslie
This is awesome! I’m going to look for an old file cabinet so I can do something similar. Thanks so much for sharing :)
I’ve seen and pinned a lot of file cabinet makeovers…but yours might be my favorite! We have the file cabinet already…and its already white…so what am I waiting for? Thanks for the tutorial!
Thanks for linking to Take-A-Look Tuesday over at Sugar Bee Crafts – you were featured today!!
–Mandy, http://www.SugarBeeCrafts.com
Ohhh lala i love it!!! The drawer pulls are sweet:) Pinned!
http://www.sewsweetvintage.com/2013/03/brilliant-2013.html
This is awesome! I saw your feature on Sugar Bee and I would have never known from that close up picture that this was a file cabinet. Or that it was just scrapbook paper! I can’t believe you did it without the math, I about gasped outloud when you said you just slapped a piece on there :)
Haha, thanks Kate! Numbers aren’t really my thing so it would have taken me a week to figure that out mathematically. My husband calls me a “ghetto” DIYer, but I prefer to call myself “spontaneous” DIYer, lol.
I love that you didn’t use math. I typically don’t either. I know things I do could be more exact, but I never really did like math…however, I love the filing cabinet! (Note to self: find and file my car title…)
I don’t know about you, but I, for one, am really happy the scrapbook paper was too small. How cool is this look? Very! love it . Thanks for sharing.
p
just had to feature it. :D Thanks for partying.
p
What a fantastic makeover – LOVE the herringbone pattern – AND the color your chose –
The handles add some bling – just beautiful!
Visiting from Under the table and dreaming,
Hugs,
Suzan
FABULOUS!!! Love the ”tile” effect!!
Thanks so much for sharing this at The DIY Dreamer.. From Dream To Reality! I can’t wait to see what you link up tomorrow evening!
Making over my filing cabinet has been on my to-do list for a long, long time. You have definitely given me the kick in the pants that I needed. Love it!
This really came out great. I will be featuring it tonight at my Winter Blues Wednesday party that opens at 8pm EST. Please stop by and pick up an I’ve Been Featured button. Thanks.
This looks awesome! I love how you just slapped one on and started! I hate measuring if I don’t have too!
Oh my, your patience is rewarded! What a marvelous creation from something that most people passed up….It is terrific.
Now you will be inspired to be organized……
Nancy
Gotta love a good file cabinet makeover! They are usually so darn ugly, and now yours is beautiful! I made a file cabinet over too…and in yellow! Great minds think alike! ;)
http://retroranchrenovation.blogspot.com/2012/08/friggin-file-cabinet_9.html
That turned out great! What patience you have :)
The filing cabinet looks great! I have to say-I don’t know if I would have the patience to apply all those little pieces of paper-but it was worth it. The cabinet looks fabulous.
You craft like me! Eye ball it and when it doesn’t work just figure something else out. :) It looks lovely!
Hi there!
I checked this out and the comments to see if someone else asked… But did u use something to space them out? And I have never modge podge’d before (yes, I know. The horror). But are those white areas (the spaces) white because of the modge podge?
Hey, you have to start somewhere :) The mod podge dries clear, the white between the spaces is just the painted file cabinet showing through. To space them out I just eyeballed it. Very unofficial, but it worked!
I just came across your website and the file cabinet makeover is great! I love the pattern.
Do you mind sharing the primer you used? Or maybe I missed it! Sorry! I’m redoing a filing cabinet for my husband for Christmas…wow I sound like a fun wife. :) But we do need one!
Ha ha, I get it! If we even give gifts they are usually practical. I believe the primer I used was spray Kilz.
Thanks so much!
Hi there, love your stuff by the way. I’ve a large 4 drawer metal filing cabinet my husband painted in gaudy colours pre me! Do I have to sand it right down to start a new upcycle or can I glue onto the old paint?
If the paint is in good condition you can probably glue right over it. I might sand it really lightly just to rough it up a bit for adhesion, but that’s about it.
I love to apply this to our old furniture, I bought a new one from https://finewal.com and it such a waste to throw the old ones, Thanks for sharing this!