
Make Your Own Plate Hangers & My Dining Room Plate Wall
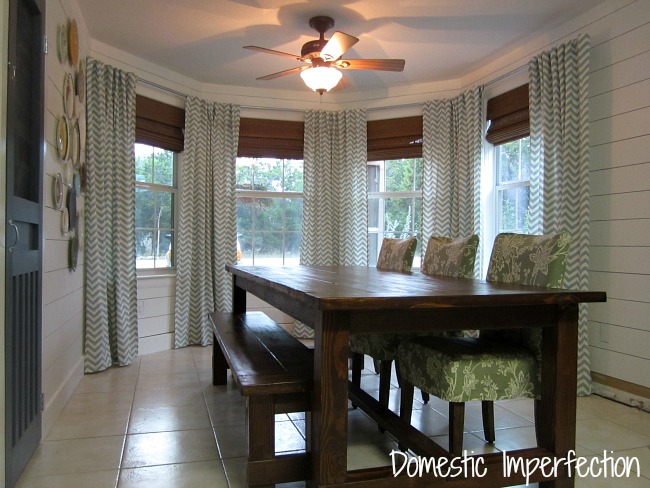
I’ve been wanting something fun for the big blank wall in my dining room. Something colorful, something cheap. I wanted a plate wall. I excitedly told Adam my idea…and he seemed confused.
Adam : “A plate wall? Like dinner plates, on the wall?
Me: “Yes.”
Adam : “You mean like grandmas have in their house?”
Me: “Ummmm….well, yes…kinda.”
Adam: “Okayyyyy, but if I come home tomorrow and you’re wearing a muumuu I’m gonna nix this whole idea.”
I promised him I wouldn’t be wearing a muumuu, but then I got to thinking about it… a muumuu actually sounds really comfortable. But a promise is a promise, right? For now anyway…
It’s easy to find plates in thrift stores, not so easy to find plate hangers. I looked for a month and never found a single one. I went online to buy some (okay, 24) and was shocked to find that they are almost $4 a pop. Eeek, that’s almost $100 in plate hangers! That’s an insane amount of money, especially considering the plates only cost me about $15. Then I ran across these newfangled plate hanger thingy’s…you glue them to the back and they don’t show. Great…except that they are only slightly cheaper than the wire ones. So I turned to Google, and it lead me to this tutorial from In My Own Style on making your own plate hangers with glue and paper clips. DUH! So easy…and so cheap.
In the tutorial she used hot glue to secure her paper clips to the plates, but says it works best for lightweight plates. I had some lightweight plates, but I also have some monster sized, super heavy plates. So instead of using hot glue I bought this Gorilla Glue, since Gorilla Glue has never let me down.

I put some glue on my plate, slapped the paper clip on (after bending it a little), and let them dry. I came back about half an hour later to find this…

The glue went crazy and bubbled up so much the paper clip wasn’t even close to touching the plate. After a few good slings over the bed I decided that they were secure, though they didn’t sit flush on the wall because the glue was so thick.
I ended up using a butter knife to remove the glue and clips from all 24 plates.
Then I read the directions, where it said to apply the glue SUPER THIN because it expands as it dried. Go figure…one of these days I’ll learn my lesson and read the directions first.
So I started over. I applied the glue SUPER THIN, didn’t bend the paper clips at all…and it turned out perfect and sat completely flush on the wall. The best part is that I made 24 plate hangers for about a dollars worth of glue and paper clips!


UPDATE – I just gave you terrible advice! The Gorilla Glue ended up not working at all… CLICK HERE to read my follow-up post and learn what you should use to make plate hangers.
Next it was time to put them on my wall. We just finished installing and painting our plank walls, so I was feeling protective and wanted to avoid peppering them with holes. So I thought ahead and tried to decide on my plate design before putting them up.

While trying to find some inspiration I came across this wall and loved the swoopiness of it.

So I tried some swoopiness of my own….

And I hated it. It didn’t look swoopy and awesome, it looked like a giant backwards moon. (I know the moon goes both ways…it just looked backwards to me.) So I took it all down and puttied and painted all the holes I had made. Blah.
After much more plate arranging I decided a few things..
- I had too many dang plates.
- Swoopiness was not going to work on this wall.
- Everything I was doing looked too uniform and planned.
- I had been working from the top down and working from the inside out would make everything better.
So I hung my biggest plate right in the center of the wall and worked out, being totally thoughtless and random. I stopped when I liked it and only ending up using about 2/3 of my plates. Perfection.


I love when I finally get to the decorating stage of a remodel. This room has needed some color for a while and I think the plate wall is a fun way of doing that. Plus it only cost about $15. This whole dining room has actually been pretty cheap so far. Just in this picture we have an $18 custom screen door, $100 plank wall, $100 bay window rod and curtains and a $150 DIY farmhouse table and bench. That’s what I call a thrifty remodel!
Love this! It looks great! You better stay away from the swooping!
Looks great. Great job.
I love plates on the wall and have plates on the wall. You did good!
Oooh! I love it! I would totally have passed by half of those plates that you have up there, but together they really work!
That looks great, Ashley! Everything looks better on that plank wall, hey? So gorgeous.
I think one reason that Pinterest photo looks so good (I have it on my Pinterest, too) is the piece of furniture which sort of anchors it and provides a nice contrast. But I actually did like your swoopy version as well as the non-swoopy one.
I have a set of plates I inherited from my parents. They are really lovely, the English countryside, one for each month. The only thing is when you put them together they do look a bit old fashioned and a bit busy. When we move, maybe I’ll try some swoopiness or else divide them up maybe? Or maybe put some plainer plates among them. You’ve given me lots of ideas!
Yes the furniture makes it purposefully swoopy and that is definitely needed. Plus that piece of furniture is awesome in general. Are you all moved into your new place?
Click “like”.
Your plates look beautiful! A perfect spash of color – I love it!
That looks so good Ashley! I’ve always wanted to do a plate wall too and I’ve been admiring that swoopy photo for ages! Thanks, I’m Pinning your pretty planky plate wall!
That swoopy photo is great…I think the furniture is needed though, or else its swoopy without an anchor. That was my downfall!
Thanks for the tips on hanging the plates! it looks great! I have been collecting all kinds of plates, for hanging on my privacy fence in a corner of a garden. The glue i tried just would not hold. So i will give this a try for next year!
Plates on a fence is a great idea! I love the look of putting indoor stuff outside and outside stuff inside.
i have found great plastic colorful plates at various cheap shops around town. if they fade, i just spray paint them and they look like new again!
The plates look fantastic! I’m so bad at putting eclectic things together. I also love the plank wall and whole dining room!
Thanks Dorris!
WOW!! It looks great. But, I liked the swoopy moon also.
Haha love it! It looks great! I am not even kidding – I have a pile of plates on my counter that I was going to hang today!!
Good luck, I hope you put less holes in your wall than I did!
Such a fun way to add color to a kitchen or dining room! I’m going to have to start a plate collection so I can do this one day once August and I buy our own house!
August’s Megan! I didn’t know you had a blog! I’m going to go and cyber stalk you now… Hopefully one day I will get to meet you in person :)
Haha, yes, I am August’s Megan. :) I’m so glad August told me about your blog because I love all the stuff you and Adam have done. And yes, hopefully one day I will get to meet the infamous “Adam and Ashley” that August always talks about!
i think it was semi swoopy, but i can see how you got moon. love your collection of plates, and you must tell us if everything stays intact! i’d be scared that paperclips wouldn’t cut it!
I pretty sure those plates aren’t going anywhere, but If they do I’ll let you know!
I have never thought to do this with gorilla glue and I always have this on hand for working with furniture. Gotta pass this along to my dil who plans to hang plates on her kitchen wall!
I liked how they ended up! I like the idea of the using the gorilla glue and the paper clips!
Love your cheap DIY version!
I love how your plate wall turned out! Great tip on the hangers!
I used that same tutorial! Isn’t it awesome what you can do with some glue and paper clips (or safety pins)?
Love your wall – you’re right, the swoopiness was too much with the linear plank wall. I like the random pattern much better.
I love this. Please link it to my linky party & anything else you have to share. It just went live a little early :) Thanks, Peggy. http://diycraftyprojects.com/2012/10/whatcha-work-up-wednesday-5-linky-parties-are-back.html
Great job! It’s exactly what that wall needed…Sometimes when you don’t try hard and just go with it, those turn out to be the best projects!!
Hi Ashley, This turned out great! I have seen the inspiration photo as well & have always wanted to do it, but I didn’t know about the paper clip method – BRILLIANT!
Warmly, Michelle
Faith, Trust & Pixie Dust
PS – I made the same mistake with gorilla glue the first time!
I love this! I plan on doing something similar in my dining room. I just need plates! And I love your cheap DIY plate hangers. I may have to steal that for my own plate wall. Thanks for sharing!!
I love the placement – the wall turned out fabulous. Your husband’s response sounds like something mine would say :)
I’m such a fan of plates as art and this is one of the best I’ve seen. Good for you for knowing when it was too much and editing. It looks awesome!!
It looks really nice… I liked the swoopy, backwards moon too… but the way you have it now looks better on your wall, you’re right!
Tania
I love your plate wall ashley!! btw – do you have a new header? looks great!
Would love if you came and linked up with us. We’re giving away one free week of ad space for one lucky feature! Hope to see you there!
http://www.oneprojectcloser.com/the-humble-brag-link-party-4/
the plates are perfect together!
Nice idea. I like the homemade hanger idea. Thank you for sharing it.
Ashley that looks so good, thanks for sharing the plate hanging, I think this might work with tiles which is something I was looking for, stopping by from cure for the common cold
I really love your plate wall! Using a mix of plates, colors, patterns really makes it so fun and eclectic. I have a small plate wall in my dining room and the plates are totally hung up with glued on paper clips, too. ;)
Ange;a
Your post described the exact thoughts that have gone through my head – over the past several years! I’ve been wanting to create a plate wall in my dining room, too, because I just love the mix-n-match appeal of different colors and textures. And, because it would be a fun and inexpensive way to use random thrift store finds. But, WOW are those plate hangers expensive! Much thanks for the tutorial on creating my own…now to get those plates and get to work. :)
I’ve got to say that you are braver than I am. I would envision all of those plates falling and breaking – probably in the middle of the night. :D But seeing how well yours have worked and how great your displays look, I am definitely willing to give this technique a chance.Thanks for sharing on beColorful.
p
I think it turned out great! I love the punch of color and the whimsy it adds. And I’m totally stealing the paper clip idea – especially since my little mirror in my new bathroom gallery wall fell OFF in the middle of the night last night and scared the bejeezus out of me! Gorilla glue, not hot glue – lesson learned!
If one of them falls in the middle of the night it will freak me out for sure! I don’t think those paper clips are going anywhere though, thank goodness :)
Have they stayed up a year and a half later? I have 9 plates to hang, and do not want to spend $3 each on hangers! But I’m scared of the glue not holding up.
Did you see my update post? https://wildfireinteriors.com/2013/01/sometimes-i-give-terrible-advice-a-plate-wall-update/
After I redid them with the E-6000 they have been great, nothing crashing to the floor!
Love the plates! Art can be found in so many functional items; plates being a wonderful, inexpensive gallery. I did something similar in my office/workoutroom/extra laundry “basket” ;-) some time ago and had a lot of fun with it.
Lol, I love your room description…so beautifully honest :)
holy shit i love u
So… I’m literally googling images for a plate wall right now… and saw your post. And have 2 things of gorilla glue epoxy in our front hall to use for my plates. :) Going on Amazon now! :)
Just wanted you to know that I did my dinning room wall with silver serving trays of various sizes and shapes. It looks amazing. I used the paste on plate hangers in various sizes and weight capacity. I love the look but created a silver polishing frenzy every couple of months when I can’t stand the tarnished look anymore. Plates would have been a wiser choice for me because I’m creative but lazy when it comes to polishing silver!!!!
I think your backward moon is almost perfect–which is it,s problem. It is the lack of a few out-of-kilter plates that bothers me. Think of flower petals wafting gently in a breeze, then think of them slammed against the wall (figuratively speaking).
Thank you for the tip! I have always use the icky, ugly metal plate hangers until I saw your suggestion! ps I knew about the gorilla glue issue prior, same thing happened when my hubby glued something for me. lol
I’m one of those also who just runs ahead so excited about creating and doesn’t quite think the directions are that important, until later . LOLOLOLOLOL