
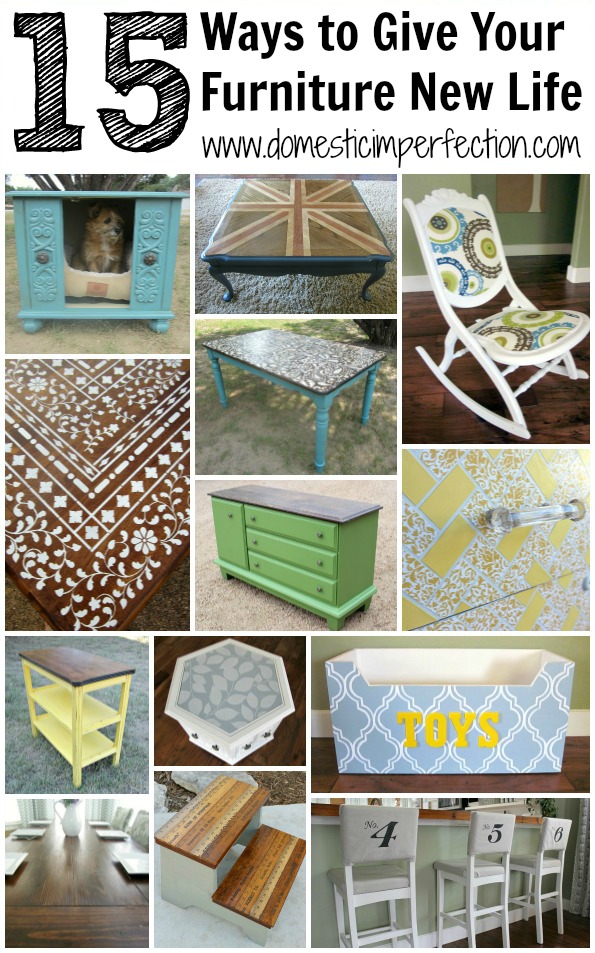
Indian Inlay Stenciled Table
Bone inlayed furniture is really popular right now…not with people like us, cause we’re cheap, but with people that have money to throw around.

The first dresser (the little black one) has a price tag of….hold onto your britches….$2,999! Holy cajoles…most of the cars we’ve owned have cost less than that. Do people really pay that much for furniture? I’m sure some do or else these companies wouldn’t be in business…I’m also sure that those people wouldn’t be caught dead reading my blog.
So designer Kim Myles came up with a solution for us penny pinching (hundy pinching?) DIY kinda gals…in the form of a stencil, of course. It’s called the Indian Inlay kit and is made by Cutting Edge Stencils.

I wanted to give this stencil a go, but first I had to find an old table. I see old tables everywhere…that is until I started looking for one. I looked for about two weeks, and then my sister-in law Jaime offered to bring me her table to play with. Perfect! Here it is…

I know, it’s pretty much the exact same as my old table that I did the paisley stencil on…I think everyone in America has owned this table at some point. It’s like an unspoken right of passage.
So, first things first…

I did a few things different on this table than I did on the paisley one (if you haven’t read that post you should, I’m going to reference it a lot). On the paisley table, I sanded, then stenciled, then stained. I didn’t want this table to have a rustic look though (I wanted it to be brighter and whiter), which meant I had the stain BEFORE I stenciled. Let me just say this…it was much more forgiving to stencil on bare wood. If you mess up, you can just lightly sand off your mistake, where as if you mess up on a stained table then you just have to live with it. Kim painted her table first and that would by far be the easiest way because you can do unlimited touch-ups. I like some wood on my furniture though, so painting it wasn’t going to happen.
Anyway, I stained mine and did two coats of English Chestnut by Minwax. Then I had to figure out how this stencil works.

Other stencils I have used come as one big easy sheet…this one came in a bunch of little pieces. I would be lying if I said I wasn’t a little intimidated looking at all those little stencil pieces and my big, blank, already stained table. It comes with three “border” pieces, one “interior floral” piece, and one small “filler” piece. I was already being non-traditional by doing this on wood rather than a solid colored surface, so I made it official and used the “interior floral” piece first. Also, instead if having mine look like bone I wanted it to look like pearl inlays. Capiz inlays? Whatever kind is shiny…that’s the look I was going for. My hubby stopped by Hobby Lobby (I know, he’s awesome) and found this…you just add it to normal paint and it gives it a pearl effect.

So, I got to stenciling. I would usually use a foam roller for this, but the roller was wider than the stencil so I had to use a flat-ended brush (same one as on my sign and mat).
If you have never stenciled before then I wouldn’t recommend starting with this one. Remember when I said that the paisley stencil was super easy and took ten minutes to do the whole tabletop? This one took me at least six hours. Granted it has a much more custom look…you can fit the design to the exact shape and size of whatever you want to stencil. Just giving you a heads up that you won’t finish this in one naptime unless your kids sleep for six hours straight. And if that’s the case then I propose a trade…

While stenciling I was having a hard time with the corners. I wanted them to look sharp and purposeful, but that wasn’t easy. As I was looking at Kim’s table I noticed something…

Some of her corners were less than awesome. Phew! If the designer of the stencil can have corners that don’t match up than mine certainly don’t have to be perfect. Here is the method that worked best for me…

1. Bring your stencils almost together, making sure the vertical lines aren’t longer than the horizontal ones. 2. Cover areas that you don’t want stenciled with tape, other stencils…whatever you have lying around 3. Stencil 4. Pull everything up and admire your (crisp, albeit not perfect but good enough) corner.
When the top was all stenciled (whew!) I applied three thick coats of polycrylic and moved on to painting the chairs. I rummaged through my paint closet and chose the leftover paint from our cabinets…Harbor Gray from Sherwin Williams.
Now, if you are a two-year-old boy you will really want to help at this point. Here is how two-year-old chair help goes down… 1. Lightly sand the chairs 2. Throw a tantrum when you are done 3. Clean up all the dust with a damp towel 4. Get stripped down and banished to your high chair when it comes time to paint.

Here is the final product!

Beautiful, huh? Hard to believe it’s the same table!

It doesn’t have the shimmer I was hoping for… I was too stingy with the pearlizer because I was afraid of running out. Live and learn! It does have a hint if shimmer though, not that you call tell from the pictures.


It’s certainly not perfect, there are two areas that are blurry. This is where stenciling on a painted surface would have come in handy…

Not to worry, the mistakes disappear when you step back a couple of feet. I’m still allowed to be proud of my corners though!


Here’s a side-by-side before and after, because everybody loves those.

Your table turned out fantastic! I love the transformation. I can’t believe that one table cost $3K…what a joke! I don’t know anyone that buys stuff like that. I could do my whole house for that. :)
Megan
I like it! It’s busy enough that the little mess ups are less noticable. I would maybe paint the bottom and chairs the creamy white instead of the grey, I think it would make the top pop!
Amazing! Those corners look great. I must not be up with the times because I haven’t seen any of these bone inlay pieces until just now, but I think I’ll follow along with this trend! It looks so custom!
Wowza! Kudos to you for dedicating 6 hours to tedious taping, rolling, etc. The outcome is terrific! And woot woot for the chance to win a $50 stencil credit.
wow your table turned out ammmmazzzzing great job
I like it! I really want to stencil our kitchen table.
Fantastic job – well done! Do you think this stencil could be worked onto a round table or strictly square surfaces?
Ok…forget that question. I was just looking at the beautiful results but I can see these stencil pieces would definitely not be workable for a round table. Maybe Cutting Edge will eventually design one for a round piece. :)
Oh Ashley, this table is gorgeous!!! We have an IKEA table that definitely needs a makeover. I’m excited for your stencil giveaway. I will keep checking back to enter.
I love the look of your table! And your corners DO look fantastic!
Wow that table top looks fantastic! I pinned your last table and have been dreaming about what I could do with a stencil ever since. I really appreciate the reality check on this one. I will take it on board and make sure that when I finally get to do some stencilling that I choose carefully.
You know, I wasn’t going to read this post because I wasn’t interested in an Indian Inlay Stenciled Table. However when I saw that you were again using my style of table, I read it, mostly because I still haven’t done anything with mine. I am impressed not only with your finished result but your honesty in mistakes and imperfections. It helps me, a perfectionist, to know what to expect. Even if I only sand and re-stain my table, I will send you a picture because you are the one who inspires me to do something!
Would love to know where these stencils may be acquired. I would like to try some of them. I especially like the Indian style table. GREAT JOB!!!!
http://www.cuttingedgestencils.com
hi.. the table looks awesome.. i stay in india.. wanted to know which is tht white colour u hav used?
thank u!
Stunning! You do remarkable work. I look forward to your blog always!
You just gave me the answer to doing a cabinet makeover in my kitchen, bookshelves, and a great idea for a headboard !!!!!!!!!!!!!! Thanks, I can SO do this !!!!!!
This is SO beautiful! Thanks for sharing. And you’re right, the corners turned out great!
Beautiful! I so want to try this on some old ugly furniture to make what I have look nice!
It is beautiful!!! I prefer your paisley table to this one personally, but I can totally see that making a lovely statement in someone else’s home! ;)
I like the paisley one way better myself :)
Gorgeous work! I love stenciling and use to do it as a border on my walls many years ago. Now I have a lot of chairs I’ve found at garage sales and in piles at the side of the road. I stencil and paint them. I’m dying to try a project like your tables, though! I didn’t realize stencils came in huge sizes. I’d love a chance to win the prize for stencils!
You did a gorgeous job – I think I would have been intimidated, but then 30 yrs. ago I did these kind of projects too. I even wallpapered people’s ceilings! It’s nice to know that this “fixing and making” old and not so old, beautiful again, is still going on.I think I will try the old bench in my garage for a start (once again) – you’re never too old to learn a new trick or two! Thanks for sharing the awesome project!
Fantastic work! I would love to win the stencils.
The table and chairs look great! I have a coffee table, which is less than perfect, I want to stencil. I also want to try stenciling my dining table pads which are also less than perfect. Has anyone tried painting/stenciling them?
Love it!!!
Have to ask, how did the sister-in-law like it? Or did it not go back to her afterwards?
I have no idea, I don’t think see’s seen it yet!
At first when I saw this table I thought you had painted over the paisley print on your own table! I was beginning to think “that poor table, can it take much more sanding!” LOL. I love the print! I’ve been inspired by you, but I’m still scared to try it on my own tables! You have that “just do it” attitude and I will send you a picture of mine when I get the nerve to do them!!!
I love this table. I’ve got an old table, in pieces, under my bed that I’ve been meaning to stencil. I was inspired by your paisley table post. The “bone inlay” stencil looks amazing but a little intimidating! Great job :) I hope you sister in law loves it!
Just saw this on 36th Avenue link party and it caught my eye immediately. This is so beautiful!! Great job and do more…….
Wow!!! Your table is gorgeous.
I adore this table – and the chairs and color of the chairs is perfect!!!
Would love if you stopped by my party to link it up!
Stacey of Embracing Change
http://staceyembracingchange.blogspot.com
I was surfing the net looking for ways to refinish my dining table – I have the same one as you! Several years ago I painted the legs and apron black… the white had gotten so dirty. But I left the top the same, but always wished I could stain it darker. Did you just sand the table and you were down to bare wood? My table has such a thick coat of poly that was probably baked on, I didn’t think I could get it off. Maybe I will paint the top now too!
I loved the paisley stencil!
I. CANNOT. BELIEVE. THIS!!!!!!!!!! ( I’m seeing it – but really cannot take it all in – breathtaking)
This has to be the most incredible makeover yet –
Definitely your newest follower –
Would love to have you visit and follow back!
:)
This is just ahmahzing! I absolutely am jealous of your table right now.
So Cool! I’m inspired to do it someday.
This is one of the most amazing stencil projects I have seen. The table is absolutely, GORGEOUS! You are one patient lady, with the toddler to boot! I really enjoyed reading this post, I know I won’t be duplicating it, but it is so fun to look at!!!
Wow, that’s amazing, Ashley! I know someone who has one of the bone-inlaid ones (even bigger! Now I’m dying to know what it cost…), and I’m impressed by how much the stencil looks like the real one. I also prefer the paisley, but I think I’d really like something like this if the colours were a bit more delicate, like white and aqua or some such, and on a smaller piece. What are you going to do with this one? Give it back to your sister in law?
So I did try stenciling the other day and you were right – I loved it! It is so much fun. I also did the dirty cowboy treatment and am super happy with the results. I got the original dresser for free from the paper and it definitely ugly, though sturdy, and now it looks awesome! The whole process made me feel great :)
Cheers!
Yup, the table is going back to my SIL. I just got to give it a little makeover and blog about it :)
I’m glad your stenciling turned out well…it is fun isn’t it? I would LOVE to see a picture of your finished dresser!
o my girl you rocked this…and with a toddler to boot…brave woman..I am working on a table..and I sanded….and found not solid solid wood…I thought so…but mostly wood…what you did on the top is way cool! and brave..HMMMM got to think I have a waterfall wardrobe…hmmmmmm WOW
This turned out so beautiful! I didn’t know there was a stencil that did this. I would LOVE to try this on a piece of furniture! Thanks for the tutorial! =)
I’m stopping by via the Link up (fivedaysfiveways), and I’m glad I did.
Wow, I really like you table! Now I want some stencils.
Thanks so much for sharing.
Hope you have a chance to stop by and visit: http://www.craftyspices.com
You did a fantastic job on the table! I used to work as an assistant to a faux painter and did a lot of stencil work for her since I liked doing it so much. There is always a lot of adjusting to do. Only you know where all the “mistakes” are. I would love to do some more stenciling – thanks for the giveaway chance!
Thanks so much for the chance to get the stencil – your table is awesome!
Oh My Goodness! That is beautiful! You have a way with tables (that sounds weird…) but you do!
This is stunning! Beautiful job. I love the idea of using the pearl additive to the paint.
Beautiful job. I have a Blog Hop, and I would love it if you would link this post. You can find it at
http://www.adornedfromabove.com/2012/07/surf-spray-and-wednesdays-adorned-from.html
It is called Wednesdays Adorned From Above Blog Hop.
I hope to see you there. Have a great Day.
Debi Bolocofsky
Adorned From Above
http://www.adornedfromabove.com
Wow, what a difference! If you hadn’t pointed out where it wasn’t perfect, I never would have spotted it. It’s absolutely beautiful and you did a wonderful job!
Absolutely beautiful job! I’m in awe! I’m no stranger to stencils so I know how much work that took. Girl, you could make a fortune doing this on dressers. I have also seen those online for over $1000.oo! The sky’s the limit with what your imagination could come up with!
I LOVE IT!!!!! I love all your stuff, but I really LOVE these pieces! I am blown away at how a stencil makes such a differnce. I look forward to many other beautiful and stylish masterpieces!
What you have done has made this table beautiful! Awesome job, Ashley! I’d love for you to link this up to my Marvelous Mondays party. The party opens on Sunday evenings. Hope to see you there! :)
Julie
That’s some serious genius and dedication. I’m in awe of your determination and skills! I just love the outcome!
Liz
Oh my heck! It’s fabulous!
I think this is great! wonderful job! Hopping over from 504 Main :)
JoAnn
Hi! I’m Amber! I see that we’ve linked a few of the same parties this week, and your project really stands out as being among the best I’ve seen! Since I’ve stopped by to see it and admire your organization within your post, I figured I should comment and say, “Bravo!!!” :D :D :D I’m still really new to blogging, but if you have a minute, I hope you’ll stop by! :D ~Amber of WhatAmberLoves.com
My mom had Indian, inlaid coffee and end tables. I guess my bro was the smart one for taking them! Your version looks great!
Beautiful job as always! http://www.iheartpears.blogspot.com
Your table turned out absolutely gorgeous! I’ve never used a stencil but I sure know that I wouldn’t want to start with this one. You did a fabulous job.
I AM SO IMPRESSED, I LOVE HOW YOUR TABLE CAME OUT!! I WILL BE FOLLOWING YOU ON MY WAY OUT, I DON’T WANT TO MISS ANYMORE OF YOUR PROJECTS.
Holy crapazoids, this is amazing! You look like a natural with your sander. Your table turned out absolutely gorgeous. Your were really creative and must have a heck of a lot of patience. So worth it. So glad you shared your creative inspiration at Sunday’s Best!
this is incredibly beautiful! I bet it’s a focal point in your house!
Wow! I have that same table (in the original honey blonde wood/white finish) you are a total inspiration! I adore your table. You are such a stud – prep/sand/stain/stencil all by yourself! (well, with a little help form a little someone… so cute!) Thanks for sharing at Home Stories A to Z. xoxo
the table is SO cool! and you look simply adorable, too!
It is stunning!!
Holy wow! This looks incredible. The detail is amazing. What a transformation. Great job!
Nice job…looks great.
This is beautiful! My in laws have some real inlaid side tables from India, and I just love the look! This is a great way to achieve the same look without having to ship furniture across the world ;-)
Beautiful I love the idea… This is definitely going on the to do list when we buy our first home.
YOWZA! This is amaze-balls. I don’t think I have the patience or the steady hand to be able to pull something like this off.
I’m sure you know by now that with all the comments you’ve received that you have done an out of this world, outstanding, humongusly great job on this table. You’ve transformed the table and even started a new DIY trend that has yet to explode. I’m sure you will get all the accolades for starting this one. I’m now you’re newest follower. I’m a newbie and aspiring DIY’er, check me out! TY, P
Oh wow! I saw this stencil on the Cutting Edge Stencils website when I was looking for a stencil for my hallway and wondered if anyone could actually pull it off. You definitely did- it looks fabulous! Great job! Now I’m wondering if you’re giving this back to your sister-in-law, or if it’s yours to keep?
Thanks Stacy! The table is going back to it’s rightful owner, I just got to play with it :)
Looks AMAZING!!You have some serious patience, girl!! But what a payoff!
{HUGS},
kristi
Well Hello Indian table! I see you have made it there.
I am from India and I own a couple of inlayed tables- I mean I got it from my grandmother. But tell you what, this is PERFECT. Can’t really tell the difference and just so you might know I’m very skeptical about furniture paints. Well done.
Oh wow, that’s the best complement I could have gotten!
Its absolutely awesome!! You give me hope!!
STUNNING!! You did an amazing job, you are one talented girl, you should go on business doing this marvelous dinner tables, end tables, chests, atc..! Just dropped by from Addicts (No so Anonimous) Linky. Enjoy the weekend.
FABBY
This is absolutely gorgeous! What a labor of love! Visiting from Primitive & Proper.
Allison
http://www.thegoldensycamore.com/2012/07/herringbone-dresser-and-announcement.html
This is absolutely gorgeous!! Wow!!
Thank you so much for sharing {nifty thrifty sunday} last week! You will be featured at this week’s party!
xo! Vanessa
Beautiful job! I love cutting edge stencils and that one did catch my eye. Your table is gorgeous, Ashley! Love it!
your table turned out great – thanks for the inspiration!
I love your table. That’s a lot of work and measuring! Beautiful job. Would love for you to join my party Totally Transformed Tuesday.
It turned out awesome…from a distance you don’t see anything wrong with it. I give you credit for trying it. I applaud you.
http://www.cuttingedgestencils.com/kitchen_border_stencil.html?page=3 My favorite its the Kitchen boarder or paisley anything.
Beautiful! This is truly stunning! I’m visiting from Nifty Thrifty sundays.
Great post and a fabulous look. Wowza. I was so impressed that I featured you on this week’s Motivated Monday at BeColorful.
Thanks so much for linking up.
p
This is truly inspirational. I am hosting a Giveaway to win a 50 dollar gift card to the store HomeGoods. It would be great if you stopped by and entered. Thanks Anu
That looks great and took a lot of patience to do that tedious painting. Thanks for sharing at Wow and this will be one of the features this week.
This is incredibly beautiful! Pinning now!
That is absolutely beautiful. I will be featuring it tonight at my Sizzle into Summer party that opens at 8pm EST. Please stop by and pick up an I’ve Been Featured button. Thanks.
seriously awesome!
m ^..^
Wow- that table is amazing! Popping over from Savvy Southern Style.
I have that EXACT same table ! I was wondering what to do with it, what a great idea. I am so excited to have a fun project to start in the near future.
This is my first time at your site via Beneath My Heart’s July Linky Party. Oh my gosh! This table is now worth at least $6,000! I can’t wait to read through the rest of your projects…I think I’m just speechless!
Simplemente fantástico!!!!!!!!!!
Felicitaciones!!!!!!!!!!!!!
This is absolutely gorgeous. You did an amazing job! I’d love to do a dresser or a hutch in this style. I’m slowly working up the courage! :)
The table looks so great! Would love to have a table like this one :)
I love your table! I would have never thought of doing that. Thanks for the great tips!!
You table looks great. I would have never thought of doing something like that. Thanks for the inspiration!
I love it! Great job, I have a question – I’ve done the opposite before, like your paisley, where you stained after ( http://ninered.blogspot.com/2012/02/school-of-restoration-striped-round.html ) but I’ve always wondered if painting OVER the stain would cause any kind of… leeching? How do I explain….I was worried the oil based stain would over time come up INTO the paint, so I was thinking of sealing between the step. What’s your opinion, have you had any trouble?
You know, I didn’t really think about that but it sounds like a totally legitimate concern. This table has been done for about a month now and that hasn’t happened at all, but that doesn’t mean it couldn’t happen over time. I wouldn’t think it would be TOOO drastic though, even if it did leech.
Wonderful, maybe it’s not a concern! The stain probably dries enough and doesn’t leech up. I did one table where I sealed it and then painted on top, because I was worried about that, but the new problem was paint sticking to the seal…! Maybe it would give it some nice age 20 years down the line. Great work, I want to stencil soon – it’s been forever! Need.. more.. space… haha!
Do you have any tips for painting your chairs? I’ve been working on mine. Everyone has told me to use spray paint, and I tried and hated it… but I’m having a hard time getting them to look nice!
I love your ideas. I was looking online for DIY ideas for Christmas when I came across the paisley table on pinterest. Then I started looking at the Domestic Imperfection website. Kudos on some fabulous DIY projects. After reading more about the paisley table and the inlay table, I got inspired to take an old coffee table and matching end tables and create my own stencil with stain creation. Just wanted to say thank you for the inspiration. I am halfway through the project and getting really excited. I have put family and friends on the lookout for random wood furniture that they find so that I can keep making more and trying out different designs.
So glad you were inspired! And look at you already starting on Christmas stuff, you are way ahead of me :)
I just loved the step by step photos of two year old chair prep help! I can so relate!! ;-) But, you know, barring a few of those 6 hour nappers, I wouldn’t trade any of mine for anything. The table turned out lovely by the way!
Holy cow! That is awesome! I’ve never seen anything like this and wouldn’t have thought it was possible to DIY something like this. Nice work!
Thanks so much Dorris :) I’m glad it turned out well because it took forever!
That is super gorgeous! I have a table that I have been wanting to do something to the top of. I want to try this! Was the stencil expensive?
Ashley, I love your table! It’s always a thrill to see my stencil kits ‘out and about’ in the world, and I think your corners in particular are amazing! ;) Thanks for using my stencils and sharing the inspiration with your readers! Happy Holidays – Kim
Ack, Kim…thank you! I’m glad you appreciate my corners, lol. I have to admit, when I was writing this post I thought “I hope Kim doesn’t take it the wrong way that I picking on her corners…” and then that thought was quickly followed by one that went something like “Oh who am I kidding, Kim is never going to read this.” But look, here you are :) Thanks for taking the time to comment (twice!) and Happy Holidays to you as well!
Ashley, I just wanted to give you a shout out and let you know I used your idea for staining over the stencil. I love it. I just snapped a picture before going to bed http://aldanadecorativeart.com/2013/02/14/making-of-little-table/
Hi Ashley…that was a very cool turnout. I am highly impressed…I am from Pakistan ..can u plz tell me that from where I can get this type of stencil?thanks..
Of course, the stencil came from this website http://www.cuttingedgestencils.com/indian-inlay-stencil-furniture.html . And they ship internationally!
This table has me speechless! It’s gorgeous. I do have one question…what did you use for the white paint before adding the pearl?
Thanks! I just used regular ‘ol latex wall paint.
I just bought that stencil and i want to thankyou for the tips on corners. I think your table turned out great!
Table looks awesome but one thing I would do different is left legs and back of chairs black orrrrrrrrrr if painting grey stain the seats to match the table as painting the seats don’t seem to fit the flow .
I have this breakfast table I bought on Amazon. Its a foldable round leaf table made of light colored wood. Do you think I can use these stencils to work on the round table. I am not sure how to do the curves.
You’re in luck, Cutting Edge Stencils just came out with a round version of this stencil. It looks WAY easier to use too!
http://www.cuttingedgestencils.com/indian-inlay-stencil-medallion-kim-myles-stencils.html
I just saw the link. But, my table is a little bigger than the stencil size, have to figure out a way to cover the additional part.
Thanks
I absolutely LOVE this! You did an amazing job and I cannot wait to try this on my dining table. Approximately how much paint did you need for the table bottom and chairs?
I can’t really remember, it was so long ago now! I think that if you just bought a quart it would be plenty.
The table is beautiful !!!!!. I can appreciate all of the time and work that you have put into it. And I can also appreciate how it feels to do something that comes out soooo nice. I want to apologize up front for the comment I am about to make. I wish you had pick a different color for the chairs, perhaps an off white,cream, or something a little more cohesive to go with the table. I feel bad to have perhaps hurt your feelings because your work is so good and when someone has a negative remark I know it can make you feel bad and I am sorry. I personally think some other color for the chairs would have brought the whole set together a lot better. Love the table and your did a GREAT JOB.
Debra, you’re sweet :) You certainly didn’t hurt my feelings, I’ve gotten some pretty thick skin after a few years of blogging! Everyone has different opinions on stuff like this and readers are always welcome to add their two cents. I’ve learned a lot from my readers! I think white or cream would have looked great too, I used blue because I did this for my inlaws and they wanted a darker blue color to blend in with some of the decor they already had.
Stunning!
This is awesome!! I always have trouble with my stencils leaking through. Any tips? Great job on a beautiful table!
Could you please tell me the top measurement of your table? I know you said it wasn’t exactly a beginner’s project–but I’m willing to try–and the size of your table would be a big help. I’m thinking it could be the same size. Many thanks!
I am definitely going to do it but what paint did u use for the stencils? Tjoko paint or white acrylic?
Thanx for dealing it with us
Kind regards
Edna Steyn