
The Cutest Table I Ever Hated
I’m going to start this post off a little different than normal and show you the finished product first.
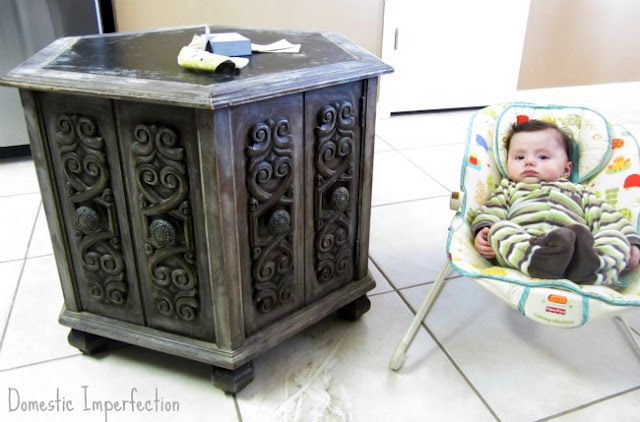
See this adorable little table?

It was a total pain in the butt. Projects going wrong before they go right seems to be a theme around here.
.
I bought the table back in January for $10 at a thrift store. I actually finished it last month but couldn’t show it to you because it was part of the Every Creative Endeavor contest (it won first place in round two!).
.
Here is the before picture…

(In case your wondering where my crappy $5 table went, it now happily resides on the other side of the couch.)
.
So here’s the process. It may seem like I did this in a matter of hours or a day or something…it actually took about a week of being an in-progress mess on my kitchen floor (aka my workshop). Just FYI.
.
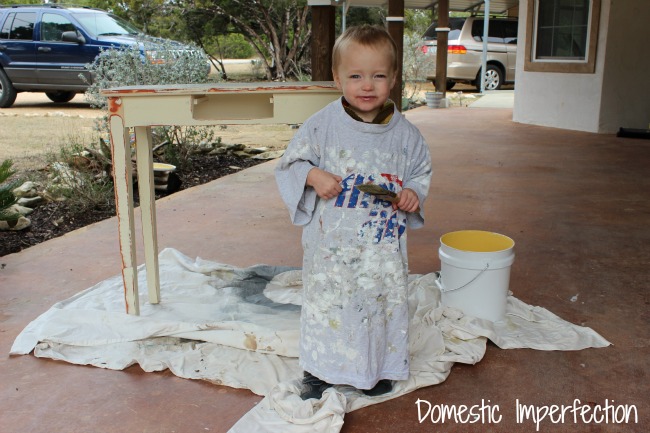
First, the boys and I sanded –
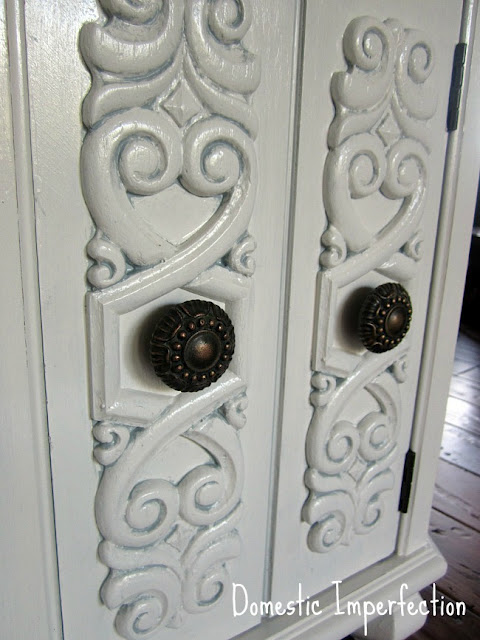
and then removed all the hardware.

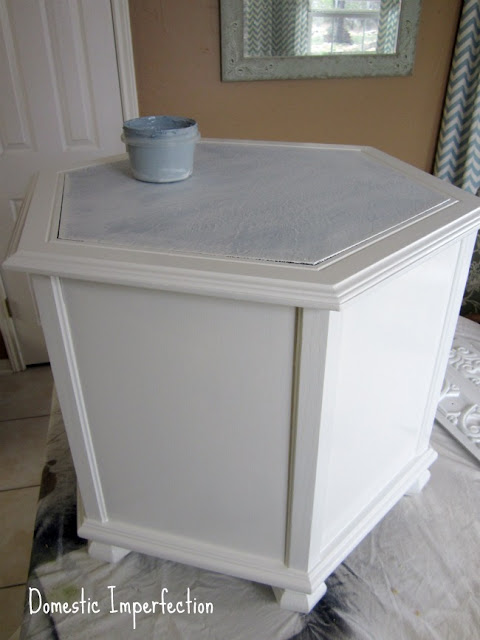
Next came the painting. This piece wasn’t the easiest to paint, spray primer would have made it an easier process.
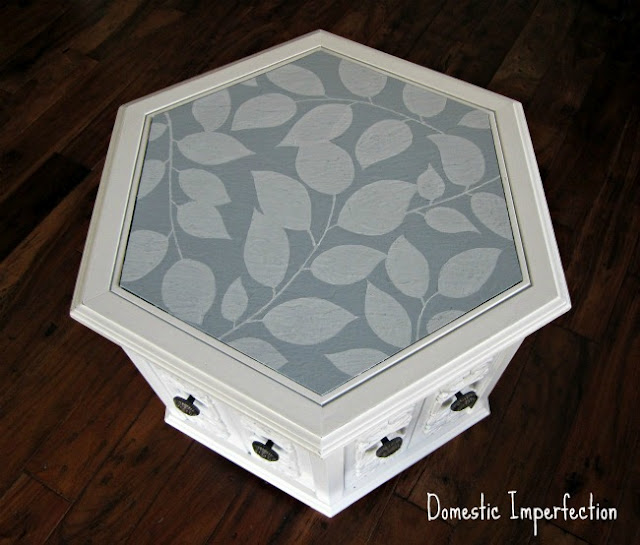
I wanted to do a design on the top, so I painted the octagon insert blue (left over from the toy box – which I had mixed from leftover kitchen paint. Resourceful, yes. Cheap, you bet!).
For this part I turned to my friend Katie from CRAPTASTIC, who did a tutorial for her zebra table.
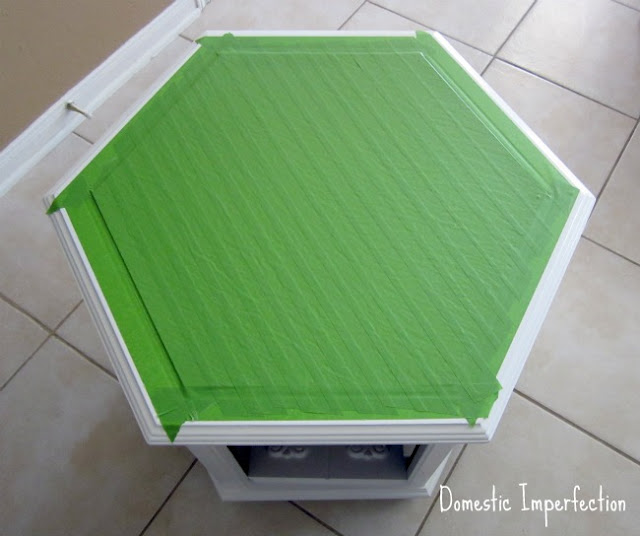
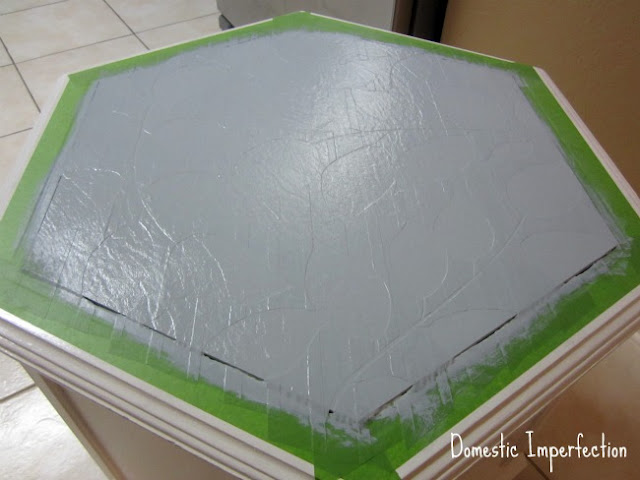
First I taped off the outside..
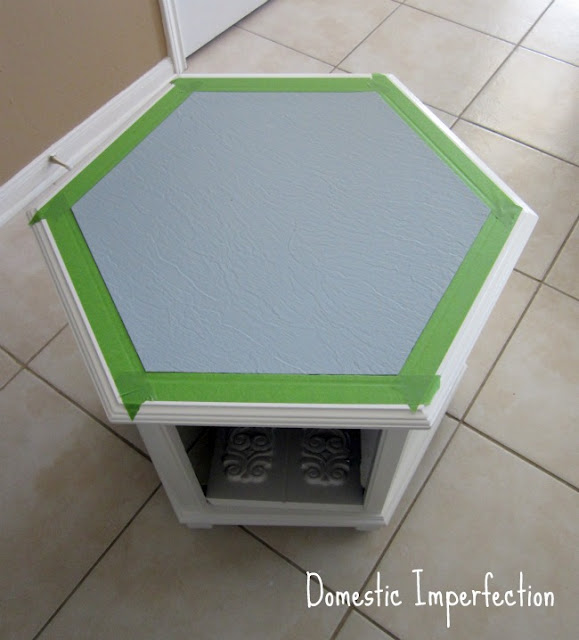
then completely filled it with painters tape (This is frog tape).
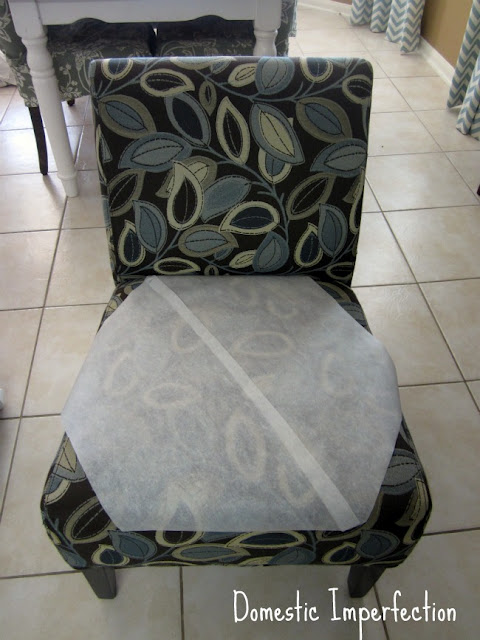
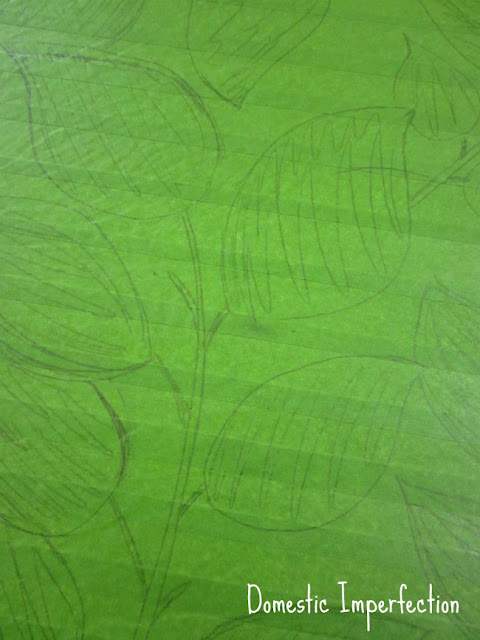
I decided to copy the leaf pattern from a chair I have in the living room, so I tried to trace and transfer it using parchment paper.
It wasn’t working out all that well though, so I ditched that idea and decided to free hand it.
Much easier.
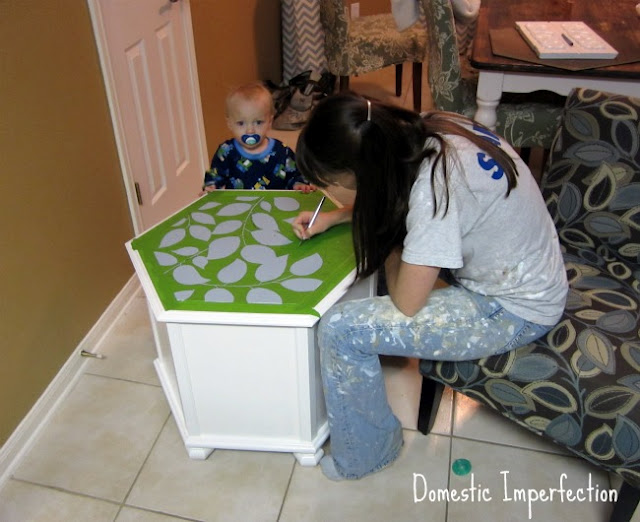
Next I cut it out using an exacto knife…while wearing my painting uniform of course. I swear I wear regular clothes sometimes!
Then I gave it a quick coat with the base color again. The top is textured and I wanted to keep the lines crisp, this way the base coat fills all the cracks instead of the pattern color. I didn’t let it dry all the way before applying the leaf color – which was the base color mixed with white.
Then came the exciting part – taking the tape off to reveal my perfectly crisp leaf pattern.
.
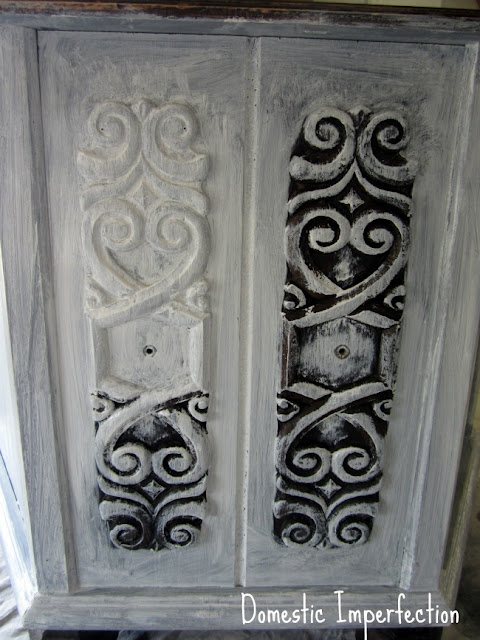
Except that’s not even close to what happened.
.
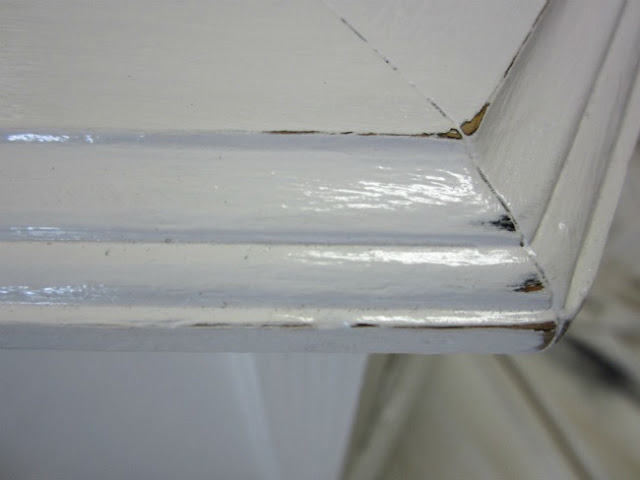
I caaaaaarefully peeled back the tape…..and when I was done, well, this is what I was left with.
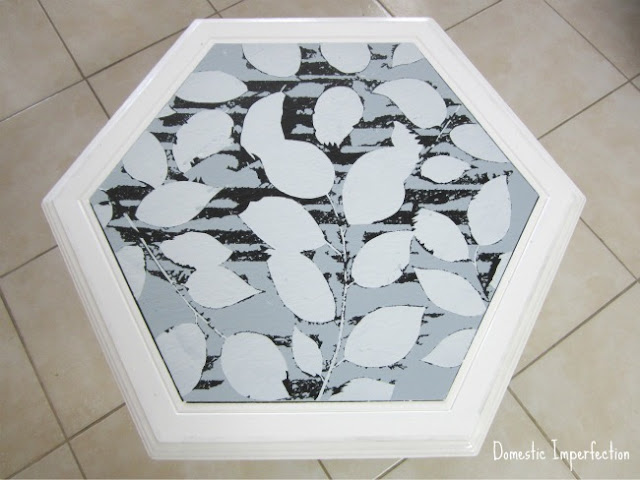

I did not freak out -at least not out loud. I hurried over to my pantry and grabbed a ginormo handful of chocolate chips and thought about how I was going to fix it.
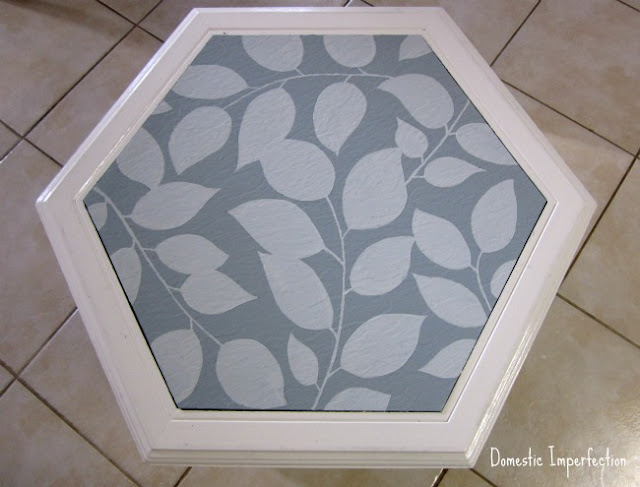
Now, if I wasn’t entering it in a contest I would have painted it over in blue and called it a day. After four days of working on it I was pretty over this table. But I WAS entering it and I had to make it work.
So yeah, I hand painted it. It took two more days worth of nap times… and along the way I really started to hate this table.
Thank goodness it turned out well!
The last step was to glaze it. You can’t have a furniture piece with detail like this and not bring it out with glaze, right? I used the same process as I did with my experimental frame and used the base blue color.
Glazing didn’t really go as planned either, but when I compared the finished door with the plain one I had to keep going.
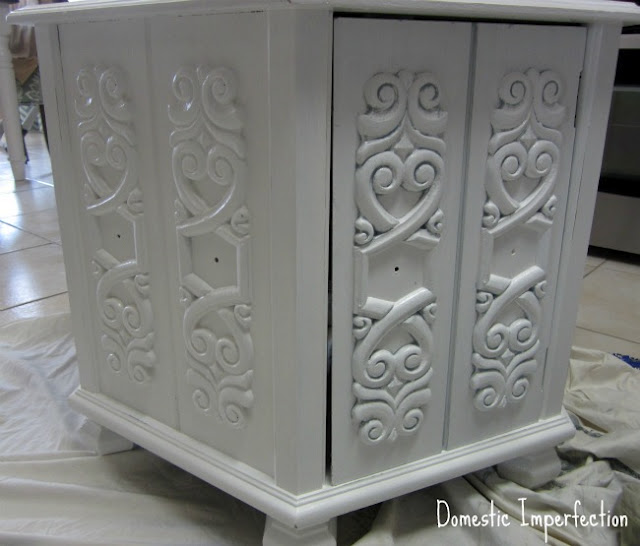
Next I gave it some super light distressing, put the hardware back, on and was done…finally!
Here is the finished product again….and you know what? I. LOVE. IT. It’s the cutest table I ever hated.
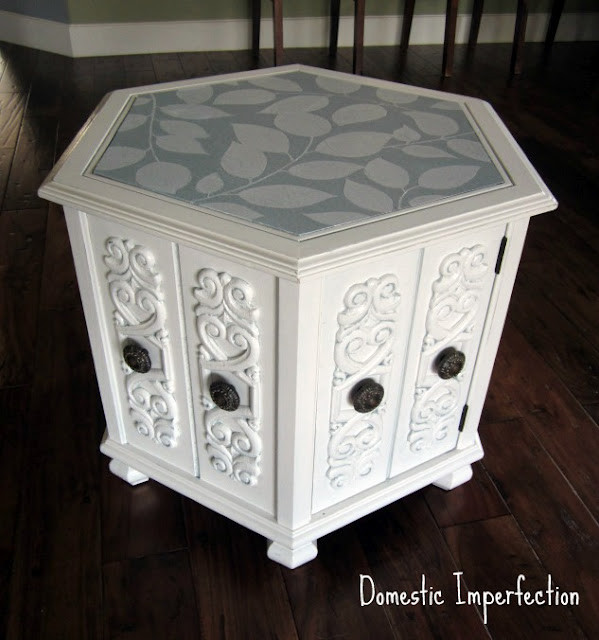

I’m so glad I stuck it out…I love how unique it is. I also love that it only cost ten bucks and was made just for my living room!

Looking for more furniture ideas? Check out THIS POST.

Ashley – that table is absolutely gorgeous! Im in love with it! And well done for winning round 2 – awesome. xx Nat
http://northshoredays.blogspot.co.nz
The table came out amazing! I LOVE the shape and the details, so jealous of your $10 table. What brand of painters tape was that! I wouldn't want to use that again!
That is adorable! I would have had an absolute fit if I had pulled off the tape and seen that! It turned out great though!
Allyson
http://cupcakescandycanes.blogspot.com
It turned out awesome Ashley!! congrats on the first place!! That stinks the frog tape didn't work, but you did an awesome job with the hand painting!
I see similar tables all the time…and always pass them up…but not now…this is gorgeous! Paint is amazing!
Wow- it looks awesome! Way to stick it out! I have a table I have worked on and love, and last night I left it outside after a put a protective clear topcoat on it, and I forgot about it! Uggg!! This morning? bubbles….. :(
It turned out great! Don’t ya just hate when a project goes wrong? I have some that I walked away from because they did that, but then there are those ones that I stuck it out with. I am always glad when I stick it out. Maybe I should pick up some of those I walked away from and get them finished. You have inspired me.
Debbie
OH my! I actually have a table very similar to this in the before shot. In it’s former life in my son’s bedroom I had done a little job on it with world map wallpaper, now it’s stuck in my guest bedroom – purely functional – and I was considering giving it away. Change of Plans! Woohoo! Thanks for the inspiration.
This looks great! I would love if you came by my Creative Inspiration linky party happening NOW to link it up!
I would love to have you there!
Stacey of Embracing Change
http://staceyembracingchange.blogspot.com
Who would have thought it could turn out so cute?!?!
I think it came out great – I have projects like that all the time…Those octagonal pieces remind me of the 70’s. I know I am dating myself. They were the style back then. Glad to see they can be magic-ed up (:
It looks wonderful! What a good job you did. I ‘m a new follower on linky, and I would love it if you came by to visit me and link up to my linky party this Sunday @http://www.arosiesweethome.com/
Hope you come
Rose
Your table looks fantastic! Thanks for showing us your step by step…including the first try at painting the top. As a fellow DIY’er, it is nice to see that others have those moments too! How nice that you have a little helper :)
Have a great day ~ Laura
Well, not that it’s any consolation, but I’m glad to see that these kinds of project dilemmas don’t just happen to me. It turned out fabulous in the end and looks like it was so worth it!
What an amazing transformation! I love it! I would love it if you could link it up to Fantabulous Friday going on now!
http://littlebeckyhomecky.blogspot.com/2012/04/fantabulous-friday-7.html
Hope to see you there!
I love what you did! SO cute!
The finished result looks great! I’m loving your calming chocolate chips tip! ;) Next time I freak out over a craft fail a hand full of chocolate chips will be in order! ;) Thanks for sharing on Fancy This Fridays Ashley!
What a great idea! I would love you to share this at my blog party this weekend. Hope you can join in.
Oh, my goodness! It turned out beautifully, but what a lot of work that table turned out to be. I probably would’ve cried when I peeled off the tape. The detailing on the sides is absolutely gorgeous, and your hand-painted leaves are simply perfect!
Some people cry when thigs go wrong, other eat chocolate, lol.
Visiting via Addicted 2 Decorating. I absolutely adore your table.
I created several spring projects on my blog this week. Please stop by if you have a moment.
Have a lovely Easter weekend.
Visiting from Finding Fabulous. Love how your table turned out – the leaf pattern is great! I have a similar table in my stash and need to get moving on it :)
That turned out beautiful! As much of a pain in the butt the glazing was, it made a world of difference!
This WAS quite the project (especially with a little one watching every step of the way it seems :) but it’s a good thing you persevered — the end result is just beautiful!
SOOOO CUTE!! definitely worth all the trouble! I did a VERY similar project on an hexagon occasional table too… I would love your feedback! http://www.littlehouseinthebigd.com/2012/01/blinds-drapes-occasional-table-oh-my.html
Samm
http://www.LittleHouseintheBigD. com
This is so adorable! I’m glad you stuck it out :-) I feel like throwing in the towel often when things go awry in DIY land! Loved the blue glazing idea btw. I’ve only ever glazed with brown, so this has opened my mind to a whole new world. lol
If I threw in the towel whenever things went awry nothing would ever get done…I feel like I do most of my projects twice!
Two years ago I would have run away from that “before” table in a jiffy. But now I know the potential of once-ugly pieces. Love what you did with the table, especially the pattern on top.
Two years ago I would have judged anyone that bought it! Now look at me, lol.
this is really beautiful. i would love for you to link this post or any other posts you want up to my weekly link party called spread the love. it’s a weekend wrap up party where you can share anything and everything you want! there is also a really awesome vinyl giveaway going on there right now too, so go check it out! http://www.lovenotesbylauryn.blogspot.com/2012/04/spread-love-5-decallove-giveaway.html
have a wonderful weekend!
{love} lauryn @ lovenotesbylauryn.blogspot.com
I love the way this table turned out. I am following you in theblogfrog. I am very interested in finding out more about no spend February the the contest you entered with your table re-do. I am off to click on your links.
Michelle
Thanks Michelle! The contest I entered is still going on…this week is the final round. It’s been great motivation! No Spend February was kinda a bust…only cause I didn’t get much done. I’m planning on doing another (more productive) no spend month later this year :)
Your hard work was well worth it. This is so pretty. I love the way you created the leaf pattern on the top using frog tape. That’s a great idea.
Wow, I can’t believe that design is hand painted! I thought it was a decorative paper of some sort, glued down. You did a REALLY good job, it’s amazing!! I’ve had projects go bad and just gave up, good for you for sticking with it, I bet the contest was really good motivation to keep going and it paid off in the end!
Aww, thanks Colleen!
Gorgeous makeover, and your helpers are adorable.
This turned out so beautiful! I would love for you to share this with my Unveil Your Genius link party.
http://taylornorris.blogspot.com/2012/04/unveil-your-genius-link-party-5.html
Happy Sunday!
This is GORGEOUS!! I have a table Very Similar to this one that I found, get this, on the side of the road in my neighborhood with a FREE sign on it! I snatched it up and refinished it too although not nearly as creatively as you did! I’m a Texas gal too (also near SA) and have loved looking back over your posts…I totally “get” the struggles of the hill country! You’ve got yourself a new follower and I can’t wait to see what more you come up with. I adore inexpensive home projects and have been inspired to do some of my own! Thanks!!
Wow, what a difference! I think my dad used to have a table almost exactly like that! Wish I would have painted it. :) Thanks for linking up.
Anna
http://www.askannamoseley.com
I will say that you truly suffered for that table! I turned out lovely! ~ Maureen
Awesome perseverence, my friend. It paid of!!! GREAT job!
How gorgeous is this?! Glad you stuck it out, the end result is well worth it.
Love, love the transformation! I have had a few pain in the bum furniture projects myself that turned out to be worth it! Great job-pinning for future thrift store/garage sale projects.
Great table makeover. I love what you did with the top!
Great transformation!
… cute little helper too :)
Greetings from Australia♥
Great job! I love it! I have an old desk that needs a makeover and I love what you did with the leaf pattern on the top!
I feel your pain. Even though it took some time it looks great in the end!
Oh my…so cute! I use to have this same hideous table…a hand me down from someone. (I know they were glad to part with it! ) I wish I had seen the potential in the table as yours is great.
Wow, I really like this table. What a bargain, too ! $10 ? I wish my local thrift stores had such great deals and steals… And hating that table is what’s the best about DIY… You may have hated it in the process, but you can look back and be like, “Wow, yeh, I did that !” =)
it looks so much lighter and brighter! love the design you added to the top!
Most of the projects I do turn wrong before they turn right, I now expect it. Your table went from ugly to beautiful. Love how light and bright it turned out, and the details really pop. The leaf top is so beautiful and so glad you didn’t paint it after you pulled the tape off. Looks so very pretty now. Thanks for sharing you creative inspiration at Sunday’s Best!
What a sweet table – I can imagine those carved shapes were tough to work on. Really nice results – would love for you to link this to my Craftastic party:)
Looks awesome…really!
Wow, that did turn out fabulously! My favorite part is the top where you hand stenciled, you did fantastic, can’t tell it’s hand stenciled :)
It turned out beautiful! Love the color and stenciled top. I think anyone who dabbles in DIY can relate to the horror of a project gone wrong. Thankfully, we are resourceful and keep going and the end result is that much much sweeter. Nice work!
Your big helpers did such a great job. This table is a millions times better. Great job! I’d love for you to come share your post at my link party.
http://whitelightsonwednesday.blogspot.com/2012/04/wednesday-whatsits-4.html
So much hard work, but so definitely worth it! It looks great :)
Wow! What a beautiful project that turn out to be! I love that you ran for some chocolate chips when you had a problem!!! It’s just gorgeous!
I LOVE this little table. I hate it when projects take forever to get right, but it was worth all your efforts. I had to laugh at your painting uniform, because I have one too. I’d love for you to share this at my link party {It runs Tues-Sat}. http://adventuresofadiymom.blogspot.com/2012/04/terrific-tuesdays-10.html
Rachel
Love this! I would love it if you would share this project at the CSI Project. The challenge this week is stencil projects. Come link up!!! You just might win. The link party begins tonight through Friday.
http://www.thecsiproject.com
Hugs,
Dee, the CSI Girl
I am so very impressed that you free handed that. I don’t even mention free handing in the same breath as projects that I work on.:) It’s lovely!
Thanks! If you want to try freehanding you should do leaves…they are very forgiving!
(and ohmygosh, I love your name)
This is a gorgeous table! What a transformation! Thanks for sharing at oopsey daisy!
Awesome job! Love the transformation.
Mrs. Delightful
http://www.ourdelightfulhome.blogspot.com
Love the difference! The table top is beautiful and inspired. I had to give it a feature today! Have a great weekend!
I love it! I did lots of naptime crafts back in the day! I love how you didn’t get discouraged and just kept on going! Nice job!
~cathy
WOW – I have 2 of the Same tables – and I always knew I wanted to update them or else get RID of them. Now I know what to do! I was wondering, tho, if they could be spray-painted, then glazed…..Have any idea? Love your blog – check out mine. THX!!
I don’t see why you couldn’t spray paint and then glaze. I say go for it!
Darling. Well done!!! So, I am inviting you /your creative ideas over to our party at http://www.finecraftguild.com/party/ Our readers would love to find this!
What a fantastic finished project! I love the little leaf detail on the top, and I love that you showed the good, the bad and the ugly with each step! I literally pulled it’s twin out of a pile of cast off wood pallets behind an office park, yesterday. (I tend to lurk in these places). So inspired to “Redoux” it now. Thanks for sharing.
Amazing. I remember those old tables! My aunt had one! What a great makeover! Love it and the matching chair!! Great job!
Just came over from Better After because I just had to see the cutest table you ever hated. Wow! It’s perfect! Way to not give up on a project!
Your table turned out really nice!
Found you through Better After! LOVE your transformation & I LOL at the original “finished” project as it looks so similar to some of mine! I have had that exact experience and felt defeated. Next time, I will take your lead and eat a twinkie or something while deciding to keep on keeping on!
Love your blog!
What a great story to go along with your table! Thanks for linking up to Topsy Turvy Tuesdays, and I’m featuring your table this week!
I’m so excited! I read this post yesterday and absolutely LOVED it. Last night I found a very similar table at an auction for $10. This will be my very first refinishing project. I can’t wait to see my own before and after pictures. Thanks so much for posting.
Awesome! When your finished you should post them on my facebook page so I (and everyone) can see!
I saw this on before/after and I wanted to THANK YOU for showing your bug uh ohs…I was really feeling down because i just tried to do my first, lets make this better thing…and I used frog tape..and it bled a bit and peeled and just DID not look like it was supposed to…and I thought…obviously I suck at this…and then a week later here I am..and if a Great pro like you has these problems…maybe there is hope for me yet! Thank you for buoying my spirits!
You are very welcome! You don’t suck at projects…you are normal. Nearly every project I do goes wrong in some way…just read a few posts and you will see. I want to encourage people to do their own projects and I don’t think posting perfect pictures with perfect projects and not sharing mistakes does that very well. I’m really not a great pro…I just like to fix things up and happen to write about it. So keep up the good work…the best way to learn is by screwing up!
Hi Ashley..so you did another project that caught my eye…and I saw that you live in San Antonio too!!! I live near downtown in tobin hill. Well I wanted to give you an update. SO after my cabinets bled out…and i wanted to cry and give up..l.I saw your cutest table I ever hated post…so serendipitous…and it made me wipe off the tears…go get a small craft paintbrush and carefully paint in the lines and touch up…and guess what??? it looks as fabulous as junky old cabinets that I need to live with for 3 years while we save up and replace the roof and walls, cement, baclony… AND THEN the kitchen and the cabinets in our just bought 104 yr old house ( we already paid for the plumbing and leveling) can look. I remember when i just kept staring at them…soooo sooooo sooooooooooooooo ugly, and dirty and nasty, and they don’t even line up right. And one day I told my husband..we are fixing up those cabinets…and he says to me with his mouth full of yogurt..why? we are going to replace them anyway. And me on the brink of frustration because ive been staring at the ugliest cabinets i have ever seen in my entire life for a couple of months say, “yes, but not for at least THREE years!!! And I’m the one that has to look at the ugly things and work on them!!” SO that basically ended that discussion ( i think he quietly muttered something like sheesh, it was just a question) And I have to tell you, they really look decent now. I no longer contemplate if maybe it isn’t better to just chop with my eyes closed and risk chopping off a finger to spare my eyes the pain of looking at those things….a lost finger worth it?…maybe. If you’d seen these cabinets…you’d quietly agree…yeah maybe it would be worth a lost finger to save your eyes the pain of looking at the brownest, uneven ugliest cabinets ever. Anyway…the point of this follow up post was that..Thanks for the encouragement! My project came out pretty great!
Ashley – I will have to share with my sister (Ashley) that she is not the only crafty Ashley I know now! I enjoy reading the process of your project especially this one, “I hurried over to my pantry and grabbed a ginormo handful of chocolate chips and thought about how I was going to fix it.” I laughed out loud as I would do the same thing. Thanks for an awesome blog.
Hello! I love your table!!! Super cute. I am addicted to anything with leaves and trees. So i have to ask, where did you get the chairs you got the leaf patten off of???? :)
I bought that chair from Overstock.com a couple years ago.
AMAZING! Your freehanding turned out fabulous! No spend February – can you tell me more?
wow, what a huge difference!!! i love it!!!! and i love how you stenciled the top. :)
Wow! All that hard work SERIOUSLY paid off. AMAZING WORK! I can’t believe you free-handed and hand painted that leaf design. GORGEOUS!
I have an end table that is very similar to this. U have any idea what it is called brand wise or whatever. I’m looking for a 2nd one to pair with it
I love this so much! My daughter just bought a table almost identical to this to make a house for her cat. I’m sad we’ll be taking the door off (hers only has one) because I love the pattern. We were trying to figure out what to do to make the top more interesting (hers doesn’t have the insert) and this gave us some really good ideas. Great job!
What do you use to glaze it?
I have that exact one. I was wondering if I should sell or re-finish.. It looks great, even in the hexagon shape lol.
I have these exact same tables. They are currently white with a black top. But I want to change them to something softer on top. I love, love this. Do you feel like putting a coat of satin poly or modpodge over it before doing the stencil part would help in avoiding the peeling?