
Let The Renovations Begin!
This past weekend we started our kitchen renovation with the most fun part…painting cabinets! (That’s sarcasm, by the way). Despite the fact that painting cabinets is sucky, I was stoked to get started. So here is a photo bomb post covering the process. It mostly consists of a SUPER messy kitchen, me looking less than awesome, and my husband’s back. And now that I have you all on the edge of your seat, let’s begin.
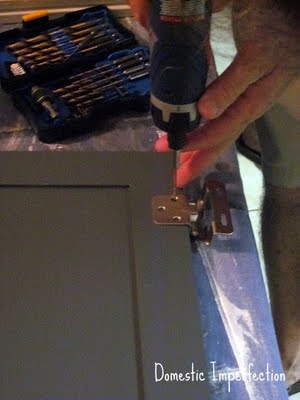
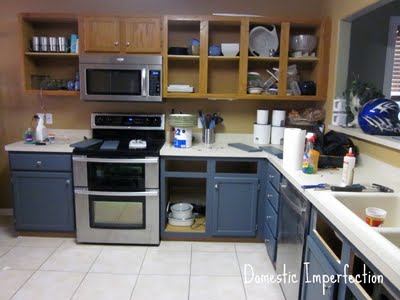
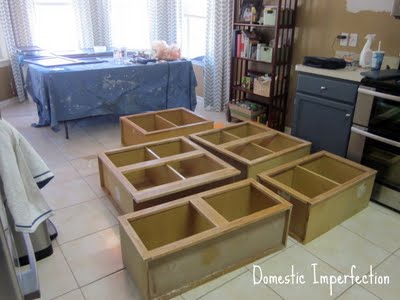
Saturday morning – bright and early – the destruction begins. We started out by removing the drawers and doors, sanding, and priming. Elijah began the day by stuffing screws into the back of the oven.

Next we have photos of me painting. I also realize that this is the first time I’ve posted a picture of myself on this blog, and I can’t have the first picture you see of me be a paint covered, no make-up, crazy hair disaster. First impressions are very important after all. So here is a good picture of me before I post all the terrible ones.

and now back to business…
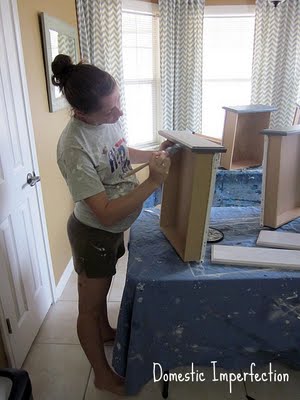
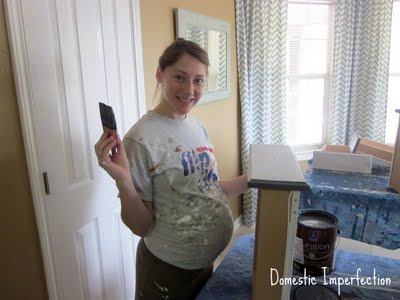
Oh, and something else most of you didn’t know…I’m pregnant. Significantly pregnant. I’m 30 weeks on the nose in these pics.


Then I did something totally unexpected…I started painting.
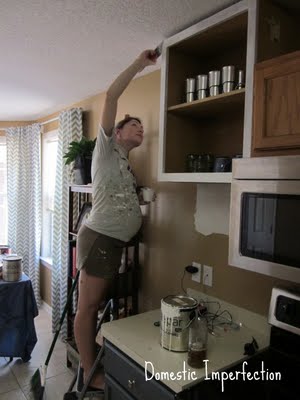
You may be wondering if I am wearing the same clothes two days in a row. Why yes, yes I am. They’re my painting clothes, I was painting. I’m not one of those people that can paint in nice clothes and come out of it unscathed. I’m messy. Normal people (take my husband for example) paint in regular clothes and then when they get a little drip somewhere they have to stop what they’re doing, go get a rag, blah blah blah. ME? I wipe the drip up with my hand, wipe it on my clothes and keep going.
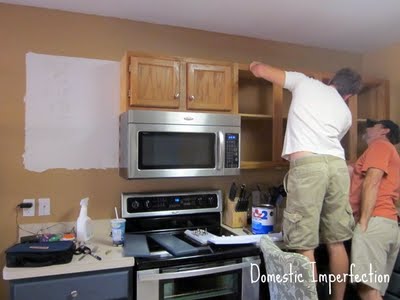
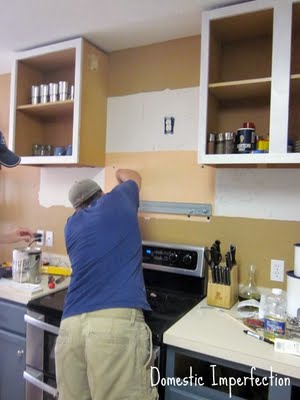
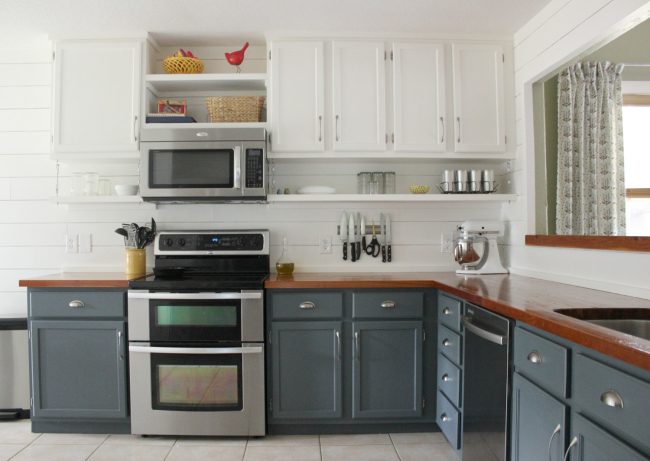
We also decided to raise the microwave so that the bottom will be even with the floating shelves. It only went up like two inches, so we can still reach it, no worries.
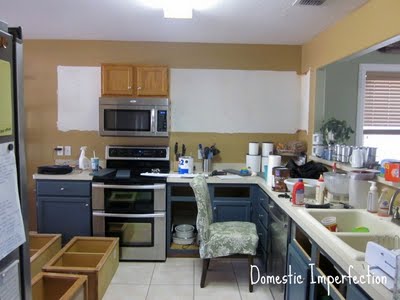
This is what what we looked like Sunday evening. We couldn’t hang the doors yet because I was still painting them. The white wasn’t nearly as good to me as the blue was. It took five coats on those babies to have them look decent. That’s five on each side, so it felt like ten. I didn’t finish until yesterday (Tuesday) night.
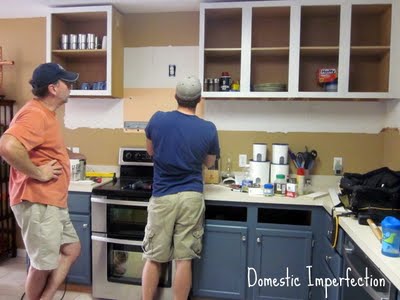
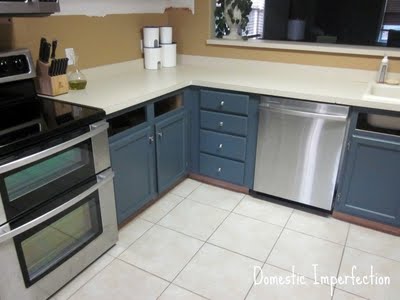
This is what it looks like Wednesday morning! Not an after picture by any means, but a huge improvement nonetheless.

Above the microwave we are going to do bead board and open shelving.
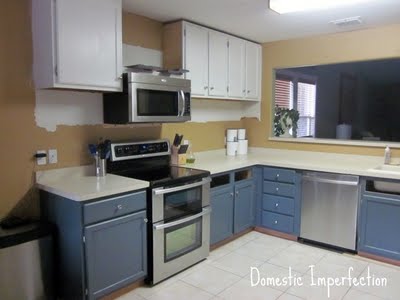
There are two missing drawers because that cabinet is a sink base cabinet, which means the drawers were fake. Why? I have no idea…builders cutting corners I guess. Anyway, we’re in the process of making drawers. Also, none of the lower cabinets had shelves (no pics, sorry) and everything has precariously balanced since we moved in. Now we have shelves…so nice!
I’m not going to paint where the cabinets used to be – that will all eventually be covered up by bead board. I can’t show you a picture of the other side of the kitchen…that’s where I had to push all the mess so that I could take pictures of this side.

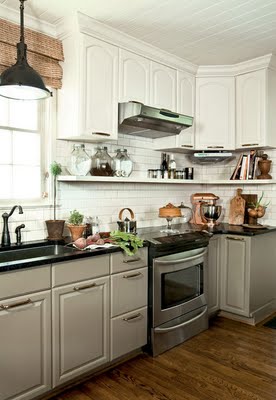
And that’s where we’re at! I’m really loving the grey/blue lowers, I think it gonna look great once its all pulled together. Isn’t it amazing that a coat of paint (well, a lot of coats of paint) can take crappy old cabinets to sleek and modern?
Kitchen Remodel Links
Shop the Look

Love, Love, Love it! I have been complaining during the process of painting and am so sick of it (we did 4 layers of polyurethane on top of the paint), but after seeing you pregnant and painting I can no longer complain. I also painted my top cabinets a white/cream color and the bottom ones darker. I even thought about that same blue color at one point, but mine look more like your inspiration picture. Thanks for sharing, I love seeing what others are doing in their kitchens.
I love the colors and the change made by raising the cabinets slightly. I can't wait to see it when complete…it is already a huge improvement!
Great Job, looks like tons of hard work but the results are/will be worth it!
I love all of it, My husband is not going to be very happy when I tell him that he has to help me raise up the kitchen cabinets this week. You gave me so many good ideas all the way to the bead boards backsplash!! You are so awesome!!!!
Loraine from Breakfast For Dinner.
You are too funny! Love your blog! Very inspiring!! Great Job!
It's looking amazing!! I love the two colors. The beadboard is going to look perfect! Can't wait to see the finished project. :)
i LOVE it! I've been wanting to paint our cabinets for awhile now, but have never decided on the right color. I'm really liking this combo tho!!
Great Job! I can't wait to see the final product! :)
They're looking great! Love that blue with the stainless steel! Can't wait to see the floating shelves and bead board!
Looks fantastic and I liked seeing your pics as this progressed.
The best to you!
d from homehaven
They look great! I've always loved blue cabinets for some reason, and yours are turning out great. Can't wait to see everything pulled together.
(You look great, too!!)
That looks great!! I so love the idea of cabinets to the ceiling and a floating shelf below…sorry had to steal that photo for “pinterest”..I have to remember that for a later date…
You are the cutest DIY pregnant woman!!!
This is so cool! I've looked at the same pictures as your inspiration and wanted to know what it would look like in a real kitchen. I'm a new follower so I can be around when you've added the beaded board and lower shelf. Great job! By the way, I'm a messy painter like you too. And I do paint (and other) projects hugely pregnant! :)
awesome! i am about to tackle repainting some cabinets and have never done it before – so scared!! Did you use a brush or a roller to paint the cabinets???
It's looking fabulous!
Love your kitchen so far!! I just came over from “Making the World Cuter” and am now a follower. We are debating whether to paint our bottom kitchen cabinets black or grey….your pictures are making me lean towards grey. Great job! Feel free to come visit me
http://blissfullyever-after.blogspot.com :)
~Jennifer
Wow!! Just plain fabulous!!
Can you share the exact SW color you used… I would love to copy. We are renovating a cottage & the cabinets need to be re-done…
Great transformaton!! & kudos to husband for raising those cabinets
that guy gets the gold star this week… : )
I’m also looking for that SW color. I love your kitchen. I have wanted it for a while. My hard decissions is I have 1 cabinet with a double oven and don’t know to ” split”. The color. Any advice
Girl!!!! It looks so awesome!!!!! Great job on everything! Very cool & inspiring. Not that we own anything to paint or remodel. Last time we were homeowners may very well have been the last. You guys are rockin' it though! I should have known…all that hard work at Jackie's…
Love the kitchen so far, can't wait to see it all finished. I share the stigma of being a messy painter, all of my clothes are slowly turning into my “painting clothes”
Really appreciate you linking up this awesome masterpiece at the Creative Bloggers' Party & Hop :)
Wow, you guys have done so much work! It looks awesome, thanks for the step by step! I love learning stuff like this for when we have a home! Visiting from Homemaker on a Dime!
http://www.modernwivelyhood.blogspot.com
What an inspiration!! I LOVE this kitchen!! I can already imagine all the pretty beadboard and how gorgeous it will be. I am dying to re-do our kitchen… I love what you've done! ps… I thought it was hilarious that you put your 'before' photo up! :o) You are cute, even with paint all over you!
Erin – I used a brush, but I think a combo of a super small roller and a brush (for the corners and whatnot) would have worked better. Good luck on your cabinets!
Hey great renovation! I finally just got our 70's kitchen pics posted with white cabinets to :) Fun stuff!
Wow! I think you must be some sort of super woman–to do all that while 30 weeks preggo! I repainted our cabinets last summer–before we moved into our house–and it was still a huge pain! I can't imagine doing it while living here, using it, AND being pregnant! Go you! The change is amazing! You have me wanting to repaint my lower cabinets, lol–if only I didn't know how much work it entails! ;) Can't wait to see the finished kitchen–it's going to look great!
Good luck with the reno! Can't wait to see it finished! You can see the results of my kitchen reno featured in the September Romantic Homes magazine! Stop by my blog for the before and during photos!
Now Following!
~Mikey @ Shabby French Cottage
http://www.shabbyfrenchcottage.com
LOVE! My sister wants to do this with her kitchen so I'm sending her the link. She'll LOVE this version! Very cute!
So impressive, esp with all the work you did being 30 weeks pregnant! It turned out so well!
It looks great so far! I'm envying your kitchen's style even on these in between shots. This kind of redo wouldn't work in mine, but I wish it would!
And WTG on persevering through 5 coats!
It's looking good! I really like that bottom color. I can't wait to see it all finished. I also have painting clothes – I am really messy when painting.
I love your painted cabinets! They're so pretty! Thanks for linking to Wicked Awesome Wednesday!
Your kitchen is looking amazing! You guys really put in a lot of hard work and it shows. I'd love it if you'd stop by my blog and check out the giveaway I'm having for a Dremel Trio!
Beautiful! Be proud.
I'm a painter, and I can say that sometimes it takes that many coats to get it right, so good for you for sticking with it. Duration is excellent paint, by the way, so excellent call there.
The idea of raising your cabinets is genius.
Really enjoyed your post. I found you at Handy Man, Crafty Woman.
looks great! thanks for sharing! you rock!
This is already an amazing redo! But what is so amazing is…you! I hope you get it all finished before the baby arrives.
That is a big project with a little one running around! I really like how you used white paint on top, gray on bottom. I can't wait to see the finished kitchen. You look super cute pregnant too.
What a terrific job you're doing! I love it! Hope you'll post the 'final reveal' next week!
This looks fabulous! And I love your little baby belly helping you along with your painting skills :) I just finished up my kitchen painting project…I know how much work you had to do!
FOund you on Linking with Luna!
http://www.releasemecreations.com
Looks absolutely beautiful already! I can't wait to see the finished room!! Would love for you to come share this at Feathered Nest Friday sometime! :)
I am super impressed, not only have you done an awesome job on your kitchen but you have done it all with a toddler around and a baby in your belly!
I want to paint my kitchen cabinets but haven't worked up the nerve to put in all the work ha ha. You make it look totally doable!
Stopping by from Flaunt it Friday!
Wow, love it! The beadboard is going to look great with it!
Rondell
I love this! it's so great that you're going bold with the color – it's going to look so great when you're done!
I've been wanting to paint my kitchen cabinets for ages and keep chickening out. You give me hope that I can do it too!
I love your painted cabinets. I like the white on top with the blue on the bottom. That's a great idea to raise your upper cabinets to ceiling height. I think a shelf running around will be so handy for those items used everyday. I would love to paint my wood oak cabinets. I'm so tired of them. I, too, have painting clothes. I'm a mess when I paint too. And my hubby isn't. Just like yours. Well done and thanks for sharing. It looks just fantastic.
Very impresed with your chosen design, especially the colour combo and raising the cupboards. How useful it is to have a handy husband and family. Love your photos and yes I have paint clothes too. You are going to have a beautiful kitchen in the end just because you were willing to think out of the box and have a go yourself. Looking forward to seeing the finished look.
I clicked over from TT&J and, I'm addicted. I adore you “new” kitchen.
You are too funny and this is going to be awesome! I need to follow you so I can see how it turns out!
It's looking great!! I love the cabinet color!
xoxo
Jen
you have done a wonderful job! Great idea to raise the cabinets and put in a shelf. The paint color choice and the execution of it is genius! Will be watching for the final reveal.
It looks so good already! I can't wait to see it finished. I love it that you went with the blue on the bottom cabinets.
Krista
krista-artista.blogspot.com
Hello! I found your blog from a link on Addicted2Decorating and am totally excited to see your kitchen renovation. I have long been a fan of raising upper cabinets, just makes the space feel roomier. Happy Renovating!
-Cora
I love your color combo. Your kitchen will look beautiful!
Well done! Your kitchen is looking great! Thank you so much for linking up at Savvy HomeMade Monday. I hope you will link up again!
You are seriously brave! I thought painting the bathroom cabinets was going to kill me… I haven't even started the kitchen! Good work I love it! Can't wait to see what else you are up to… I'm your newest follower! :)
Meaghan @ thismessybusiness.com
I love the idea of having two different colours on your cabinet, keeping that in a corner of my brain… for my future kitchen remodel. I'm very impressed by that picture of you paiting on the ladder with your belly that big (no offense intended, I'm really jealous of the balance you have while being pregnant!)
LOVE IT! The base color is a fantastic idea with kids. I just painted all of my cabinets white in the past couple of months and have been regretting it ever since. They get so dirty so quickly with little hands or dropped cups of juice. This gives me ideas.
I want to thank you for linking up on my “Sundae Shake Up”. I love your new kitchen! You did a fabulous job.
I have a little bit of information for you. I will not be hosting my “Sundae Shake Up” party until October due to a new project that I'm doing… “30 Day Photo Fun Party”! I will be taking pictures based on a daily theme, and have invited all of my followers and friends to join in on the fun. I would love it, if you joined too. Stop by my blog for more info.
Jacque @ Jacque's Soda Parlor
thesodaparlor.blogspot.com
Looks gorgeous so far! I love the idea of raising the cabinets and using the shelf!
This looks great! I love the idea of raising the cabinets. Ugh, now I totally want to do that. If my husband tries to kill me, I am totally blaming you. :) We are in the middle of renovating our kitchen too. Can't wait 'til it's done. And I can't wait to see yours finished! New follower! :)
So when do we get to see the finished project? I can’t wait to see the bead board and floating shelves! Please oh Please tell me there will be an after after picture coming soon :) Love the Blue on the bottom cabinets!
Girl, I could have written your comment! If I could finish it myself than it would be done already. I told my husband I’d give him a month of not asking him to do any projects (we’ve been on a roll lately), but after that he’s fair game ;)
LOL I guess we should give him a bit of a break. You guys have done an AMAZING job on the house! I love the curb appeal, guest room, and the laundry room just to name a few.
You’ve been busy reading, haven’t you? Thanks so much! Sometimes I feel like we’re moving slowly, but then I look back at the pictures from when we moved in a year and a half ago and think we’re doing pretty well.
Hi!! I love this renovation! Could you post a picture of the finished product above the microwave with the bead board please? Thanks!!! I love all of your projects!
I would LOVE to post a picture f the finished product…except it’s not finished yet. I KNOW, how long can a kitchen renovation take? Turns out a really long time when you don’t work on it, lol. As soon as it’s finished I’ll post all about it, promise!
Absolutely love the finished kitchen cabinets!!! I know it was a lot of work but you were able to save so much money doing it this way. I enjoy your humor & honesty. :D
What is the name of the blue Sherwin Williams paint that you used? Thanks!
It’s the Duration line and the color is Grays Harbor.
I’d love to see a current picture. My husband and I need to do this. I’d like to see how you finished it off
Okay, as embarrassing as it is…we still haven’t finished. The most recent post I wrote on the kitchen was this… https://wildfireinteriors.com/2011/11/and-then-there-was-beadboard-part-one/
Your cabinets look beautiful, and I’m now inspired to start on my own. Did you use water based or oil based paint?
Water based…oil based paint is a freakin nightmare. It’s Duration paint from Sherwin Williams
This post cracks me up because we’re in the middle of painting our own cabinets… I’m currently 29 weeks pregnant and were trying to do it all while chasing around a toddler, and working around nap/bedtime. As you know, this task/accomplishment deserves a gold freaking medal! Your kitchen looks great, love the 2 toned cabinets!
I hope you finish sooner than we did, its been a year and a half and we are still working on the dang kitchen. It’s just so hard to get anything done with the kids (two now, eek!) running around, and when you do have free time all you want to do is nothing, lol. Are you doing your cabinets two toned as well?
on the shelves yall installed in the lower cabinets what did yall use for the front supports? i’m assuming the back support is a board or cleat attached to the wall, but we have the same problem with no shelves and have yet to figure out how to support the front of the shelve.
Our cabinets are the super cheap kind with the adjustable holes on the side and the little metal thingys to hold them up, so our shelves were easy to support. Adam used really think plywood to keep it from bowing, and you could just put a lip on three sides of your cabinet and do the same, I imagine.
new to the site, but i must say that wow, I just love your taste! i’m SO ispired of your tutorials, pictures and all!
…and i just wanted to tell you that you look so cute and beautyful in that “real-life picture” – personally i like it better than the formal picture of you ;)
Thanks so much, glad you enjoy my site! I do really need to ditch that formal picture of me, it was from when I was selling real estate and I never really liked it for the blog. One day I’ll get around to it :) Thanks for stopping by and taking the time to comment!
I’ve been looking for idesa for months to redo my kitchen on a budget… I think I found my solution! I love your kitchen. For the painting process… Did u use a de-glosss or sand the cabinets? What actual color brands/names did u use? Just love your kitchen! Very inspired to do it even though I have a 13 month old ;) thank you for posting your experience
Thank you Julia! We did sand the cabinets before we painted them to get most of the gloss off, it was pretty fast and easy if you don’t count the edges of the insets. Hand sanding curves…bleck. I actually wrote a post about the paint color, here is the link…https://wildfireinteriors.com/2011/08/kitchen-colors-update/.
And we have an almost three year old and a 15 month old, so I can totally understand the project hesitancy. Having toddlers around makes things 10X harder! Still, it’s doable…even if it takes you nearly two years (like it did us!).
Just wanted to say what a great idea.
I am so glad I found your site! I’m not in love with the cabinets in our new house and can’t afford new ones as of yet. I’m totally going to paint them. I do have a pantry door and a window sill that match the current cabinets. Would u suggest I paint those to match the cabinets? If so, the dark or light color? Or a completely different but complimentary color? I would greatly appreciate ur advice!
It’s hard to answer that without seeing pics…what are your cabinets now? Wood? Do you only one window sill (like over your sink or something)?
In all honesty, how are your satin cabinets holding up? The guys at the home improvement store are all recommending semi-gloss paint. I really don’t want them that shiny. Thoughts or suggestions? Thanks!! Love the site. Changed my perspective on whether or not to update when you are considering selling. It’s still MY house and reasonable updates will make everyone happier for the next year or so!! Just realized this is still our home, and while its fun to think of our future home, this is where I create home now! Thanks!!
So the satin on the cabinets is holding up…okay. Actually, the top ones are perfect…the bottom cabinets are the ones I’m having trouble with. I think my troubles might be unique though. I have toddler locks on the lower cabinets and when I’m working in the kitchen I always seem to have wet hands. Wet hands + fiddling with toddler locks = lots of rubbed off paint. Besides the lock area the bottom ones are holding up really well, considering. They are kinda dirty…but kids will do that. I think I will add a layer of poly on the bottom ones soon just to seal them from my hands.
I have the same struggles when it comes to remodeling when you know you’re moving. We will likely be selling in the next year or two and I know it would make more sense to remodel for the masses…but I don’t want to. It’s much more fun to just enjoy your home and do what makes you happy. That is probably terrible financial advice…I’m just praying for a buyer that likes my style. Buyers have to get bored of beige houses, right?
Just found your blog and love the kitchen renovation. Did you do any special prep to the cabinets before painting, like sanding and stripping? Or just primer and paint? Does the paint hold up to wear and tear?
Thank you!
We didn’t strip them, but we did sand and prime. We used Kilz 2 and did two or three coats of primer, sanding lightly with 400 grit before the first coat of paint. They are holding up well…besides the part on the base cabinets where I fiddle with toddler locks with wet hands.
Ashley, what would you do if you had a cabinet going from floor to ceiling (pantry cabinet) – which color should it be? It basically is at the end of the kitchen (i.e. no more cabinetry after it). It is separated from the rest of the cabinets by the refrigerator but is connected to the top cabinets (cabinet above the fridge and this pantry cabinet are connected). Trying to figure out what color to make it. I think it would look weird to split it and do two-tone. So all white? Or all blue/gray? I just need another opinion of an expert :))))))
If it were my kitchen I would paint the whole thing the base cabinet color. That’s really just an opinion though, you could do white if you prefer…not two tone though. That would just be weird ;)
Looks great! I am inspired to do this in our 70s kitchen! What color are the top cabinets?
Thanks for the inspiration!
The top ones are Bistro White by Valspar.
Hello Ashley, I just loved what you have done with your kitchen. Well i had started painting my light green cabinet Chocolate Brown got the top done (half of them) and just did not like the colour so left the rest unpainted, of course, every day I say i must finish painting these cabinet, then I came upon your blog and was amazed at the work you have done on yours, so tomorrow I am going out to buy white paint and I am going to finish painting them, also loved the ideas you have shown in your cabinets I am going to try some of them. Thank you.
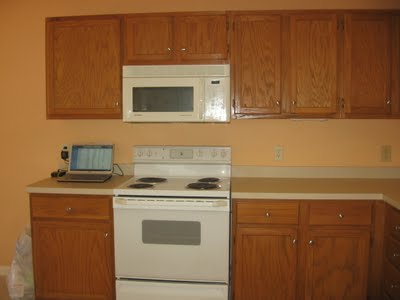
We are in the planning stages of (eventually) bringng our cheap 70s renovation kitchen back to its 1920s farmhouse glory. I thought we were going to have to replace the sturdy but ugly kitchen cabinets, which look like your “before” cabinets, but now I’m excited to see that they can be sucessfully painted! That saves a bunch of money and means we won’t have to wait so long to actually do it!
My question is about the Sherwin Williams paint. The only time I have gone into a Sherwin Williams store the paint was crazy expensive! We normally buy the better paint brands from Home Depot or Lowe’s, which cost $30 to $35 per gallon. The SW seemed to start at more than $50 per gallon. Was the extra cost worth it? For walls….meh. But cabinets are a whole different ballgame! They need to be durable and, well, great. how much paint did you need to do the lower cabinets? If it was just a gallon, I can see where the extra cost would be worth it. What are your thoughts?
I normally just buy Behr paint as well, but I’m glad I went with SW for the cabinets. The paint, particularly the blue one, went on SO WELL. Smooth, amazing coverage, no brushstrokes whatsoever. I only used about 1/3 a gallon to do all the lowers. I waited to but the paint until SW had their 40% off sale, it happens every so often. Like once a month? When that happens the prices are pretty much the same as HD or Lowes on a normal day.
Hi Ashley, I really love how your kitchen turned out! I have wanted to do blue lowers and white uppers forever and found your website trying to find pics to justify to my husband that I am not crazy! I also love the open shelf underneath the uppers, what a great way to blend the open shelf look with actual cabinets. I have a question though, do you find it difficult to put things away in the upper cabinets? It looks awesome but I am a little wary of not having usable space. Would you do it that way again?
Thank you!
Suzanne
Yes, I would absolutely do it again. I’m kinda short (5’3) and I can reach some stuff on the top shelf if I’m on my toes, for smaller items I have to climb onto the countertop (or I suppose I could get a stepstool, ha). I rarely use the stuff that is stored up there though, so it’s not a bother at all. I wouldn’t call it unusable space though…storage is storage!
Is your husband on board with the two-toned kitchen now? I think Adam thought I was a little crazy when I told him my plan…I had to hunt down pictures for him too. Sometimes men just need a little help in the vision department :)
Was just sent a post from my mom about your bathroom countertop, which led me to your site. Love the kitchen. Question – did you just take out the cabinet over the refrigerator or did you raise it too?
We just took it out. Right now there is nothing above our fridge and it looks sort of awkward over there all by itself. I’m thinking I’ll put a big wooden wine rack above it? I don’t know. If the fridge had been in a wall that had other cabinets I would have found someway to make it fit in, which probably would have been buying/making a bigger cabinet that would so that it would touch the ceiling and go down to the top of the fridge. Actually, maybe I’ll do that anyway. Can you tell that this is the one part of the kitchen I’m stuck on?
Thanks for the reply. I am repainting our cabinets soon and it always bothers me that stupid space above them and before we moved in the last owner put in new appliances, great but had to move the cabinet above the microwave up, so all the cabinets aren’t level- drives me crazy. to move them all up makes perfect sense.
Hi – Great kitchen redo! I’ve been perusing your site all afternoon.
I’m wondering how the microwave got mounted when you removed the upper cabinet? I know the microwave has a metal bracket at the back on the wall, but I’m assuming your husband put in that shelf immediately above the microwave so that the microwave could be mounted to the shelf too? I don’t think there’s a way to attach the microwave to the cabinets you have on either side, so I’m guessing that didn’t happen. How did the shelf get attached to the cabinets securely enough to be able to help support the microwave?
We have a microwave that needs to get mounted above our range, but it will be on a currently blank wall. We’re going to secure the bracket to studs, but we’re trying to figure out a solution for the support the microwave is supposed to have above it too.
Thanks!
I had another reader comment and ask me this exact question and my husband explained it perfectly…but now I can’t find the comment. But yes, the microwave has a shelf over it that it is attached to, just like it would be with a cabinet. The shelf is sitting on pieces of wood that are attached to the sides of the cabinets, and there is a face frame on the shelf that hangs down and hides that gap between the microwave the shelf. The microwave also has a bracket that attaches it to the wall, so all in all it is very sturdy. If that made no sense I can have my husband hop on here and explain it better!
Love the kitchen, we are embarking on our own “redo” starting this week but not as elaborate as yours. This may sound like a crazy questions but on one of your shelf pictures whether I saw it on this post or another of your kitchen you have a set of what looks like stainless steel drink ware!! Where did you get those? We have been looking for some just like that and you even have a rack they fit in!
That’s not a crazy question, I’ve actually been asked that a few times before! I wish I could tell you a store name so that you could go get some, but I got them at an antique mall. They were fairly expensive, but one of my husbands friends had a set when they were growing and Adam talked about them all the time, so I splurged. They are great, especially in summer…it’s like holding an ice cube.
Hi there! I have a quick question..do you have cabinets above your fridge? I don’t think so but I do and was wondering what in the world to do with that space? I am planning on raising mine like you did but was kind of stuck with that area… I was thinking maybe adding some sort of shelving under those cabinets as well…any thoughts? Thanks :)
I did have a cabinet over the fridge and I took it down…now the fridge looks all weird and out of place, like an afterthought. If I had to do it again I would raise that cabinet and add a floating shelf, and/or add wood to the sides of the fridge for a built-in look.
Great job on your kitchen! I didn’t see that you used a grain filler or any other product to cover the wood grain of your original cabinet…other than primer. I’ve seen other posts that suggest a filler, but if you had success covering the grain with Kilz and a good quality paint, then I’m feeling better about this “painting my kitchen cabinets” idea.
Hi there,
Your kitchen looks great and my husband and I used it as a jumping off point for ours! Here’s my question… how do you like the cabinet height? I raised mine to about 3″ from the ceiling and now I can barely see into my bottom shelf of my cabinet. I’m adding the shelving below for the day to day essentials, but am having a hard time knowing if the cabinet height will be too high and then not be useful/functional.
Thanks!!
What paint did you use for the top cabinets? Maybe I missed that reading your blog. Thank you for a wonderful inspiration!
The color is Bistro White by Valspar.
Wow!! @ Ashley!! you have done phenomenal job..I mean what a great transformation..I just love all pictures you have shared above. same me and my wife want our kitchen like this and one last thing you seems me so pretty..:) lovely blog and awesome pictures..Thanks for sharing it..
Hello! Thank you so much for recording all this info to help other people. I have a couple questions. 1. I can’t tell from the photos, does the wood grain show through? 2. How has the paint held up?
Have you put up the trim yet? Did leaving the gap work!? We are about to start and I am worried I will leaving the gap then be unable to cover it
Yes we did (years ago now) and it worked great. I don’t have a specific post on the topic, but you can see finished kitchen pics HERE.
Thanks for the post! Your work is fantastic! I’m tackling a similar project in a few weeks. I tried to click the link on how to make a floating shelf, but it is not working. Do you have more info regarding your shelving above your microwave? I would love to do something just like that. Thanks!