
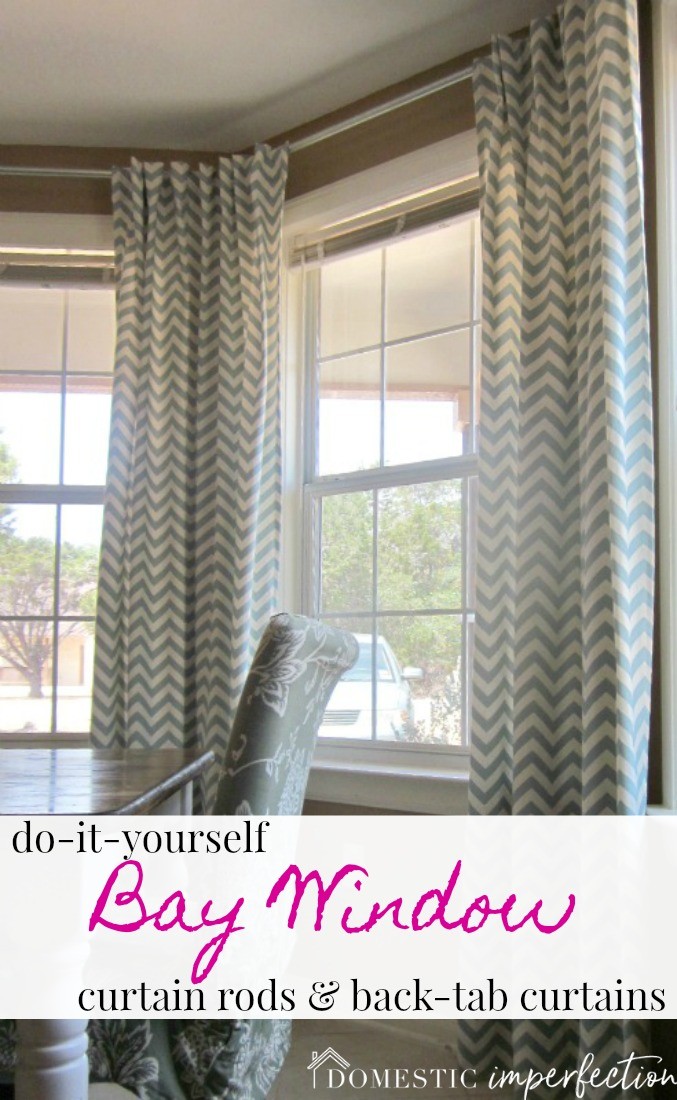
DIY Bay Window Curtain Rod & Back Tab Curtains
Bay windows, though beautiful, can be a problem when it comes to adding window treatments. The main problem is that hardware can be crazy expensive, if you can even find any to work for your particular window. But I found a way to my windows go from the bare before to the much better after for only $100 (including the curtains!).


.
Here is what you will need to make the bay window hardware –
Materials
- Electrical conduit (one for each window in your bay)
- Curtain rod brackets (one set per window)
- Plastic tubing (the same size as the conduit)
- Hacksaw
The first step was to measure and cut all the conduit. I measured my windows from wall to wall and took off about 3.5 inches to leave room for the joints (not all of mine were the same length).

Next I hung the brackets and put the conduit in place, then I stuffed some plastic tubing in the joints to connect the rods. This will give you one continuous rod and assure that the curtains won’t fall between the cracks. I know it’s not the prettiest thing, but it will be covered by curtains and you will never see it (also, you can spray paint the whole thing if you want a different color). Here is what it looks like finished…

Next step…make the curtains. After a few rejects, I ended up choosing a grey/blue chevron pattern I bought off of fabric.com. I bought 15 yards and had juuuuust enough. I had to make back-tab curtains to that I could lace them around the hardware and have a clean finished look. I’d never made them before so I just winged (wung?) it. First I made the tabs by cutting 4-inch strips, folding in half and sewing. I did this so it would have a nice edge when I turned them pattern side out.
(Also, I’ve discovered a way to make “back tab” curtains without actually having to make tabs. It really is so much easier and I don’t ever think I’ll make tabs again. CLICK HERE to read that post.)

Here they are finished, I made eight for each curtain for a total of 40.

Next, I hemmed all the four edges of each curtain, then I folded down the top edge of the curtain (4.5 inches) and pinned the bottom part of the tabs to the edge, sewing the tabs and seam all at once. For the top of the tabs, I folded them over to be even with the top of the curtain and sewed them individually.

Here is a view of the back of the curtains all hung up…

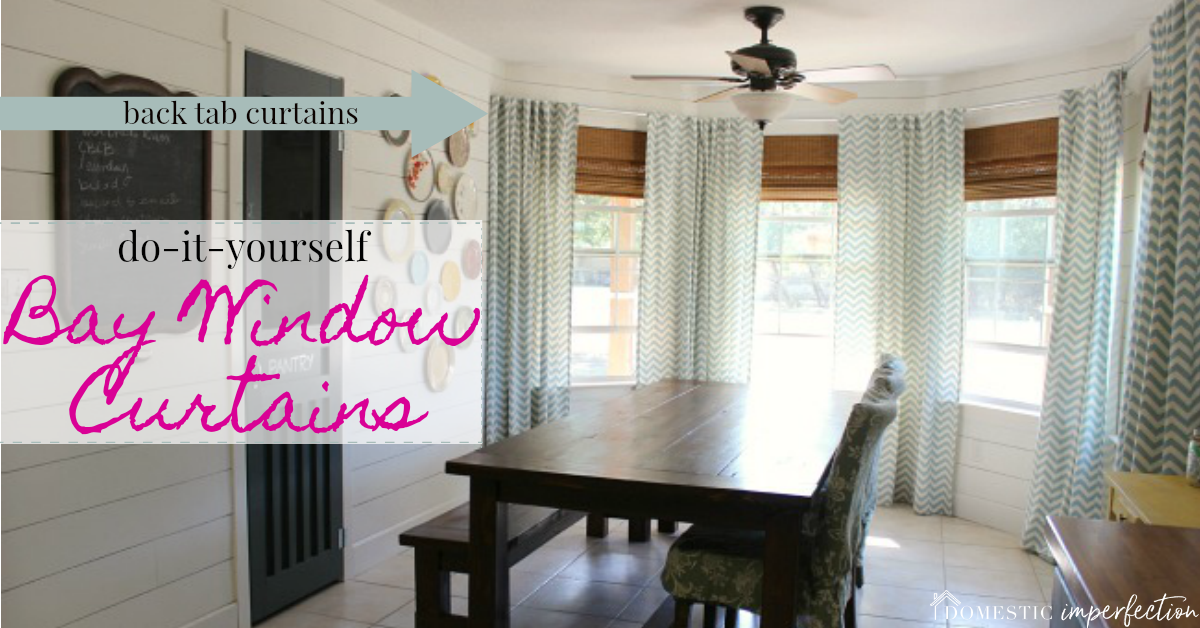
And here it is finished! My casual dining room looks much more “grand” now!

The grand total for this project ended up being just under $100. Not bad considering I’ve seen the same curtains (shorter, rod pocket) selling for $150 a pair on etsy. Hmm…maybe I should sell curtains…
.
Update: This post was one of the first posts I’d ever written and we have done a ton to the dining room since then.

You may also like –
Farmhouse kitchen on a budget – the big reveal!
How to update your shower with paint (no, really)
How to make curtains the easy way
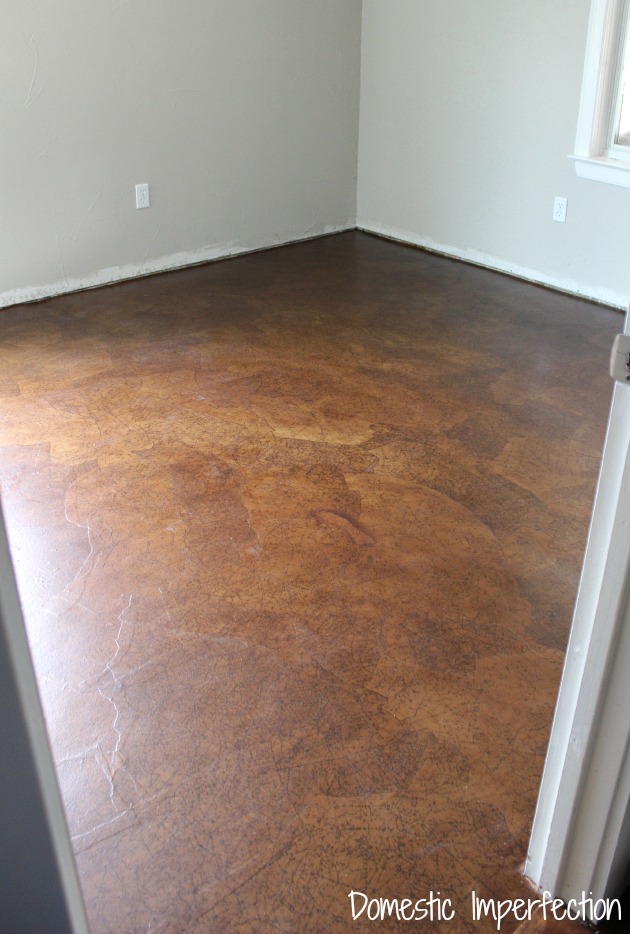
Flooring that won’t break the bank (because it’s made out of paper!)


You are such a good wife! Clipping coupons, being crafty, and now blogging. Not to mention the bun in the oven. I want to come see this in person! What are y'alls plans near the end of July?
“`Robin
It looks SO GOOD!!! Great job Ashley!! Love the blog!
Your curtains are BEAUTIFUL!!
I feel your pain on cutting conduit! We borrowed a pipe cutter…didn't go well. It was worth it for the cost savings!
Visiting from Remodelaholic. Your curtains make the room look more finished. And I love the color palette and the chevron pattern. Nice work!
Love the chevron pattern…looks so much nice with curtains!
Wow! Those look awesome! I never would have thought about making a continuous rod! The chevron print is so cute also!
Great transformation!!
Thank you so much for linking it up to {nifty thrifty sunday} last week as well!
xoxo,
Vanessa
Great way to hand curtains around a corner. My mom and I were looking for an inexpensive solution to her bay window!
You just solved my problem!!! I've been wanting to make curtains for the bay window in my front room and didn't want to fork out the big bucks for the fancy curved curtain rod! I'm running to Home Depot as soon as it stops raining!! Thank You!!!
I am stopping by from TDC – what a difference curtains make! I love the look and the fabric you chose is awesome!
Why do you need a new table? The whole space looks great!
Very very cute!
Beautiful!! You did an amazing job on those curtains! I would have never had the patience to set all those little tabs. The whole is just perfect!
Hi Ashley…
Wow…I am sooo impressed! What a job you took on…to make the drapery rods and the drapes! It turned out sooo beautiful though! What a creative and talented lady you are, my friend! You have a beautiful dining room…I just love the walls of windows…FABULOUS!!!
Thank you for sharing your lovely home with us! I'm coming over from Jena's Roomspiration party.
Warmest wishes,
Chari @Happy To Design
Beautiful job! I am so impressed you made the curtain rods and the curtains. They both look fabulous and you can't beat less than $100. Way to go!
Ashley, the new curtains look beautiful and at such a great price! I love the fabric you chose. It looks great with the wall color and really accentuates your gorgeous windows. I can also feel your pain sawing through metal with a hack saw…it's totally nails on a chalk board! Thanks so much for linking up to Roomspiration!
Your new curtains are very pretty and that was genius the way you connected the conduit around the curves. You saved yourself a fortune making those rods. I have a question though, what did you use at the end of the rods? I can't tell from looking at the photo's. Thanks
This looks great!
Jenny
http://www.simcoestreet.blogspot.com
love the open window feeling and the blue and white looks great oh my so elegant come see me at http://shopannies.blogspot.com
Oh I just love your drapes! I hope you will add your lovely metamorphosis to my Fall in Love linky party on Wednesday.
Until then, stop by and see the under $20 makeover I gave an ugly brass light fixture.
Happy Monday!
Your window looks awesome! I love the curtain rod idea!
~JamieS@ Scattered Thoughts of a Crafty Mom
Patsy – For the ends I wrapped the curtains around the end of the rod and then added a carpet tack to secure the curtains to the wall. I didn't want the gap between the curtains and the wall to be the first thing you see when you walk in, plus it makes the curtains look fuller.
The curtains are great. I also take the sides to wall (above comment).
I hope you are able to stop by and share at the It’s a Wrap Link Party at Artful Rising
Erika
These look great! And I love your table! : ) Thanks for sharing at Craft and Tell!
The homemade rod is genius!
I love your homemade rod, it's so pretty in that gorgeous room with all the windows!!!
XOXO
Kristin
Wow – your curtains are gorgeous! Adds just the right touch and feel to your beautiful room!
shannonsews.blogspot.com
wow, these are perfect! and i can't believe you made that rod! way to go! glad you had your helper with you! ;)
i would love for you to come link up this or any other amazing project at my creativity party going on right now!
letbirdzfly.blogspot.com
thanks so much for sharing!
very nice! I might try that hidden loops trick. I usually let the loops be seen but this is prettier. I bought cheap curtain rods at IKEA – just need to move my butt and sew the actual curtains!
i just wanted to say thank you for showing your curtain rod idea.. i have a wall of window and the cheapest rod i could find was $350.00… way way over my budget. i am going to be brave and attempt to make one myself.. and i will splurge on the hacksaw. ;-) thanks for showing us.. they look fab!!
Your room is beautiful! What a transformation! I really like your fabric choice.
Awesome job on the diy curtain rods & curtains definitely gives the room a more glam feel.
Wow, your curtains turned out darling! You did a wonderful job.
Ah chevron. I'm definitely a fan. Just wanted you to know that my post was late today but I did feature you this week on Motivated Monday at BeColorful
Pam
SO pretty!! Would love it if you would link this up at my turquoise lovin' party going on right now!! http://www.sweetlittlegals.com/2011/10/turquoise-lovin-7.html
Fabulous! I've never used conduit – great idea! And thanks so much for sharing the underneath/behind pics.
Dropping by from TDC's Before & After.
Featured these on my facebook! Love them so much : )
facebook.com/cherishedbliss
Love your fabric. We are closing on a house we bought at auction tomorrow. Lots of DYI in my future. Thanks for the inspiration.
Your curtains are so lovely and your step-by-step is wonderful. I pinned this project to my DIY board!!!
Hi there! Stumbled over from Someday Crafts and your Pantry (gorg!). I have used and will be using conduit piping again for curtains. What a great idea – yes?!? I share a similar corner issue, but was considering the metal conduit elbows. Is the plastic piping you found flexible, or rather a hard PVC sort? Did it come as an elbow, or were you able to bend it? I'm really interested in knowing just how you did it!! Thanks! I'm over at http://todoimmeasurablymore.blogspot.com. Also, thanks for the back tab reminder – so much cheaper than the curtain clips – and they'll stay on! Great effort!
Hi Jen! I tried to use the metal elbows, but could never find the right angle. The piping I used is flexible and comes straight, but bends fairly easily. To stuff it inside the conduit I left about an inch extra on each side and cut a long skinny triangle out as to make it a tight fit. Does that make sense? Good luck on your curtains and feel free to ask any questions you have along the way!
Ashley, thank you sooo much for that information!! You have inspired me to tackle a set of windows that I have been putting off due to the corners. The tips will be helpful! Thanks for getting back to me, and so quickly!! Now I have no reason to procrastinate! :-)
I am also linking up with Linky!
I love the curtain rod idea. We have been trying to come up with something for this same sort of issue. Awesome!!
Gosh what a wonderful idea! And I’m loving this blog!
Helen — Firenze Cards
YOU, are amazing!!! I have never liked “Chevron” anything until I saw your curtains! Absolutely LOVE THEM!!! The curtain rod thing is genius!!!
I’m wondering how the wooden rod hangers don’t interfere with the way the curtains hang? The pictures seem to show the curtains hiding all the hardware except the tubing.
Yes the curtains cover everything. The wooden hangers don’t really interfere, I just laced my curtain tabs around them, half on one side and half on the other. Does that make sense? That being said the curtains don’t move very much because they are held in place by the wooden part. I never use them so it doesn’t bother me, but if they need to be completely functional then you will need to make the curtains wider.
I was wondering if you would kindly share a link on fabric.com for your curtain fabric, please. Is the fabric by Premier Prints?
Yes it is! Here is the link… http://www.fabric.com/ProductDetail.aspx?ProductID=33e9dab5-1f58-404f-b34b-e470be5de0df
Thank you so much! Your blog is fantastic and your dining room looks lovely. All the best to you!
Genius! I had a bay window in my last kitchen and just kept it curtain less because I couldn’t figure out an easy way to hang!
Kelly
I missed this the first time around so thanks for posting it again! Not only are the panels well made but they are hung perfectly! Love them. :)
LOVE it, Ashley! It’s such an amazing room…and the curtains are fantastic!
omg….love the creativity
Simply amazing!!!!
Gorgeous! Love the chevron pattern of your curtains!
That is genius! Thank you for the great tip! Hopped over from Blogtalk and pinned. :)
Anna
http://askannamoseley.com
Thanks Anna!
Love the dining room, where did you get your bamboo shades?
I bought them from Select Blinds – http://www.selectblinds.com/bamboo-blinds.html
Boy, I cannot believe how clever you were with the tubing between the conduits!!!! And the “winged (wung?)” made me laugh!
Love your blog!! Your so creative. Love your color schemes & the fabrics that you chose for your chairs & curtains!! I would love to follow your blog!
Hi there!
I am so inspired with your diy bay window curtain!!! I am thinking of doing the same
with mine. Can I ask what is the measure of your curtain? The length and with?
I have the standard 3 bay window and 3 tiny square windows on top of each, weird right?
I’ve been struggling on how to put curtain there. Any ideas???
Mine are as wide as the bolt of fabric, which is 54 inches I believe. For length, they a were just a little under 8ft, but I washed them (which I really should have done BEFORE I made them) and they shrunk a ton. I had to lower the rod. For your windows, if the picture I have in my head is correct, then I would treat the two stacked windows and one and make floor to ceiling curtains.
Beautiful! I have a question for you though. The tabs are cut into 4″ strips. What was the width of the strip? Two inches, or so?
Thanks!
Sorry it took me so long to respond to your question! You’re correct, they’re about 2 inches or so wide..maybe a tad thinner. I just looked at them to be sure and they are all a little different, haha.
Hi, I was just wondering how wide your curtains are? You put 8 tabs on them and I wanted to make sure I did it the same width apart as you. Thanks for sharing!
I’m pretty sure they are 54 inches wide.
LOVE these!! I’m newly inspired!! This past Spring, we moved into a new home with LOTS of windows. I love to sew, but these windows have me procrastinating because there are SO many of them and they’re so big/wide!! Luckily, we live in an area where our backyard is very private, so during the spring/summer, it wasn’t a problem to not have any window coverings. But now that it’s getting cooler, I’m now desperate to get those things covered! Love this idea so much! Thank you for sharing your talents with us all!
I’ve seen you mention some measurements in the comments but I have a more general question. I am attempting similar curtains for my kitchen bay window. I am not a seamstress… I actually have to borrow a sewing machine from a friend just for this project. So I am seriously green at all things fabric. When I take the measurements of my windows and where I want the curtains to be, how much should I add to width & length to compensate for hemming and bunching?
Thanks a ton for sharing your skills and creativity!
I’m not a seamstress either…I can really only sew square things :) Did you see this post…I think it may answer your questions. If not, let me know! https://wildfireinteriors.com/2012/02/how-to-make-custom-curtains/
I have been following your blog for the better part of a year. Well I happened upon this post while looking up DIY curtain rods, I seriously just ordered the same fabric and didn’t even realize that you had the same one. Great minds think alike! Being a military wife, we move alot so my hope is to be able to use this fabric in every house we move to.
I love beautiful, creative ideas that most anyone can make. Thank you for sharing your ideas. My only question, what did you use on the ends of the conduit? Will a pipe end cap work? I think it’s threaded though.
I folded over the end of the curtain and placed the backtab on the rod backwards, covering the end of the rod. Does that make sense? I have other conduit rods in my house and made my own finials, you can read about that here – https://wildfireinteriors.com/2012/01/how-to-make-your-own-curtain-rods-on/
What exactly are those white things holding the middle part of the curtain rod , I made this but could not figure out what those were! Help! Please & thanks!!
Are you talking about the brackets? Those are what hold up the curtain rods, I bought them at Home Depot. I think these are it… http://www.homedepot.com/p/Martha-Stewart-Living-1-3-8-in-Wood-Single-Bracket-in-White-33-BS-1/203721233
Great!
The idea used to make a rod perfect is awesome. Curtain looks so nice. Great job…!!!
Fabuloso!!!
FYI…if you want to paint the conduit, you can do it w/ this primer/bonder that adheres to metal (or almost anything else):
XIM 11052 Advanced Technology UMA Bonder and Primer/Sealer, 1-Quart, White Sometimes I can find it at Ace Hardware, but also order it off of Amazon. It hardens into a strong shell that you can sand. I used it on my conduit curtain rods over my wide sliding glass door.
I want to do a very long line of curtains in our basement. It will be one straight line. How often should I place the brackets to keep it sturdy? I hope my question makes sense!
Thanks!